Race car suspension Class

In summary,-The stock car suspension is important for understanding the complexity of a Formula Cars suspension.-When designing a (front) suspension, geometry layout is critical.-spindle choice and dimensions, kingpin and steering inclination, wheel offset, frame height, car track width, camber change curve, static roll center height and location and roll axis location are major factors.-The first critical thing to do is to establish the roll center height and lateral location. The roll center is established by fixed points and angles of the A-arms. These pivot points and angles also establish the camber gain and bump steer.-I have used Suspension Analyzer for years on Super late Model stock cars as
  • #246
I been doing some studying on the situation. Your dirt car set up now works so I would not change anything.
When you throw it into the turns the body does major roll and does three things..
plants a lot of left rear weight on the right front
shifts right rear weight to the right front
rolls a lot of that left front weight onto the right front.
This all goes out the window if you run the current BBSS setup Big Bar Soft Springs. Proponents of this setup want minimal body roll so the bottom of the car will seal up with a smooth track to cause downforce. On paved tracks the panhard bar or J bar is mounted to the chassis on the right side and the rear end on the left side. The Roll Center and CG move very little during body roll and actually lowers as the body rolls! This reduces the angle of the force going to the tire patch and thus reduces the tire downforce on the right rear tire. Even traditional paved track set ups had very little roll, a few inches shock compression and little left side droop. Paved track cars mount the J bar on the right rear chassis to kill off tire loading of the right rear. If they used the dirt track mount ( left side chassis mount) the right rear would be too loaded and PUSH.


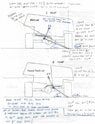
You get an idea by looking at the crude pic I attached. The dirt set up left side chassis mount has almost a 90 degree lever from the CG to the roll center ( J bar roll center is the mid-point between the mounting points). As the dirt car body rolls, typically 4 inch left side droop and 3 to 4 inch right side compression, the CG and Rc raise up. The angle of the RC tot he right side tire patch increases as does the downforce. You would burn the right rear tire if this was the paved track setup!


Revised in March 2024 - years after I first wrote this post.
Here is why dirt track cars mount Panhard bar to chassis on left side. More right rear load on tire patch. Paved car may roll 4 degrees but that honking dirt late model body rolls 15 degrees
 

Attachments

  • J-Bar dirt vs paved RC migration 2024_000068.jpg
    J-Bar dirt vs paved RC migration 2024_000068.jpg
    43.3 KB · Views: 3
Last edited:
Engineering news on Phys.org
  • #247
it looks like the angle of the bar in right roll is what is making the difference in the amount of jacking effect due to lateral accelleration, and the fact thet the axle attatchment point is on the right side is actually counterproductive as this applies more of the force to the outside wheel. If the bar were mounted to the right side of the chassis, but lower than where it is mounted to the axle on the left side of the axle, the jacking force could be maximized for the inside tire, which needs al the help it can get. of course, the roll center for the chassis needs to be fairly high, I would assume to maintain a front down sloped roll axis and allow soft springs without using an overly stiff sway bar, and unloading the inside tire too much with the sway bar. so, maybe a bracket could be made to lower the chassis Jbar mount on the right, and a bracket attatched to the axle to raise the Jbar the same amount on the axle, creating the same jacking force as the Jbar mounted to the left side of the chassis.

This is just theory to play with, I am not making any recommendations based on experience here. Like I said, I don't quite get dirt. I am trying to learn about all forms of racing suspension, though, because that is the best way to stay on top of the type you are in to.
 
  • #248
oh, also the jacking force would actually pull the rear of the car down, not force it upwards, with the Jbar mounted as descrided above. so I guess that would be a negative net jacking force on the chassis, while still having a net downward force at the axle. Of course the point at which the force vector(which is more lateral than vertical is applied at a higher point on the axle, so the torque with which it affects right rear loading more than left rear may cancel out the benefit of it being more to the left. But, why not make it a little longer. You would decrease the downward component of the jacking force, but it would be applied more evenly across the rear tires.
 
  • #249
Yes Autodoc911

you are correct in that different mounting will change the angle..my point was to show the differences..and you can see the jacking effect when the body hikes up so dramatically..
I would guess that the Left front spring would be 750, Rt ft 850
and both rear springs at 250 or close to this
are these close to springs you are running Doctor?
 
  • #250
Thanks to all 64,528 people who took the time to read this post.
Merry Christmas 2011
Ranger Mike
 
Last edited:
  • #251
In an attempt to make more clear my description of front roll center location please note attached. Top roll center set up has Roll center 3.5 inch above ground and centered..good for sports car racing turning left and right..50 % of body weight will plant right front tire and is best balancing act you can do when racing left and right. Lever arm from RC to CG is 2.75 inch long

Bottom is for left hand turn racing. RC is 3.5 inch above ground but offset 3 inch to the right. Now slightly more than half the left side spring weight is rotating about the Roll Center and is used to plant Right Front in the turn and you have a 4 inch long lever between RC and CG. Note angle of vector between RC and tire edge. Jacking effect that tries to lift body in reaction to centrifugal force.
Note: if you have too much leverage you will lift the left front
as the body rolls. This will load the Right rear and over heat the tire and eventually you get no grip.

I value your input so let me know if this helps
 

Attachments

  • rc comparison.jpg
    rc comparison.jpg
    25.8 KB · Views: 1,047
Last edited:
  • #252
Ranger Mike said:
Yes Autodoc911

you are correct in that different mounting will change the angle..my point was to show the differences..and you can see the jacking effect when the body hikes up so dramatically..
I would guess that the Left front spring would be 750, Rt ft 850
and both rear springs at 250 or close to this
are these close to springs you are running Doctor?
yeah that's pretty close, spring wise, and my driver has 2 hands... he just prefers to drive with one, and he don't do too bad, and Autodr911, I think you ashould come on down and give dirt a try... the comments you made regarding the look an handling of the car may be valid for pavement, but for dirt, ummm nope...the "paveemnt line" as we call it where you keep the car going straight has been tried, and after they get lapped about 4 times in a 20 lap feature they stop thinking bout it...lol please don't take it that I am knocking your comments , I do not intend to do so... this is not our first race car, well for me it ain't its only the drivers second year, and we got 2 track championships to show for our efforts, i do understand what you guys are saying, BUT ... when the car DON'T roll over, our tire temps on the left side are really low, and it don't want to turn, so it seems by allowing the car to roll over it evens the temps out, and yes I check tire temps on a dirt car, lots of people laugh at me for it, BUT its how I do things... lol got a few championships under my blet doing it my way... lmao
now I have a new question, what effect will raising my 3rd link bar have? not changing the angle but raising the bar away from the rear end center link and keeeping the same angle... we plan on running the gopro cam on our rearend a couple races this year for more input...
thanks to both of you guys for your thought provoking idea's... and should you ever be down south around NW Ga. holler and stop by and be my guest at the traack one night...
the dr.
 
  • #253
Hello Doctor..glad you are well..Note the attached diagram showing the top 3rd link is being pulled..all I found was the following suggestion on mount height.
3rd link and axle damper can be mounted side by side or over under and the 3rd link should be mounted 12 inches above center line of the axle housing tube. The lower trailing arms should be located with in 8 to 12 inches of the brake rotor face. If they are too far inboard to the center line of the car, leverage forces are going to really shorten rod end life. In an ideal race car world the mount height of top and bottom links would be equal , like the 4 link and swing arm bird cage mounts but we can not make the
3rd link mounts equal because the rear end center section will not permit 3rd link mounting other than on top of the center and if we made the bottom mounts 12 inch they would drag when cornering.

Note: the 3rd link should be mounted to the chassis at the center of the weight mass of the car. The center of weight mass is found by multiplying the rear track width by the cars left side weight %. If you have 60 inch rear track width and 58 % left side weight: 60 x .58= 34.8" so the 3rd link is mounted 34.8 inch to the left of the center of the right rear tire. If the 3rd link is not mounted at the center of width mass the car will not load the rear tires equally under acceleration.
 

Attachments

  • 3rd link.jpg
    3rd link.jpg
    40.9 KB · Views: 886
  • #254
HELLO ALL < THIS IS MY 1 ST POST

IN CONSIDERING cog IN RELATION TO TRACK WIDTH , IS THERE A FOMULA? FOR ASPHALT

1 CAN YOU BE TOO WIDE ? OR TOO NARROW?

2 SPRING LOCATION ? BUCKET SPRINGS ARE LOCATED MORE INBOARD OF THE CONTACT PATCH THAN THAN COIL OVER KEEPING INTO CONSIDERATION SPRING RATES!

3 FRONT TO REAR WHEEL TRACKING?

4 SOFT TIRE VRS HARD TIRE

5 cog TO rc RELATIONSHIP TO WIDTH?
 
  • #255
Smokin..welcome
a lot of your questions are addressed in detail on this post..suggest you read page one on to the last and buy the reference books. in general, low light and left for a stock car turning left..,make it as low as possible, and light as possible and as much left side weight as your permitted..the rule book form sanctioning organization will dictate this..

1 CAN YOU BE TOO WIDE ? OR TOO NARROW?

In my opinion if the rules are open on this ..
wider is good for stock body class, make sure the front is wider than the rear by minimum of an inch..more is good here..if your running open wheel indy car style, narrower body is better so you cut down aero drag but track width ..wide is better. you will be limited due to spring/shock location etc..


2 SPRING LOCATION ? BUCKET SPRINGS ARE LOCATED MORE INBOARD OF THE CONTACT PATCH THAN THAN COIL OVER KEEPING INTO CONSIDERATION SPRING RATES!
see above post on trail arm location..same thinking
3 FRONT TO REAR WHEEL TRACKING?
see above answer..

4 SOFT TIRE VRS HARD TIRE
depends on the track, temperature, race duration, weather5 cog TO rc RELATIONSHIP TO WIDTH?
this all relates to suspension linkage. ideally you want to use equal length upper and lower control arms but the engine gets in the way..so you go with 2:1 ration..


You bring up a good point..is wide better.
A wide front track will give a good stance on corner entry ( try turning a tricycle some time) and reduce the lateral load transfer at the front ..this will get work out of the inside front tire. Look at the attached and you can learn a lot about track width..adding 4 inch will give you more cornering ability..note how CG height changes this too
 

Attachments

  • track.jpg
    track.jpg
    37.1 KB · Views: 979
Last edited:
  • #256
Hi, this is directed towards Ranger Mike but anyone who wants to reply is welcome. I am new to this forum but stumbled across it a few days ago. I am a sophomore at The University of Georgia and looking for some tips/info on a dirt race car I am building in my spare time. My question is directed toward the area of a top link/damper shock, as I ran stock classes through high school and have my front end geometry about where i want it. All that aside, the car is being built to race at East Alabama Motor Speedway in the hobby class. The chassis is a camaro clip with 2x3 tubing to the rear of the car. I will be running hyperco composite leaf springs, but the rules allow us to run a top link and damper shock with the leaf springs, and i would like to do this to control axle wrap as opposed to the leaf springs having to do that. I know many have never experimented with this but I would love some info as just where to start as far as mounting location/angles on the top link and damper shock(the mounting locations for the top link/damper shock in relation to the axle center line would be helpful as well). Obviously I will build the mounts with various holes to fine-tune after i find a solid starting point. Also, I would love to know which top link is recommended, whether it be spring loaded or bushings. As i previously stated I understand this application may sound weird as I have never seen it done myself but if none has any specific experience any info would be helpful. The last question I have is in relation to under slinging the chassis. As i stated previously the chassis is 2x3 tubed to the back bumper but I was considering the possibility of under slinging it also (as most of the cars in this area are done). At the same time I have always been told cars need to flex some but i was under the impression that under slinging the chassis wouldn't hurt. Any information would be greatly greatly appreciated!
 
  • #257
Welcome Carson76
you are the hope and future of the racing sport..thank you..regarding top link..please read #253 above..i recommend a spring type top link as you can really fine tune it.. The biscuit type fine but popular on dirt modifieds. As far as undersling..need more detail..as we may call it different up here in Yankee land..
I like the idea of composite leaf springs and they have really come a long way over the years.
I got to run so let me know about this...and again..welcome..was 14 when built my first race car..time flys..enjoy it

rm
 
  • #258
Thank you for your response and reference to the previous post! As far as the under slinging, the car now has 2x3 rectangular tubing running in the same location as the stock frame rails would if they were present, and of course it also has the two bars which run from the rear of the car forward and attach to the rear of halo above the driver. The under slinging I am referring to would be attached in front of the rear end to the bottom of the frame and run straight back under the rear end and turn up at roughly a 45-50 angle behind the rear end and connect back to the 2x3 main frame rail at the rear of the car, essentially triangulating the assembly. As I said, many down here do that but I have no Idea whether this would help or hurt. On a different note, if you had to take a wild guess as to what spring on the top link would work best with a leaf spring what would you suggest? (I deal mainly through day motorsports and they have springs from 300 lbs to 1200 lbs. I have also attached a picture of the set up to see if this type will work) The last question I have is if I position the damper shock over the top link, how far above it should i mount it and at what angle should it be mounted? I appreciate your time as i know you don't have to do this! p.s. the guy that helps me is a mechanical engineering major at GA Tech, not your average southern good ol' boy race team.
 

Attachments

  • TorqueAbsorber.jpg
    TorqueAbsorber.jpg
    4 KB · Views: 589
  • #259
Thanks Ranger

when you look at the diagram it makes it look so simple! is load transfer the same with

large anti roll bar

very soft springs that let's the car down on bump stops

taking that an 1 inch norrower rear track on a oval car is sufficent is the same for road racing on a track with no banking and more straight line bracking than in oval racing?

thanks smokin b
 
  • #260
Wow..between Carson and Smokin..the old man is going to be real busy..i will try to answer all questions today..i got to make a run to the carry out and stock up before the snow hits..
I'll be right back
 
  • #261
Under sling is the ONLY way to go. This design protects the rear end, adds stiffness and provides excellent location to mount ballast.
Leaf spring cars have a pretty high roll center like 8.5 to 11". Are you using slider box to locate the rear? I assume you bush the mounting to relieve any binding.
The only draw back to leafs is the fact the Rc is a bear to change.
Roll center on mono leaf set up is half way between the top of the mono leaf and the bottom of the rear end axle tube. You can change it with lowering blocks but...more than 2.5 inch blocks will create leverage over the spring and will really increase spring wrap deformation under acceleration. One way to change it rear handling is to mount ballast higher on a slick dry track. Will help more right rear side bite. You can adjust roll steer with a change in the spring arch. Three inch of arch will give a good amount of roll over steer, one inch will give you a little.
Spring loaded torque link is the only way to go as it is tuneable. Not so with the biscuit type..the most common on dirt modified where the driver will steer with his toe...( its all driver). On dirt , MOST COMMON AND GENERAL PURPOSE, an 800 # spring is recommended ( afco tech dept). For bigger flatter, slicker tracks use 700#. On shorter tracks where you are running taller rear gear and really torquing out of the turns you should run a stiffer spring. Afco makes a progressive spring you may want to explore. Paved track requires a 900# to 1050#. Proper spring rate is determined by spring travel of the link under acceleration. On dirt with hard tires 3.5 inch compression is ideal. You zero out the rubber travel indicator on the 3rd link before you go out to hot lap. If you can run softer tires ( tire soaking and softening to be discussed in private forum) and if you are on the light side of the weight limit 2.5 inch travel is good. It all comes down to rear gear and how you are hooking up on thetrack at the time. Like on a tacky to almost dry track a 800# spring is good for 3/8 to 1/2 mile track. On a heavy wet track where your are really hooking up you are going to compress the 3rd link more and you add a stiffer spring or crank in some preload. adding preload increases the spring rate but don't go wild on this as you do not want coil bind. We covered the mounting angle and adjustment in post above.
 
  • #262
Axle damper is a 90/10 shock. Typically you have 600 pounds damping force and 65 pounds rebound. So the shock handles the braking resistance but under acceleration you got almost no damping. It should be mounted 5 degrees up hill with no more than 8 degrees max. The upward angle helps tighten the car under braking during corner entry. Lateral mounting influences handling response under braking. If shock is offset on the rear end to the left of car centerline the car will be looser under braking. The rear tire with the higher load under braking at turn entry will pull the car in that direction. Which ever tire has more load will have more traction. A distance of 6 inches to either side of the center line will influence handling.
 
  • #263
Smokin..in the old days, when en were men and women were glad they were, stock cars only ran two coil springs and no ARB ( sway bar). As speeds got faster mid 1960s, and aero began to creep in as a competitive factor, some one figured out your could add the ARB and soften up the springs to drop the nose and gain an advantage. As a typical rule of thumb, you calculate the total load transfer and divide by three and that will give your each spring rate and ARB rate..there is a lot more to the calculation than I described but that is the bottom line. ifin your are racing with max speed less than 100 MPH the soft spring scenario is not for you.
 
  • #264
track and wheel base
The advantage of a relatively long wheel base are increased straight line stability, reduced longitudinal load transfer and pitching moments, some what easier reduction in polar moment of inertia and more room for mounting components.
Short wheel base advantages are reduced weight and increased maneuverability.
Wide tracks will reduce lateral load transfer for a given amount of centrifugal acceleration and you can run longer suspension links. The major disadvantage is more frontal area. On open wheel cars this is a mute point as you have Tires that are about 40% of the drag and not much you can do about this.

In general, race cars with long wheel base and narrow track are ideal for the straight and narrow but give up handling in corners. Short wheel base wide track cars are less stable but will corner better.

Now things really get cloudy. Front track should be considerably wider than the rear track. The wider the front track, the more resistance to diagonal and lateral load transfer. Thus the car will be less likely to push when you nail the throttle on corner exit as the inside rear wheel won't be driving as much. Because the lateral weight transfer formula is - W x gs x H / G x T

where T = track width, H = height of Cg, G= cornering force we can simplify the formula by factoring in 1 G of cornering force to reduce the equation to WH/T so if we got a stock car with CG 20 inch tall, 3000 lbs. weight and 60 inch track width, we have 1000 lbs. lateral weight transfer. If we have the same car and widen the track by 4 inches, 3000 x 20 / 64 = 937 pounds transferred and
Wider track will reduce the roll angle, weight transfer, and reduce all the ill effects .
 

Attachments

  • track.jpg
    track.jpg
    30.9 KB · Views: 1,177
Last edited:
  • #265
Thanks so much ranger mike. I know this set up will have to be fine tuned as we experiment with it but you've given me the background and info I need to make a good start. That's all the questions I have for the moment but will definitely stay tuned into this forum, there is no telling what i may learn. THANK YOU!
 
  • #266
Hi all

does anybody have any info on a starting point for mounting front coilovers?
Inward outward location
forward and rearward location
 
  • #267
Mount the front coil over shock as close to the bottom ball joint as possible. Some of racers mount the coil/shock on the side of the A-arm. This greatly reduces effectiveness. The top should mount to the frame so you have 10 to 20 degrees angle from vertical. With car at normal ride height the shock should be at one half of total travel. It should never run out of travel before the suspension hits the end stops. I hate cantilever mounts and try to use double shear mount plates to avoid bolt bind which may occur with cantilever mounting. Try to avoid any front to rear angle as this reduces effectiveness of the coil over..but I have run with slight amount of angel front to rear because there was just no other way to mount it..it all comes down to compromise.
 
  • #268
Squaring my car !

Whats the best sure fire way to square all 4 wheels of my car
too many times i find chassiss tabs to be out resulting in a poor reading
i guess there only as good as the guy putting them on!


Thanks smokin
 
  • #269
String it..old as the pyramids but it works.. Set 4 jack stands on the floor and run string to each leaving the front open. You will be rolling the car into the U and running the front string after the car is in place. It is much easier to check the diagonal measurement to confirm square when car is not in the string U.

Disconnect panhard bar before you check for square. Another check would be to make sure the rear end is not bent. Scribe a line on each rear tire, all tires in fact as it will make things easier. Measure the rear track width every 90 degrees and if you have deviation, the wheel or rear end is bent.

I use plumb bobs to assist in this. I put masking tape on the garage floor and use a felt tip marker to id. the plumb bob touch point. You get the idea. cheap , an pain in the A to set up but it works pretty good. sometimes simple is best.
 

Attachments

  • sq 001.jpg
    sq 001.jpg
    51.2 KB · Views: 1,501
  • #270
good reading from a pro

Squaring a Race Car

by Jeff Butcher - Longacre Racing Products

A Brief Explanation

In tracking a race car, the tread widths don't all have to be the same and the wheel base doesn't have to be the same on both sides to track the car. First you have have to establish the centerline of your car, then make sure your toe in is at zero and that the rear end housing isn't bent and all your wheels are straight. You then need four jackstands and some string; run the string down both sides of the car at an equal distance from the centerline you have established already, preferably as close to the tires as possible.

Now you can start measuring. You are going to measure from the string to the sidewalls of the tires at the front and rear of each tire so you can compare the measurements of the rear tires to each other and the front end the same way. If the right rear tire measures the same at the front and the rear of the sidewall from the string and the left rear measures the same from the front and rear sidewall from the string your rear is square to the centerline.

If you have more distance from the front of sidewall than you have at the rear of the sidewall on the right rear and vice versa on the left rear, then your rear is ahead on the right making the car tight. Now repeat this at the front of the car, so now all the tires are parallel to the centerline of the car.

_______________________________________________________________________

Squaring a race car is key to proper race car set up. Pointing all 4 wheels in the same direction allows for all of your adjustments to perform in a consistent and predictable fashion.

Let's spend a minute getting on the same page in reference to squaring a race car. For the sake of clarity this article targets Late Model style cars, but the recommendations apply to many race car types. For the purposes of this article we are assuming that the housing is perfectly straight and your frame is in factory condition.

If you identify your goal before starting it helps in the end result. Common knowledge states that the rear end must be square. However, the question at hand is square to what? Referring to the drawing below will help keep things clear as you read the recommendations.

To have a rear end installed correctly we must square the housing to something. But square to what? The common answer is that we need to be square to the frame rails. If your frame rails are perfectly straight then a good result can be gained from utilizing the frame rails as a reference point.

The reality is that frame rails are not straight. Race car frame rails are made from mild steel that is simply pulled from a rack. The steel is not that straight to begin with and welding helps to distort it further. My opinion is that the frame rails are hard to rely on consistently.

Really our goal is to "square" the rear end housing to the front end versus the frame rails. The steel is along for the ride. The front suspension pivot points are the true reference points. By embracing this concept the frame can have some normal bends and bows and you can still be assured a square rear end. My recommendations involve squaring to the front pivot points as this will provide the most consistency.

In addition, we want the rear end housing to be located correctly from side to side in the car. For best performance lining up the right side tire seems to be best. To set the rear end location correctly the front end adjustments must be set up correctly and be in race ready condition.

The right side tires carry the highest forces so keeping the right side tires in line with each other creates the most stability and maximizes left side weight. Lining up the right side tires is my recommendation.

However, your car builder may support a different left to right location so you need to insure that you follow car builder's recommendations so that the needs of the rear suspension links are met. For this article we will assume that the car builder laid out the suspension with the right side tires lined up. You will want to pay special attention to this detail as it is a higher priority to have the trailing arm brackets and top link hardware to be located in the proper location. For example, you want the top link to be perpendicular to the rear end housing and parallel to the car. Trailing arms must also be running forward at the correct car builder design angle.

These design elements must be considered so be sure to consult your car builder about his design parameters for the Left / Right location for the rear end housing. Ok, now that we are on the same page, let's review: The front end is set and is race ready. The car is set at ride height by using solid links in place of the shocks or it is sitting up on stands at race ready ride height with air pressure and stagger set properly. Your rear end housing has been checked and it is not bent and it is ready for installation. We also need to insure that the panhard bar is set to the correct height and that the trailing arm and top link angles have been set properly.

Step 1: Setting Up The Reference String

Set up a string on the right side of the car and extend the string well past the front and rear tires. Attach the string between two simple jack stands. Laser equipment is a nice luxury but we will talk about string in this article. I have found that it is best to set the string up at a height off the ground equal to the bottom of the frame rail.

Now that your string is set parallel to the car turn the right front wheel until it is parallel to the string. Record the distance from the string to the right front tire. Take notice that you are taking in the effects of camber by setting the string at frame height versus spindle height helping you to align the rear contact patch with the front contact patch.

Negative camber at the right front moves the contact patch to the right. We set our string even with the frame rail so the effects of negative camber are considered as compared to setting the string at spindle height. Setting the string at ride height allows the rear contact patch to more closely line up with the front contact patch which is offset to the right due to the effects of negative camber.

Step 2: Aligning The Right Side Tires

Now we want to begin lining up the right side tires. Match the distance from the right rear tire to the string so that the distance is equal to the distance from the right front tire to our reference string. Quickly check at the right rear tire that your rear end square is at least in the neighborhood. If the string is parallel to the frame then the front and rear sidewalls of the right rear tire should be parallel to the string as well.

If the rear end measures differently from the sidewalls of the right rear tire to the string then average the difference to locate the rear end. For example, your measurement to the string at the right front tire is 6". We want the same at the rear but when checking we end up with 5-15/16" and 6-1/16". As the average of 5-15/16" and 6-1/16" equals our 6" dimension at the right front tire we can be content with the lateral location and we are now ready to set the housing square to the front pivot points. Leave your string in place as you will want to verify the lateral location setting the square. Adjusting the trailing arms can have an effect on the lateral location. You will need to double check the lateral location after completing the squaring step.

Step 3: Setting Up The Reference Straight Edge

Many people use masking tape, plumb bobs, and chalk lines to square the housing in the car. Experience has shown that the amount of transfer error reading thick chalk lines as well as trying to make a mark exactly at the point of the plumb bob creates too much error. These transfer errors lead to inconsistency and the work is tedious. Further, each time you adjust the rear end you have to repeat the plumb bob transfer down to the floor. I believe this method just takes too long, is frustrating, and is less accurate.

I prefer to go about it a little differently. Remember we have determined that we want to square to the front pivot points. Ok, now here is where you need to spend some initial time to insure repeatability and accuracy. Find a perfect straight edge that spans the length of the rear end housing.

Next clamp the straight edge to the bottom of the frame about half way between the front and rear axles. The forward / aft location of your reference straight edge is not critical. Somewhere around center is good, but again it is not critical. When clamping the reference straight edge use a carpenters square and clamp it exactly 90 degrees to the straightest frame rail. Even though we are going to insure that we are square to the front pivot points the frame rail does need to be considered. We want the rear end to be square to the frame rails and we will fine tune to the front pivot points to eliminate any irregularities in the frame rail. In general the goal is to have the frame rails, front pivot points and rear end housing in perfect square.

Now that our reference straight edge is clamped in place and is 90 degrees to the straightest frame rail, we are ready to fine tune the location of the reference frame rail. Remember we want to eliminate variance in the frame rails and square to the front pivot points. Hook your tape measure on the straight edge and measure forward to the front inner pivots. Be sure that your tape is running straight forward for accuracy. Fine tune your straight edge until is is exactly parallel to the front inner pivots. Take you time and locate the straight edge until it is dead square.

Before continuing it is a good idea to mark the location of the straight edge with a scribe or a peen mark on the bottom of the frame. These marks will allow you to clamp your straight edge in place in the future in a minimum amount of time. Should you need to verify that your rear end is square at the track, you will find the straight edge and indelible marks is a very time saving luxury.

Step 4: Squaring The Rear End

Hang two strings off the rear end at the outer most points. You can use two plumb bobs but a heavy nut tied to a string will work just as well. For optimum accuracy remove the rear hubs and hang the string off the machined bearing surface of the rear hubs. However, on a quick change rear end the machined axle tubes are quite accurate.

Now that your strings are hanging down you can quickly hook a tape on the reference straight edge and measure back to the strings. Be sure that your tape measure runs straight back. Adjust the housing as needed. After an adjustment you can quickly check the square. With the plumb bob and tape method you would need to transfer all the marks back down to the ground which takes a long time. The reference straight edge concept allows you to make the adjustment and measure directly to the hanging string. You can read the exact measurement very easily.

Because it is so easy to check the square be sure to keep adjusting until the housing is right on. Spend the time and get it right. With the plumb and tape method many racers would call it "close enough" due to the hassle factor of transferring all of the points down onto the tape on the floor. Spend ample time and get it right.

You will find that the reference straight edge method is much faster and more accurate. Further, you can carry the straight edge with you to the track. The plumb and tape method requires a level and flat floor. You would have a hard time at the track with plumb bobs and tape on asphalt. The reference straight edge is an easy deal if you have done a good job of marking and recording the reference points.

Step 5: Verify The Lateral Location

Now that you have the rear end square you need to verify that the left to right location still lines up with the right front. If it is still ok left to right then you are ready to go. If the housing no longer lines up with the right front you will need to readjust the lateral location. If you move the housing laterally you will need to repeat the squaring process. It is common to have to go back and forth between the left/right adjustment and the square adjustment as they both have an effect on each other.

Step 6: Record Your Reference Marks

You have spent plenty of time and you have verified that your rear end is dead square. You have already marked the location of the reference straight edge and can rely on those points for quick reference. Next, it is wise to record a reference point for the left right location. On an under slung style late model you can utilize a good adjustable carpenter square. Place the movable piece of the square on the right rear brake rotor and slide the rule over until it touches the under slung frame rail. Write down the reference number in a safe place. If you have something other than an under slung style frame, simply use a tape measure from the right rear brake rotor to a reliable reference point on the frame. Recording this quick reference dimension will prove invaluable when at the track and really saves time when you need it most.

You will find that having the ability to square to these reference points will save you a lot of time. Obviously if your frame gets hit you will need to verify and adjust your reference points. But, if you damage your rear end housing at the track, you can utilize these reference points very quickly. You will find that the reference points come in handy when making panhard adjustments as well.
 

Attachments

  • sqdiag.gif
    sqdiag.gif
    34.4 KB · Views: 1,302
  • #271
Thanks ranger

fuel cell location in asphalt racing
in road racing in the center of car if the fuel cell is mounted to the right
in oval racing fuel load becomes left side weight . =which deminishes as the race goes on < therefore left side weight goes away
 
  • #272
Good question, Smokin...
Check the rule book and do not fudge when it comes to safety. When it comes to mounting, up, down, left, right, or center? The one you choose depends on the type of racing, how long your races are, and even what fuel you use.
If you run on pavement, you want the lowest possible center of gravity. Therefore, the fuel cell should be low and should not be the lowest thing on the car, but it can be as low as the frame rails. There must be substantial bracing around the cell..do not cut corners here. The cell should be mounted to the right. This is more important if you run long races in which you burn so much fuel that the cross weight changes. If you use alcohol, you will burn fuel at a much faster rate. This weight change tends to tighten the car as fuel (weight) is burned, and at the end of a race, it is better to have the car tighten up than have it get loose.

On a dirt track car, up is better because you need weight transfer. Mounting the cell high, not extremely high, but let's say on the trunk floor, aids weight transfer. This is a protected spot in the car as well. If you are using gasoline and running 20-25-lap races on a 1/4-mile bullring, the side on which you mount the fuel cell won't really matter. You probably won't use more than a couple of gallons. In this case, the loss of 15 pounds from a 3,200-pound stock car is not going to be noticed. On the other hand, if you were using alcohol, you would lose maybe 30 pounds. That might begin to be noticed, so mount the cell to the right.

For left weight, such as when using a 16-plus-gallon fuel cell filled for ballast, mount the cell to the left. Keep in mind that this corner usually takes a lot of abuse.
n some situations racers find themselves moving weight behind the rear axle to compensate for hard tires or very low traction conditions. While this can work, it is a double-edged sword. As weight is placed farther behind the rear axle, front-wheel weight decreases and steering control is reduced. Think of it as a seesaw, (see Diagram) as weight is increased or moved farther behind the fulcrum, the amount of weight felt at the front of the chassis decreases--especially when the forces of acceleration and the car bouncing through rough parts of the track are factored in. Locating the weight directly over the rear axle will produce forward bite while helping to maintain steering control through the corner. Extra bracing here adds left and rear weight as well as protection.SAFETY FIRST.
 

Attachments

  • fuelcell.jpg
    fuelcell.jpg
    13.7 KB · Views: 922
  • #273
Squaring chassis set up

I made this " traverse gage" a few years ago. Had 2 x 4 inch aluminum rail. I had the 12 foot rail cut into 3 sections and dovetailed for accurate fit. Had digital tape measure, height stand mounted on rollers and digital cross arm. You can really nail down the set up but for most set ups, string is going to give you enough accuracy.
 

Attachments

  • traverse gage.jpg
    traverse gage.jpg
    69.6 KB · Views: 1,603
Last edited:
  • #274
Any basic suspension advice for a FWD class car? 1/4 mile pavement, minimal banking.
 
  • #275
my old sportsman driver was racing at Anderson Indiana in this class. I got to catch up with him on the set up..i think he was racing a Ford compact 2300 cc 4 cyl that has an automatic in it.
The rules in these classes of racing are real limited as the point is to provide a race series as cheap as possible.
You ca not change suspension parts and are real limited on tire size and selection. no more than 1/2 inch stagger. as any racing it is all about tire contact. he runs- 1degree on lft front and up to 3 degrees + camber on rt ft.
go as sticky on the tires as you can...also he runs a real stiff RR spring to drive off the turns..
if it were me..i would bench mark the car as in previous posts to find the roll center and work at changing that height and location to your advantage.
Moving weight around to get most left side weight and as close to 50-50 front to rear weight and some good cross weight would be in order too.
 
Last edited:
  • #276
Thanks Mike for asking. Anderson has more banks than Wall Street, but sounds like the rules are close. Not a whole lot to play with.
Have talked to a few about cross weight and have been told to go easy on it because of the push in the FWD cars. (?)
Enjoying the thread.
 
  • #277
hey mike i found this site today and been reading just about all day an learning everything iv been wanting to know.. i got to question to ask.. I have a metric frame monte carlo street stock an iv been lookin to make it wider in the front by using longer lower front control arms.. is there any type of vehicle out there that has em that fits my frame? Also a couple of post back someone mentioned using impala spindals over regular monte ones.. what year impala has the 5-43/4 bolt pattern and why are they better?
 
Last edited:
  • #278
WN9Y you are correct..according to "Krash" my old racer buddy, who is selling his compact and racing street stock this year...these FWD cars do tend to push so you got to drive it into the turn until you see God, then nail it. You have to drive it out of a push. total against logic we been to taught on RWD cars. Anyway it works for him.

Rebel42 welcome to the forum and thanks for the kind words..like I said..Krash is building up a street stock and i have to dig out out notes on set up. I do recall the spindle swap will change roll center height legally..same thing with the A-Arm length..

Before making a change..I would bench mark your front end even if the engine is out of the car so you can note the Roll Center and location..something the competition would not do..
there is a whole lot of monkey see monkey do in the beginner ranks without understanding what the purpose of the changes are. So before making a change..know what it will do to your set up.

rm
 
Last edited:
  • #279
"Drive it into the turn until you see God, then nail it"
You forgot the part about closing your eyes.

Anybody on here ever bench marked a strut car? Any tips?
 
  • #280
WN9Y said:
"Drive it into the turn until you see God, then nail it"
You forgot the part about closing your eyes.

Anybody on here ever bench marked a strut car? Any tips?

forgive me WN9..some times do not remember if I discussed this point..let me write up the bench mark process and will psot soon...
 

Similar threads

  • Mechanical Engineering
Replies
4
Views
2K
  • Mechanical Engineering
Replies
9
Views
6K
Replies
7
Views
1K
  • Mechanical Engineering
Replies
6
Views
2K
  • Classical Physics
Replies
10
Views
4K
  • Introductory Physics Homework Help
Replies
2
Views
2K
  • General Discussion
Replies
1
Views
8K
  • General Discussion
Replies
4
Views
7K
Replies
6
Views
3K
Back
Top