Using a hydraulic press for sample testing experiment. Need Help.

In summary, the conversation discusses the use of a hydraulic shop press to test the strength of acrylic weld joints. The first question involves determining the amount of force being applied to the work area based on the pressure gauge reading of 1000 PSI. The second question delves into the set up of the experiment and whether supporting the opposing end with a steel bar will affect the accuracy of the results. Picture 4 is deemed the most promising set up for testing shear strength. The third question involves converting the pressure gauge reading into the force applied to the joint and calculating the PSI at which the joint broke. There is also a discussion about a potential design problem with the current set up.
  • #1
bigfish2000
4
0
Hello,

I am using a hydraulic shop press, to test the strength of acrylic weld joints.

Here are my questions.

-I replaced the pressure gauge that was included with a very precise digital gauge. The hydraulic piston that presses down has a removable circular head 2” DIA. Its neck is 1.48” in DIA. Thus the piston head is roughly 3.14 square inches and the neck has a 1.719 square inch surface area. If my pressure gauge reads 1000 Psi, how many LBS of force are being applied to my work area?
Would be 3140 LBS of force or 1719 LBS?


-My second question is a little more complicated. It involves the design set up of the experiment.
I have made 50 samples identical to the one shown in the pictures. I want to test shear strength with the samples.

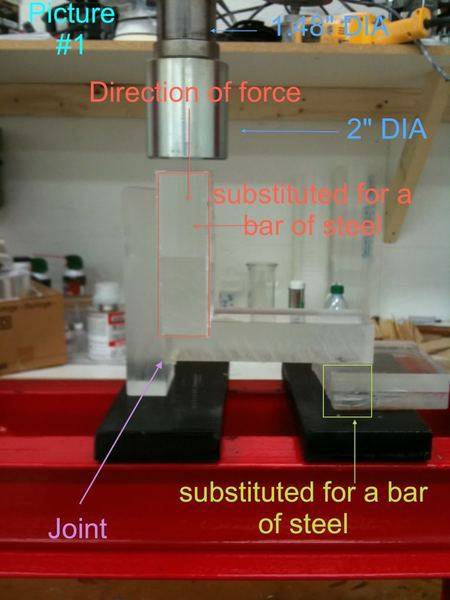
(See picture #1).
My thoughts are this; using a bar of steel to distribute the pressure evenly across the joint I would apply force with my press (red arrow). The sample will naturally want to tip as pressure is applied. In order to prevent the sample from tipping I would keep the opposing side supported with a bar of steel (green box). By supporting the opposing end (green box) will this affect the accuracy of my test results? Would it make the results artificially higher?
Acrylic flexes even over a short distance. Flexing will act as a lever and fulcrum correct? Should I move my support bar in further towards the (red arrow) to prevent flexing?
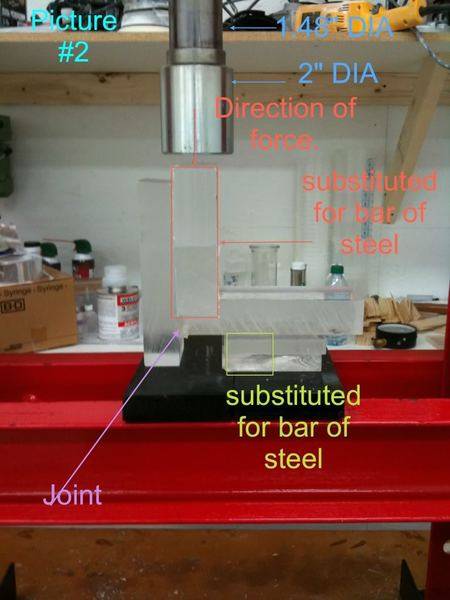
(See picture #2) Or will this affect the results of the experiment?

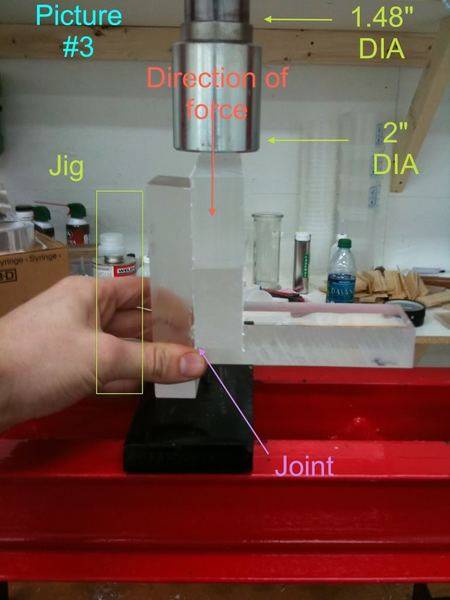
(See picture #3)
Should I have the samples held from the backside in this manner using a steel jig?

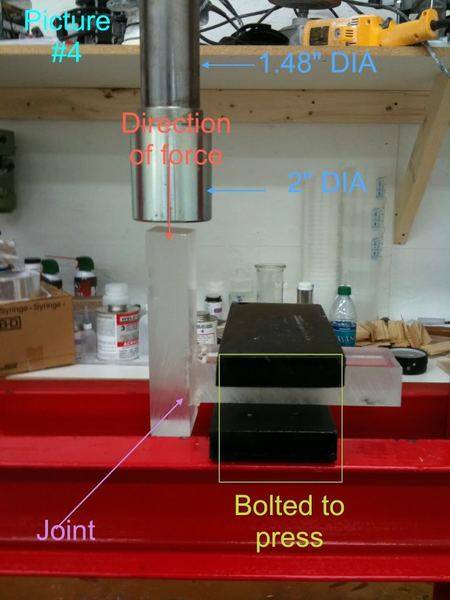
(See Picture #4)
Or should I have the samples held like this?

-When applying force to the test samples I am using a bar of steel to distribute the weight across the joint evenly. How do I translate the gauge PSI reading into how much force is being applied to the joint? And how do I calculate how many PSI at which the joint broke at?
For instance my pressure gauge reads 1000 PSI. There for the piston should be exerting 3140 LBS or 1719 LBS of force. Would I determine this by dividing 3140 LBS or 1719 LBS of force by the total surface area of the joint (2x1”=2 sqin). Thus 1570 PSI or 859.5 PSI of force was being applied to the joint?
Or would the steel bar affect PSI being applied? Picture #1
3photo.jpg


Picture #2
4photo.jpg


Picture #3
2photo.jpg


Picture #4
photo-1.jpg
 
Last edited:
Engineering news on Phys.org
  • #2
-I replaced the pressure gauge that was included with a very precise digital gauge. The hydraulic piston that presses down has a removable circular head 2” DIA. Its neck is 1.48” in DIA. Thus the piston head is roughly 3.14 square inches and the neck has a 1.719 square inch surface area. If my pressure gauge reads 1000 Psi, how many LBS of force are being applied to my work area?
Would be 3140 LBS of force or 1719 LBS?

1719 lbs

Force down = force up
The force down is the area of your piston ( neck) multiplied by the area of the piston.
You can increase the pressure at the contact by choosing a smaller head, or decreasing the pressure at contact by choosing a larger head. Note that the area of contact is not simply the area of the head but the mating area of the head and workpiece, as the head may overlap the workpiece.
 
  • #3
-My second question is a little more complicated. It involves the design set up of the experiment.

Your setup will depend upon whether you want to test for only shear at the joint, in which case picture 4 looks most promising, as the workpiece is solidly secured to a framework, and if the jig is moved closer to the joint.

Picture 1 would test for shear and some sort of bending at the joint, but the workpiece is not secured in any way.

Picture 2 would just be pressing down more and more on the support as they are moved inwards and will not give a full indication of what force or stress is at the joint.

Picture 3 you could use to test failure to a bending moment at the joint if you move the pressure point farther to the right of the horizontal piece.

This is just my opinion obtained by perusing the pictures you have provided.
 
  • #4
256bits,

Thanks for your feedback.

I also think that the set up in picture 4 is more promising.

Thats what I was thinking. If the pressure gauge reads 1000 PSI the head of my piston is exerting 1719 LBS of force over a 2" DIA (3.14 sqin) which means that 547 PSI are exerted in that space correct if full contact was achieved?

So what I am trying to determine is the force it takes to break the joint.
The mating surface area of the joint is 2"x1".
The portion where the piston will contact the acrylic is also 2"x1".

So if I understand this correctly which I hope I do.
Assuming my test samples break when my pressure gauge reads 5000 PSI. That would mean that the piston is exerting 8,595 LBS of force correct? The contact head is 2 square inches for both mating surfaces. So the samples would have broke at 4,297.5 PSI correct?
 
  • #5
Possible design problem.

Well this is the design that I came up with today. (picture 1)

Here is the potential problem. The way these joints are made leaves a small lip on the outside edge that prevents them from recessing all the way into the holding jig. Thus they have to be positioned roughly 1/4" away from the edge of the jig.

I tested one of my samples to determine if my jig functioned properly.

As you can see in the second picture the sample broke at both the assembly joint and I assume at the jig contact line 1/4" away from the joint. Additionally even if the joint could be recessing all the way into the jig, it would still create a fracture line.

The fracture line places pressure on a single line causing false results. It would be similar to holding a piece of wood off the edge of table and pressing down on the exterior edge. It obviously will fail at the opposing break line at the edge of the table.

Picture 1
photo1-1.jpg


Picture 2
photo3.jpg


Picture 3 & 4 show the joint and why it can not recess all the way into the holding jig.

photo5.jpg

photo4.jpg


Any input would be appreciated.
 
  • #6
Assuming my test samples break when my pressure gauge reads 5000 PSI. That would mean that the piston is exerting 8,595 LBS of force correct? The contact head is 2 square inches for both mating surfaces. So the samples would have broke at 4,297.5 PSI correct?
I think that makes sense.

For the fracture line you speak of, perhaps lessen the stress concentration at the jig-workpiece by chamfering the jig edge and/or adding a veneer sheet of softer material between the jig and workpiece, such as wood or lead sheet.

You might find this interesting.
http://www.vishaypg.com/docs/11212/11212_tn.pdf
as acyrilic is part of the special plastic coating.
You might see the patterns with simple polarized glasses - doesn't work always.
A sharp curve or snall circles mean stress concentration.
 

1. What is a hydraulic press and how does it work?

A hydraulic press is a machine that uses fluid pressure to compress and shape materials. It works by using a piston and cylinder system, where a small amount of force applied to a small area is converted into a larger force applied to a larger area. This allows for a high amount of pressure to be exerted on a sample, making it useful for sample testing experiments.

2. What types of materials can be tested using a hydraulic press?

A hydraulic press can be used to test a wide range of materials, including metals, plastics, rubber, and composites. It is commonly used in industries such as automotive, aerospace, and construction to test the strength and durability of materials.

3. How accurate are the results obtained from a hydraulic press test?

The accuracy of the results obtained from a hydraulic press test depends on several factors, such as the quality of the machine, the calibration of the equipment, and the precision of the testing method. Generally, hydraulic press tests are considered to be highly accurate and reliable.

4. What safety precautions should be taken when using a hydraulic press for sample testing?

Safety is crucial when using a hydraulic press, as it involves high pressure and force. Some precautions that should be taken include wearing appropriate protective gear, following the manufacturer's instructions, and ensuring the machine is well-maintained. It is also important to never exceed the maximum pressure capacity of the press.

5. Can a hydraulic press be used for other purposes besides sample testing?

Yes, a hydraulic press has a wide range of uses besides sample testing. It can be used for tasks such as bending, cutting, punching, and molding materials. It is also commonly used in the production of items such as car parts, appliances, and furniture.

Similar threads

  • Mechanical Engineering
Replies
5
Views
2K
Replies
3
Views
3K
Replies
13
Views
2K
Replies
1
Views
3K
  • Engineering and Comp Sci Homework Help
Replies
4
Views
3K
Replies
3
Views
2K
Replies
8
Views
5K
  • Mechanics
Replies
16
Views
2K
Replies
3
Views
2K
  • Introductory Physics Homework Help
Replies
6
Views
4K
Back
Top