Confused by these proton decay diagrams

In summary, the conversation discusses diagrams involved in proton decays in SU(5) and the confusion they cause. The speaker shares their understanding of the diagrams and asks for clarification on certain aspects. They also mention their lack of knowledge on the GUT Lagrangian and how it affects their understanding of the diagrams. The other person encourages the speaker to work from first principles and fill in any gaps in their understanding.
  • #1
Anchovy
99
2
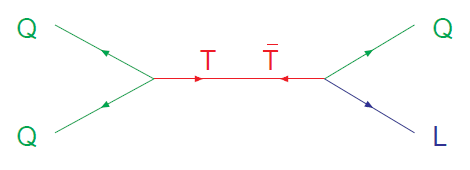
I have some confusion over some diagrams involved in proton decays in SU(5). I've seen a few like this that look weird to me. Here is one I found where the colored Higgs triplet does the job:
higgs_triplet_proton_decay.png

Straight away I don't know what to make of this because I've only ever seen diagrams where fermions are connected by one exchange boson. Here there are two, the [itex]T[/itex] and [itex]\overline{T}[/itex].

If I'm not mistaken, [itex]T[/itex] is meant to have a charge of -1/3 and [itex]\overline{T}[/itex] has +1/3. So if I specify the left hand side quarks with two of the three (uud) proton constituents, [itex]u^{+2/3}[/itex] and [itex]d^{-1/3}[/itex], then the charge from those quarks going into the left vertex is +1/3 overall. So there should be a [itex]\overline{T}[/itex] coming out of that vertex since it also has charge +1/3. But then the arrows look wrong since the arrows on the u, d should be pointing to the right?
Anyway, then the right hand side vertex would have [itex]\overline{T}[/itex] going in, so then the leading decay mode in this situation ([itex]p \rightarrow K^{+} \overline{\nu}[/itex]) would invove the Q on the right hand side being an [itex]\overline{s}[/itex] with charge of +1/3 (with the spectator u quark (which isn't shown) combining with the [itex]\overline{s}[/itex] to produce the [itex]K^{+}[/itex]), and the antilepton L being neutral, ie. [itex]\overline{\nu}[/itex].

So the diagram seems to make sense if I ignore one of the bosons. Has whoever drew this diagram combined two different interactions into the same diagram here, and if so, do the arrows really make sense? Or am I misinterpreting the [itex]T[/itex] / [itex]\overline{T}[/itex] line in this diagram?

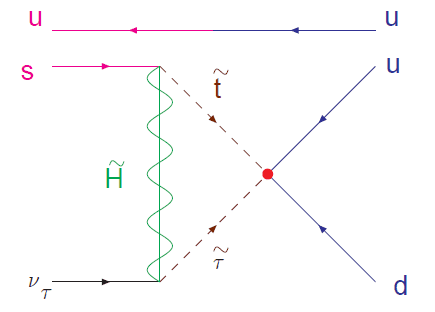
Here's another one, this time a SUSY diagram:
higgsino_proton_decay.png


The [itex]u^{+2/3}[/itex] and [itex]d^{-1/3}[/itex] put an overall +1/3 charge into the red dot vertex, the anti-stop (anti based on the arrow direction) has a -2/3 charge and the anti-stau a +1 charge, so the red dot vertex has overall +1/3 coming out of it too. So far so good.
Then we get to the vertices with the Higgsino. At the upper vertex, there's a -2/3 charge going in from the stop, and the anti-strange quark has charge +1/3, so the Higgsino must be a -1 charge (ie. it must be the anti-particle of the superpartner to the [itex]H^{+}[/itex] in the [itex](H^{+}, H^{0})[/itex] SU(2) doublet within the SU(5) [itex]\psi_{\textbf{5}}[/itex] multiplet). Similarly the +1 of the anti-stau and the -1 of the anti-Higgsino cancel to give the electrically neutral antineutrino.

--> Assuming the above interpretation is correct, my issues with this are:
1) Is there a reason why this diagram, meant to indicate proton decay, is set up to be read left-to-right rather than right-to-left?
2) I believe this decay is described by what gets referred to as a 'dimension 5' operator. I think that refers to what is happening at the red dot. However, I don't understand the '5' part. There are only 4 fields involved [itex](u, d, \tilde{t},\tilde{\tau})[/itex]. What is '5-dimensional' about this situation?
 
Physics news on Phys.org
  • #2
There's a reason why in the other thread I wanted you to work from first principles. If you are just given diagrams that you don't understand, you're not going to learn as much by having someone throw a few facts at you as you would if you actually worked out where those diagrams came from via the Lagrangian. So for instance, your question about the Higgs diagram is resolved as a simple issue of the theory of a complex scalar field. But since you have not tried to understand the GUT Lagrangian, you do not know the propagator, Feynman rules, etc. So naturally you have questions when you see diagrams written down. But you are not in a good position to absorb the information since you don't have the fundamentals in mind to build on.

I do not want you to take this as harsh criticism and be discouraged. Instead I would like to you be encouraged to step back and fill the gaps in your understanding.
 
  • #3
fzero said:
There's a reason why in the other thread I wanted you to work from first principles. If you are just given diagrams that you don't understand, you're not going to learn as much by having someone throw a few facts at you as you would if you actually worked out where those diagrams came from via the Lagrangian. So for instance, your question about the Higgs diagram is resolved as a simple issue of the theory of a complex scalar field. But since you have not tried to understand the GUT Lagrangian, you do not know the propagator, Feynman rules, etc. So naturally you have questions when you see diagrams written down. But you are not in a good position to absorb the information since you don't have the fundamentals in mind to build on.

I do not want you to take this as harsh criticism and be discouraged. Instead I would like to you be encouraged to step back and fill the gaps in your understanding.

No no criticism is welcome, I want to understand, I'm just trying to go in ten different directions at once at the moment. I'll get back to the other thread.
 
  • #4
I will try to briefly answer your questions, but, as a I said, I think you should work out all of the Feynman rules and then come back to them yourself.

Anchovy said:
I have some confusion over some diagrams involved in proton decays in SU(5). I've seen a few like this that look weird to me. Here is one I found where the colored Higgs triplet does the job:
View attachment 86574
Straight away I don't know what to make of this because I've only ever seen diagrams where fermions are connected by one exchange boson. Here there are two, the [itex]T[/itex] and [itex]\overline{T}[/itex].

If I'm not mistaken, [itex]T[/itex] is meant to have a charge of -1/3 and [itex]\overline{T}[/itex] has +1/3. So if I specify the left hand side quarks with two of the three (uud) proton constituents, [itex]u^{+2/3}[/itex] and [itex]d^{-1/3}[/itex], then the charge from those quarks going into the left vertex is +1/3 overall. So there should be a [itex]\overline{T}[/itex] coming out of that vertex since it also has charge +1/3. But then the arrows look wrong since the arrows on the u, d should be pointing to the right?
Anyway, then the right hand side vertex would have [itex]\overline{T}[/itex] going in, so then the leading decay mode in this situation ([itex]p \rightarrow K^{+} \overline{\nu}[/itex]) would invove the Q on the right hand side being an [itex]\overline{s}[/itex] with charge of +1/3 (with the spectator u quark (which isn't shown) combining with the [itex]\overline{s}[/itex] to produce the [itex]K^{+}[/itex]), and the antilepton L being neutral, ie. [itex]\overline{\nu}[/itex].
So the diagram seems to make sense if I ignore one of the bosons. Has whoever drew this diagram combined two different interactions into the same diagram here, and if so, do the arrows really make sense? Or am I misinterpreting the [itex]T[/itex] / [itex]\overline{T}[/itex] line in this diagram?

The vertex on the LHS comes from an SU(5) Yukawa coupling
$$ \epsilon^{ijklm} \psi_{ij} \psi_{kl} \mathcal{H}_m \rightarrow \epsilon^{abc} q_{a1} q_{b2} T_c,$$
where the 2nd term is just those involving SU(3) triplets. I'm using the notation from the other thread, so ##q_{a1}## is up-type and ##q_{a2}## is down. As needed, the U(1) charges are balanced when we draw the arrows on the Feynman diagram either all in or all out. If we want to flip an arrow, we need to compensate by attaching the antiparticle to the end of the leg. Since we want quarks and not antiquarks, it would be best to draw this with the lines pointing in.

The vertex on the RHS comes from
$$ \psi^i \psi_{ij} \bar{\mathcal{H}}^j \rightarrow \ell^\alpha q_{a\alpha} \bar{T}^a.$$
If we want an antiquark going out to the right, then we should draw the arrrows headed in. So if we draw just the ##T-\bar{T}## lines, we have

##T## -----<--------X-------->------##\bar{T}##

This is a correct ordering for the mass insertion, so we conclude that the version of the diagram you included with all arrows reversed is consistent. Evidently whoever wrote that diagram used a backwards convention where an arrow headed out was a particle.
 
  • #5
Anchovy said:
I
Here's another one, this time a SUSY diagram:
View attachment 86576

The [itex]u^{+2/3}[/itex] and [itex]d^{-1/3}[/itex] put an overall +1/3 charge into the red dot vertex, the anti-stop (anti based on the arrow direction) has a -2/3 charge and the anti-stau a +1 charge, so the red dot vertex has overall +1/3 coming out of it too. So far so good.
Then we get to the vertices with the Higgsino. At the upper vertex, there's a -2/3 charge going in from the stop, and the anti-strange quark has charge +1/3, so the Higgsino must be a -1 charge (ie. it must be the anti-particle of the superpartner to the [itex]H^{+}[/itex] in the [itex](H^{+}, H^{0})[/itex] SU(2) doublet within the SU(5) [itex]\psi_{\textbf{5}}[/itex] multiplet). Similarly the +1 of the anti-stau and the -1 of the anti-Higgsino cancel to give the electrically neutral antineutrino.

--> Assuming the above interpretation is correct, my issues with this are

1) Is there a reason why this diagram, meant to indicate proton decay, is set up to be read left-to-right rather than right-to-left?

We already established for the other diagram that the artist has some backward conventions. At the risk of being culturally insensitive, perhaps his or her native language is read from right to left. The conventions shouldn't be a problem once we've sussed them out.

2) I believe this decay is described by what gets referred to as a 'dimension 5' operator. I think that refers to what is happening at the red dot. However, I don't understand the '5' part. There are only 4 fields involved [itex](u, d, \tilde{t},\tilde{\tau})[/itex]. What is '5-dimensional' about this situation?

The mass dimension of a scalar field in 4D is 1, while that of a fermion is 3/2. The mass dimension of the operator represented by the red dot is ## 1 + 1 + 3/2 + 3/2 = 5##.
 

1. What is proton decay?

Proton decay is a theoretical process in which a proton, one of the basic building blocks of matter, decays into lighter particles.

2. Why are proton decay diagrams confusing?

Proton decay diagrams can be confusing because they involve complex mathematical equations and symbols that may be unfamiliar to non-scientists.

3. How do scientists study proton decay?

Scientists study proton decay by using particle accelerators to create high-energy collisions and observing the resulting particles and their decay products.

4. Is proton decay a proven phenomenon?

No, proton decay has not been observed or proven yet. It is still a theoretical concept that is being studied and tested by scientists.

5. What implications would proton decay have if it were proven?

If proton decay were proven, it would have significant implications for our understanding of the fundamental laws of physics and the structure of the universe. It could also have practical applications in fields such as energy production and nuclear physics.

Similar threads

  • Introductory Physics Homework Help
Replies
8
Views
203
  • High Energy, Nuclear, Particle Physics
Replies
1
Views
1K
  • High Energy, Nuclear, Particle Physics
Replies
7
Views
1K
  • High Energy, Nuclear, Particle Physics
Replies
1
Views
3K
  • High Energy, Nuclear, Particle Physics
Replies
3
Views
2K
  • High Energy, Nuclear, Particle Physics
Replies
2
Views
1K
  • High Energy, Nuclear, Particle Physics
Replies
4
Views
2K
  • High Energy, Nuclear, Particle Physics
Replies
13
Views
3K
  • High Energy, Nuclear, Particle Physics
Replies
4
Views
1K
  • Beyond the Standard Models
Replies
1
Views
1K
Back
Top