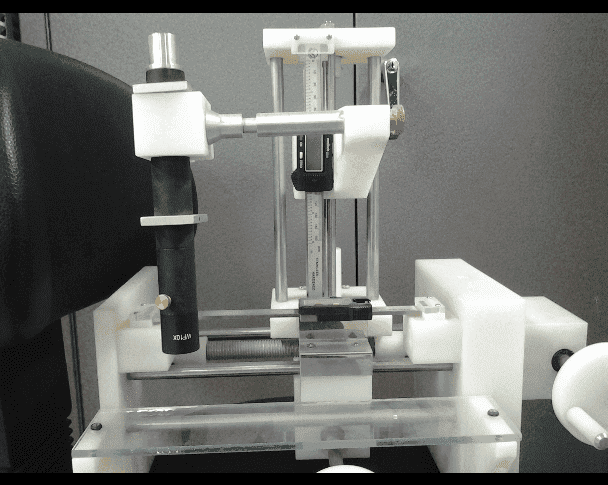
Does anybody know the name of this optics device?

  • Thread starter Thread starter Dorea
  • Start date Start date
  • Tags Tags
    Device Optics
Click For Summary
SUMMARY

The discussion centers around a custom-built optical device resembling a microscope, designed for precise measurement and depth calibration. Participants identify its components, including a Z-axis readout and a WF10X microscope eyepiece, suggesting it is a one-off creation rather than a mass-produced item. The device features a two-dimensional optical axis with a glass plate serving as the stage for subjects, and its construction indicates it may have been made in a machine shop. The primary application discussed is determining the apparent depth of objects in water.

PREREQUISITES
  • Understanding of optical measurement devices
  • Familiarity with microscope components and eyepieces, specifically WF10X
  • Knowledge of precision measurement techniques in laboratory settings
  • Basic concepts of optical axis and calibration methods
NEXT STEPS
  • Research the functionality and applications of WF10X microscope eyepieces
  • Explore the principles of optical measurement and depth perception in liquids
  • Investigate custom optical device fabrication techniques
  • Learn about the calibration processes for optical measurement systems
USEFUL FOR

Optical engineers, laboratory technicians, and anyone involved in the design or use of custom measurement devices will benefit from this discussion.

Dorea
Messages
28
Reaction score
1
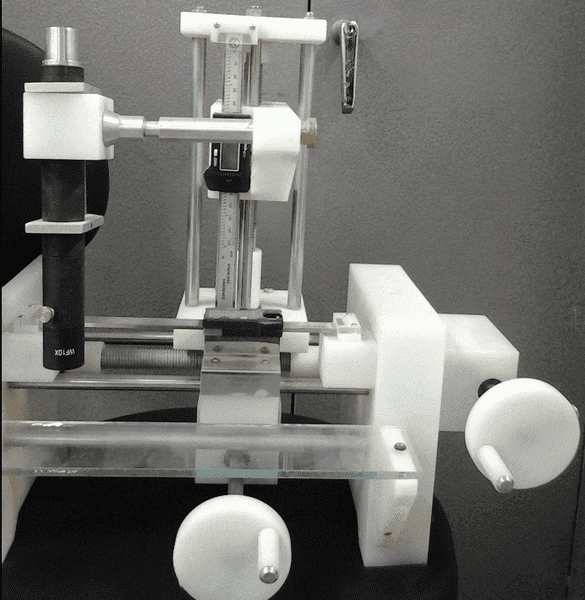
Does anybody know what is this device name and its application:
fQm7xwk.png
eKroSiD.png


(It's in our optics laboratory)
 
Physics news on Phys.org
It looks like a microscope that can measure exact/calibrated positioning and depth?
 
Last edited:
jedishrfu said:
It looks like a microscope that can measure exact/calibrated positioning and depth?
I'd agree, pending a look at what appears to be the microscope. It could be a laser or electron gun for all I know.

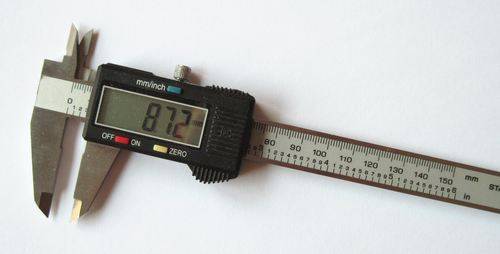
Regardless, it clearly has an X,Y, and Z axis positioning system. I'll add that this doesn't look mass produced. It looks like it's a one-off made in a machine shop. The Z axis readout looks like a 6 inch dial caliper pressed into that service, and there seems to be another one for the X axis, visible from the side. I don't see a readout for the Y axis, but there's a crank for it, so it's adjustable.

The X axis lead screw doesn't look precision ground. It looks like a piece of galvanized threaded rod. All the structural members are the kind of default blocks you'd make in a machine shop when you're just insuring everything's the right distance from everything else, though it looks like neat work (not sloppy). The white plastic looks like delrin to me, and the clear sheet looks like glass (as opposed to plastic).

So, I'd say it was made especially at the request of someone there, at your lab, or, it was made by a very small company that produced very few and hadn't streamlined the manufacturing process much yet.
 
I'm more curious about the business end of it. As in: where is it?
Does it all come down to the barrel on the left - everything else is scaffolding for adjustment?
What is the barrel pointed at? The glass plate?
Does the barrel have an eyepiece?
Does it magnify? Focus? Can you see anything if you put your eye to various eye-shaped parts of it?
Does the device still work if it's sitting on a different type of office chair?
 
DaveC426913 said:
I'm more curious about the business end of it. As in: where is it?
Does it all come down to the barrel on the left - everything else is scaffolding for adjustment?
What is the barrel pointed at? The glass plate?
Does the barrel have an eyepiece?
Does it magnify? Focus? Can you see anything if you put your eye to various eye-shaped parts of it?
Does the device still work if it's sitting on a different type of office chair?
It just occurred to me to google WF10X:
http://www.amscope.com/wf10x-microscope-eyepiece-with-reticle-23mm.html?gclid=CMLsmP6BvMECFYSPMgodTDkAWQ
Which turns out to be a microscope eyepiece. So, it looks like a microscope that's upside down.
 
zoobyshoe said:
It just occurred to me to google WF10X:
http://www.amscope.com/wf10x-microscope-eyepiece-with-reticle-23mm.html?gclid=CMLsmP6BvMECFYSPMgodTDkAWQ
Which turns out to be a microscope eyepiece. So, it looks like a microscope that's upside down.
Yes, that's why I said it looked like a microscope after googling the eyepiece. Also the eyepiece has a reticle for precise measurement as does the scaffolding.
 
zoobyshoe said:
It just occurred to me to google WF10X:
http://www.amscope.com/wf10x-microscope-eyepiece-with-reticle-23mm.html?gclid=CMLsmP6BvMECFYSPMgodTDkAWQ
Which turns out to be a microscope eyepiece. So, it looks like a microscope that's upside down.
I wonder if the whole barrel is upside-dozen or just the eyepiece.

Also, what are the two square layers for? Are they stoppers? Can the barrel move freely by hand and and down between the two stoppers? If so, why the Z-axis calibration?
 
I've been looking at traveling microscopes/inspection/measuring systems that have similar eye piece and barrels but no can find. I'm betting it's home-made. Note the red, yellow, blue "light source"?

BTW Welcome back DaveC
 
The red, yellow, blue are on/off/zero, imperial/metric, decimal/fraction buttons on the digital micrometer mechanisms. It is custom made. The optical axis moves in two dimensions only. The glass plate is the stage for the subject. The adjustment crank first nearest the operator drives an unseen right-angle drive for the vertical motion adjustment. The optical barrel may be free to move, suspended between the two square aluminum plates.
 
Last edited:
  • #10
dlgoff said:
I'm betting it's home-made.
Based on Zoob's description, it most certainly is.
dlgoff said:
Note the red, yellow, blue "light source"?
No. Where? The only R/Y/B thing I see in the pic at all is the buttons on the digital calipers. Read Zoob's descrip in post #3.
caliper.jpg


dlgoff said:
BTW Welcome back DaveC
Thanks. Good to be back.
 
  • #11
Doug Huffman said:
The optical axis moves in two dimensions only.
I was wondering about that. Zoob suggested it moves in all three axes. I assumed perhaps the Y-axis is not visible, but that the bottom dial was for adjusting the Y-axis. The brass dial on the right at the top might have been for Z-axis adjustment.

But I think you're right - only two axis movement.

So no adjustment in the Y-axis. Odd.
Doug Huffman said:
The optical barrel may be free to move, suspended between the two square aluminum plates.
Yes. I thought that odd. Why have a micrometer-accuracy adjustment on the Z-axis if the barrel can be moved freely as much as several inches?

And why no Y-axis movement at all?
 
  • #12
The brass thumbscrew may allow rotation/inversion of the optical barrel, again, floating between the square aluminum plates with visible set screws.

The aluminum rod that the thumbscrew engages is the most highly machined piece on the assembly, either scavenged from another device or with purpose and appurtenances not clear/visible/present.
 
  • #13
DaveC426913 said:
caliper.jpg
Precision ± 0.01 mm ? I'm very suspicious...
 
  • Like
Likes   Reactions: DaveC426913
  • #14
It's an industry standard device, perhaps the same model in my toolbox. Yup, $20 and even the same source. Note that the friction thumbdrive has been removed.

http://www.harborfreight.com/media/...b33525d08d6e5fb8d27136e95/i/m/image_21602.jpg

"Ordinary 6-in/150-mm digital calipers are made of stainless steel, have a rated accuracy of 0.001 in (0.02mm) and resolution of 0.0005 in (0.01 mm). https://en.wikipedia.org/wiki/Calipers#cite_ref-9

I am a sustaining contributor to the Wikimedia Foundation
 
Last edited:
  • #15
Doug Huffman said:
It's an industry standard device, perhaps the same model in my toolbox.
I know, but I would trust here only to ± 0.1 mm
 
  • #16
Doug Huffman said:
The optical axis moves in two dimensions only. The glass plate is the stage for the subject. The adjustment crank first nearest the operator drives an unseen right-angle drive for the vertical motion adjustment. The optical barrel may be free to move, suspended between the two square aluminum plates.
On closer inspection, I believe you're right. There is no Y axis movement. What looks like the Y axis crank is actually the Z axis crank, working through bevel gears in a box you can't see. There is a similar box on the right for the X axis lead screw. The Z lead screw is visible but mostly obscured by an upright structural rod. That rod obscuring the lead screw gave the lead screw the impression of being a rack such as you'd find on a height gage. I thought the Z axis must have some small, dedicated crank of its own that wasn't visible, which cranked a pinion up and down that rack.

I think the microscope proper is just inverted for storage, which is why the eyepiece is at the bottom. You can see that properly oriented, it's going to stick up much farther, due to the placement of the aluminum plates. In fact, I think that's the function of those plates: they seem to be mere stops so you can flip the scope over and put it in the cupboard quickly.
 
  • #17
Oh, thanks guys, As you said there is a simple microscope on it. I took a closer look at it and got help found the previous lab asistance. It's a device to determine the apparent depth.
 
  • #18
...of what?
 
  • #19
Yay, I win. I guessed depth early on...
 
  • #20
DaveC426913 said:
...of what?
Apparent depth in water. A simple experience!

pob85WA.png
 
  • #21
Hrm. OK. I'm not sure how this device would facilitate that.
 

Similar threads

  • · Replies 6 ·
Replies
6
Views
3K
  • · Replies 9 ·
Replies
9
Views
1K
  • · Replies 2 ·
Replies
2
Views
2K
  • · Replies 36 ·
2
Replies
36
Views
6K
  • · Replies 1 ·
Replies
1
Views
1K
  • · Replies 3 ·
Replies
3
Views
2K
  • · Replies 11 ·
Replies
11
Views
5K
  • · Replies 14 ·
Replies
14
Views
2K
  • · Replies 14 ·
Replies
14
Views
2K
  • · Replies 5 ·
Replies
5
Views
2K