How can I fix a leaky toilet without replacing parts?

  • Context: Plumbing 
  • Thread starter Thread starter arabianights
  • Start date Start date
Click For Summary
SUMMARY

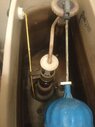
The discussion focuses on troubleshooting a leaky toilet in an old apartment building, specifically addressing issues related to a canister flush valve. Key causes identified include a misadjusted float leading to water overflow, a faulty flapper valve that may require replacement, and a malfunctioning inlet valve that fails to close completely. Solutions include readjusting the float, inspecting and potentially replacing the flapper valve, and cleaning or replacing the inlet valve assembly. For detailed guidance, users are directed to resources like Ideal Service and iFixit.

PREREQUISITES
  • Understanding of toilet components, specifically canister flush valves
  • Basic plumbing skills for disassembling and cleaning toilet mechanisms
  • Familiarity with adjusting float mechanisms in toilets
  • Knowledge of how to safely shut off water supply to a toilet
NEXT STEPS
  • Research how to adjust a toilet float mechanism effectively
  • Learn about canister flush valve maintenance and replacement
  • Explore common issues with inlet valves and their repairs
  • Review best practices for cleaning toilet valve assemblies
USEFUL FOR

Homeowners, DIY enthusiasts, and plumbing professionals seeking to troubleshoot and repair leaking toilets, particularly those with canister flush systems.

arabianights
Messages
67
Reaction score
8
TL;DR
Help with fixing Leaky toilet
My mom lives in an old apartment building and her toilet is constantly leaking. I opened the cover and took a took. I couldn’t tell which part is causing the leak. Here’s a couple pictures of it
 

Attachments

  • FAE17DFE-4A12-47BF-82F3-A13A0712BBB6.jpeg
    FAE17DFE-4A12-47BF-82F3-A13A0712BBB6.jpeg
    33.2 KB · Views: 157
  • DEBAB4C4-A540-4D3B-9BC7-87065822D5AE.jpeg
    DEBAB4C4-A540-4D3B-9BC7-87065822D5AE.jpeg
    53.7 KB · Views: 142
  • 633048BB-9E3E-45DC-8140-12D43BFA1C0D.jpeg
    633048BB-9E3E-45DC-8140-12D43BFA1C0D.jpeg
    59.2 KB · Views: 149
Physics news on Phys.org
Two possible causes I can think of:
  1. Water goes through the overflow tube. This is due to a badly adjusted float that sets the water level too high. Readjusting the float should fix the problem;
  2. The flapper valve does not seal properly. A visual inspection might show an obvious problem and replacing it might be necessary.
overflow-tube-400x355.jpg
 
  • Like
Likes   Reactions: hmmm27 and arabianights
  • Like
Likes   Reactions: Lnewqban
jack action said:
Two possible causes I can think of:
  1. Water goes through the overflow tube. This is due to a badly adjusted float that sets the water level too high. Readjusting the float should fix the problem;
  2. The flapper valve does not seal properly. A visual inspection might show an obvious problem and replacing it might be necessary.
3. The inlet valve never closes completely no matter the force from the float and flows continuously.

If #1 then lifting gently up on the float will stop the leaking. The level can be adjusted by turning the screw in the third picture of post 1. Press down on the float when turning the screw to make it easier to turn. If the pictures provided are in the steady state then it looks like the level is not the problem.

If #2 is the problem then the fill valve will usually cycle on and off as the water level slowly falls and then is replenished by the inlet valve. If the leak is really bad then the water level will never rise. You have a canister flush valve so no flapping but it serves the same purpose as a flapper valve. Cleaning debris from the sealing surfaces may fix this. If you have a shutoff valve then you can close it and flush the toilet to get easier access. Hold the handle down until no more water flows.

If #3 Sometimes disassembling and cleaning out the valve can fix this without any replacement parts but the seal probably needs to be replaced. Often the whole valve assembly needs to be replaced. If you want to take apart the valve then shut off the water first or you will get an unexpected ceiling wash-down. After opening the valve and removing any loose parts you will want to flush the line. Place a cup or small container over the top of the valve and open the shut off briefly. Hold on tight as the water comes out forcefully.

BoB
 
  • Like
Likes   Reactions: DaveE and Tom.G
rbelli1 said:
If #3 Sometimes disassembling and cleaning out the valve can fix this without any replacement parts but the seal probably needs to be replaced.
This approach may buy you some time but the parts are all pretty cheap so a trip to the plumbing supplies shop is the best solution. The cistern in the picture is not familiar to me but you can eliminate the (rubber ring?) as a possible cause if you isolate the system with the inlet valve. If it's the outlet valve then water will flow until the tank is empty. If it's the inlet valve not shutting off then overflow water will stop almost immediately. A new diaphragm in the inlet valve can be changed with very little trouble .

It does worry me that these vital mechanisms are so poorly made. They can develop splits and leaks quite spontaneously. In the good old days, the inverted bell-type flush was fail safe and the old fashioned ball cock, with its little rubber pad would last for many decades. But people change bathrooms almost as frequently as bath towels these days so the plumbing fittings are not often an issue.
 

Similar threads

  • · Replies 6 ·
Replies
6
Views
736
  • · Replies 8 ·
Replies
8
Views
4K
Replies
1
Views
898
  • · Replies 11 ·
Replies
11
Views
3K
  • · Replies 9 ·
Replies
9
Views
2K
  • · Replies 20 ·
Replies
20
Views
5K
  • · Replies 1 ·
Replies
1
Views
3K
  • · Replies 28 ·
Replies
28
Views
4K
Replies
3
Views
2K
  • · Replies 3 ·
Replies
3
Views
2K