SUMMARY
The discussion centers on the necessity of additional views in technical drawings, specifically regarding a cross section of a metal body. Participants agree that a single cross section may suffice if the diameter symbol is correctly applied and a note for a lateral hole is included. The consensus indicates that while a top view may enhance clarity, it is not strictly required if all necessary dimensions are adequately represented in the existing views.
PREREQUISITES
- Understanding of technical drawing conventions
- Familiarity with cross-sectional views in engineering design
- Knowledge of dimensioning standards in CAD software
- Proficiency in interpreting isometric drawings
NEXT STEPS
- Research best practices for dimensioning in technical drawings
- Explore CAD software tools for creating cross sections
- Learn about the importance of auxiliary views in engineering design
- Study the application of symbols in technical drawings
USEFUL FOR
Engineers, technical illustrators, and students in mechanical design who are involved in creating or interpreting technical drawings and need to understand the implications of view selection and dimensioning.

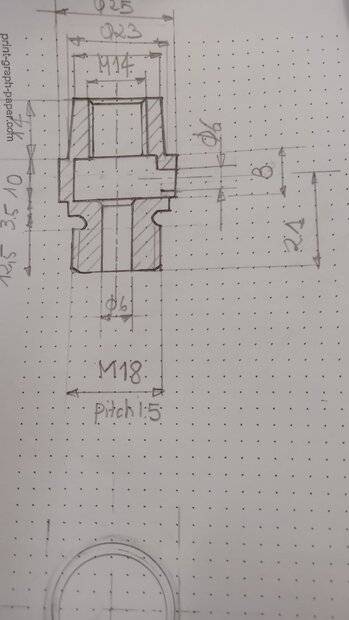
 I have done the following drawing for the cross section
 and I want to know if I need to add a top view or any other additional view? (is the cross section enough)