FEAnalyst
- 348
- 149
- TL;DR
- What can be wrong with my calculations of a corrugated tube subjected to axial load since there's no agreement with FEA?
Hi,
I'm trying to verify the results of a finite element analysis of a corrugated tube (bellow) subjected to axial load. Here are my analytical calculations based on Roark's Formulas for Stress and Strain (originally the formulas are from the article "On the Theory of Thin Elastic Toroidal Shells" by R.A. Clark): $$u=\frac{0.577Pbn \sqrt{1-\nu^{2}}}{E t^{2}}$$ $$\sigma_{m,max}=\frac{1.63P}{2 \pi at} \left[ \frac{ab}{t^{2} \sqrt{1-\nu^{2}}} \right]^{1/3}$$ $$\sigma_{h,max}=\frac{0.925P}{2 \pi at} \left[ \frac{ab(1- \nu^{2})}{t^{2}} \right]^{1/3}$$ where: ##P## - axial load, ##a## - distance from the axis of the tube to the center of the semicircular corrugation, ##b## - outer radius of the semicircular corrugation, ##t## - wall thickness, ##n## - number of corrugations, ##E## - Young's modulus, ##\nu## - Poisson's ratio, ##u## - stretch, ##\sigma_{m,max}## - maximum meridional bending stress, ##\sigma_{h,max}## - maximum circumferential (hoop) membrane stress. In my case the values are: $$P=2000 \ N, \ a=80 \ mm, \ b=42 \ mm, \ t=4 \ mm, \ n=5, \ E=210 \ GPa, \ \nu=0.3$$ and I got the following results from the formulas above: $$u=0.0688 \ mm$$ $$\sigma_{1,max}=9.79 \ MPa$$ $$\sigma_{2,max}=5.29 \ MPa$$ I also calculated von Mises stress (for direct comparison with FEA) using this formula (it should be correct but I'm not 100% sure): $$\sigma_{vM}=\sqrt{\frac{1}{2} \left( (\sigma_{r}- \sigma_{h})^{2}+(\sigma_{h}- \sigma_{m})^{2}+(\sigma_{m}- \sigma_{r})^{2} \right) }=8.48 \ MPa$$ This was calculated assuming radial stress ##\sigma_{r}=0##. The calculations themselves are correct because I performed them using CAS (Computer Algebra System) software.
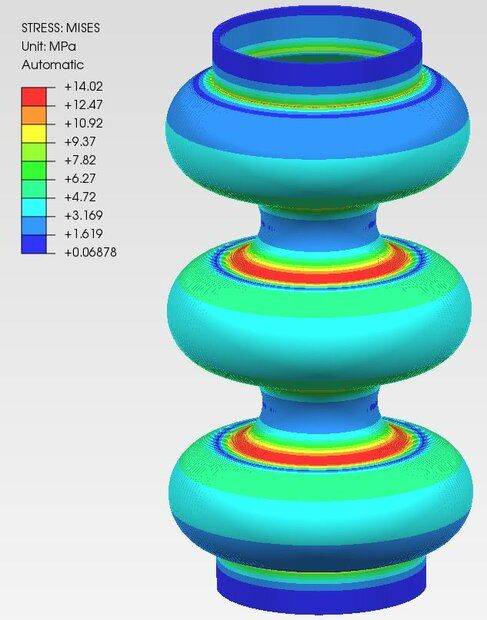
Here's what I got from axisymmetric FEA: $$u=0.07986 \ mm$$ $$\sigma_{vM}=14.02 \ MPa$$ And that's the stress distribution:

Do you know what can be wrong here ? I double-checked all the calculations. The FEA model is very simple and there should be no problem with boundary conditions for example.
I'm trying to verify the results of a finite element analysis of a corrugated tube (bellow) subjected to axial load. Here are my analytical calculations based on Roark's Formulas for Stress and Strain (originally the formulas are from the article "On the Theory of Thin Elastic Toroidal Shells" by R.A. Clark): $$u=\frac{0.577Pbn \sqrt{1-\nu^{2}}}{E t^{2}}$$ $$\sigma_{m,max}=\frac{1.63P}{2 \pi at} \left[ \frac{ab}{t^{2} \sqrt{1-\nu^{2}}} \right]^{1/3}$$ $$\sigma_{h,max}=\frac{0.925P}{2 \pi at} \left[ \frac{ab(1- \nu^{2})}{t^{2}} \right]^{1/3}$$ where: ##P## - axial load, ##a## - distance from the axis of the tube to the center of the semicircular corrugation, ##b## - outer radius of the semicircular corrugation, ##t## - wall thickness, ##n## - number of corrugations, ##E## - Young's modulus, ##\nu## - Poisson's ratio, ##u## - stretch, ##\sigma_{m,max}## - maximum meridional bending stress, ##\sigma_{h,max}## - maximum circumferential (hoop) membrane stress. In my case the values are: $$P=2000 \ N, \ a=80 \ mm, \ b=42 \ mm, \ t=4 \ mm, \ n=5, \ E=210 \ GPa, \ \nu=0.3$$ and I got the following results from the formulas above: $$u=0.0688 \ mm$$ $$\sigma_{1,max}=9.79 \ MPa$$ $$\sigma_{2,max}=5.29 \ MPa$$ I also calculated von Mises stress (for direct comparison with FEA) using this formula (it should be correct but I'm not 100% sure): $$\sigma_{vM}=\sqrt{\frac{1}{2} \left( (\sigma_{r}- \sigma_{h})^{2}+(\sigma_{h}- \sigma_{m})^{2}+(\sigma_{m}- \sigma_{r})^{2} \right) }=8.48 \ MPa$$ This was calculated assuming radial stress ##\sigma_{r}=0##. The calculations themselves are correct because I performed them using CAS (Computer Algebra System) software.
Here's what I got from axisymmetric FEA: $$u=0.07986 \ mm$$ $$\sigma_{vM}=14.02 \ MPa$$ And that's the stress distribution:
Do you know what can be wrong here ? I double-checked all the calculations. The FEA model is very simple and there should be no problem with boundary conditions for example.