Cosine Error: 5mm Ball Tip Stylus at 7.5° Angle

  • Thread starter Thread starter Ranger Mike
  • Start date Start date
  • Tags Tags
    Cosine Error
AI Thread Summary
Cosine error in measurement occurs when the angle between the probe and the normal vector increases, leading to inaccuracies in the measured point on the surface. For a 5 mm ball tip stylus vectoring into a surface at a 7.5° angle, the cosine error can be calculated using the formula ε = r sin²(α), resulting in an error of approximately 0.085 mm. This error becomes significant, especially when checking high precision parts, where even small discrepancies can be critical. The discussion emphasizes that cosine error is a vector rather than a simple value, highlighting the importance of accurate surface measurements compared to CAD nominal. Understanding and calculating cosine error is essential for ensuring precision in measurements.
Ranger Mike
Science Advisor
Messages
2,446
Reaction score
432
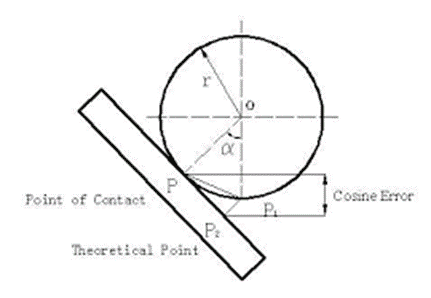
Cosine error of a measured point on the surface is not a simple value, but a vector. If the ball contacts the part surface at a point located a distance from the theoretical or nominal point then the angle between the probe and the normal vector gets larger, P1 P2 will increase. We have cosine error. This error occurs when the part surface varies compared to the CAD nominal. If the angle between the probe actual touch point P and the normal vector P2 gets larger, P1 P2 will increase.

Help..If I have a 5 mm ball tip stylus and can only vector in to the surface at 7.5° how much cosine error will I have?

1679582313705.png
 
Engineering news on Phys.org
Ranger Mike said:
Cosine error of a measured point on the surface is not a simple value, but a vector. If the ball contacts the part surface at a point located a distance from the theoretical or nominal point then the angle between the probe and the normal vector gets larger, P1 P2 will increase. We have cosine error. This error occurs when the part surface varies compared to the CAD nominal. If the angle between the probe actual touch point P and the normal vector P2 gets larger, P1 P2 will increase.

Help..If I have a 5 mm ball tip stylus and can only vector in to the surface at 7.5° how much cosine error will I have?

View attachment 323978
For what you have labeled as the cosine error ( call it ##\epsilon##) in the diagram I'm getting:

$$ \epsilon = r \left[ 1-\cos \alpha + \sin \alpha \cos \alpha \tan \frac{\alpha}{2} \right]$$
 
Last edited:
ero, thank you for taking the time to look at this.
error = 5 mm [ 1 - cos 7.5° + sin 7.5° times cos 7.5° times (tan 7.5° /2) ]
 
Ranger Mike said:
ero, thank you for taking the time to look at this.
error = 5 mm [ 1 - cos 7.5° + sin 7.5° times cos 7.5° times (tan 7.5° /2) ]

Second go, I think a cleaner version is:

$$ \epsilon = r \left( 1- \cos \alpha \right) \left( 1 + \cos \alpha \right) $$

But they should give the same result.

Or even cleaner!

$$ \epsilon = r \sin^2 \alpha$$

Sorry for all the changes...but as I keep looking I keep seeing more simplifications...
 
I checked the first against the last and they are equivalent. Computationally, better to use the last one!

I get ##\epsilon = 5 [\text{mm}] \sin^2 (7.5°) \approx 0.085 [\rm{mm}]##
 
when checking high precision parts, the error of 0.0033" is HUGE.

thank you for the great work.
 
  • Like
Likes berkeman and erobz
Thread 'What type of toilet do I have?'
I was enrolled in an online plumbing course at Stratford University. My plumbing textbook lists four types of residential toilets: 1# upflush toilets 2# pressure assisted toilets 3# gravity-fed, rim jet toilets and 4# gravity-fed, siphon-jet toilets. I know my toilet is not an upflush toilet because my toilet is not below the sewage line, and my toilet does not have a grinder and a pump next to it to propel waste upwards. I am about 99% sure that my toilet is not a pressure assisted...
After over 25 years of engineering, designing and analyzing bolted joints, I just learned this little fact. According to ASME B1.2, Gages and Gaging for Unified Inch Screw Threads: "The no-go gage should not pass over more than three complete turns when inserted into the internal thread of the product. " 3 turns seems like way to much. I have some really critical nuts that are of standard geometry (5/8"-11 UNC 3B) and have about 4.5 threads when you account for the chamfers on either...
Thread 'Physics of Stretch: What pressure does a band apply on a cylinder?'
Scenario 1 (figure 1) A continuous loop of elastic material is stretched around two metal bars. The top bar is attached to a load cell that reads force. The lower bar can be moved downwards to stretch the elastic material. The lower bar is moved downwards until the two bars are 1190mm apart, stretching the elastic material. The bars are 5mm thick, so the total internal loop length is 1200mm (1190mm + 5mm + 5mm). At this level of stretch, the load cell reads 45N tensile force. Key numbers...
Back
Top