RagingCalm
- 1
- 0
Rotating Coupling Pin--Mechanical Failure as a Safety Precaution
Hi everyone, I am RagingCalm, a mechanical design engineer. I hate to ask for help on my very first post but considering that I am utterly stumped and no one at the office can help me...well...ummm...help, please.
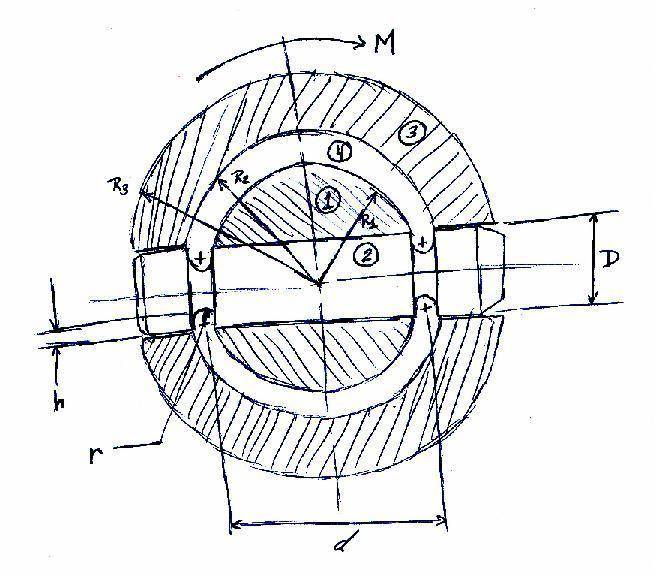
Please see the attached picture, which I hope is clear considering I handsketched it. I am working on a system that contains 4 main components, each of the components is labeled in the sketch with a circled number.

The set-up is that for all intents and purposes, Component 1 is fixed and cannot rotate or translate. Component 3 is subjected to a moment/torque, which I defined as M. Component 2 is the connecting coupling pin that holds everything together. Component 4 is just acting as a bushing/spacer and does not interact with Component 2 at all.
Components 1, 3, and 4 are all concentric.
The nomenclature that I've defined so far is as follows:
My problem is that I am trying to accurately predict the stresses in the U-grooves of the pin formulaically such that the answer I get from an equation (or equations) matches my FEA results. Sadly, this is not the case so far. Ideally, I want to create an Excel spreadsheet so I can just change the values of h and r for whatever loading I need them to hold.
2. Homework Equations ?
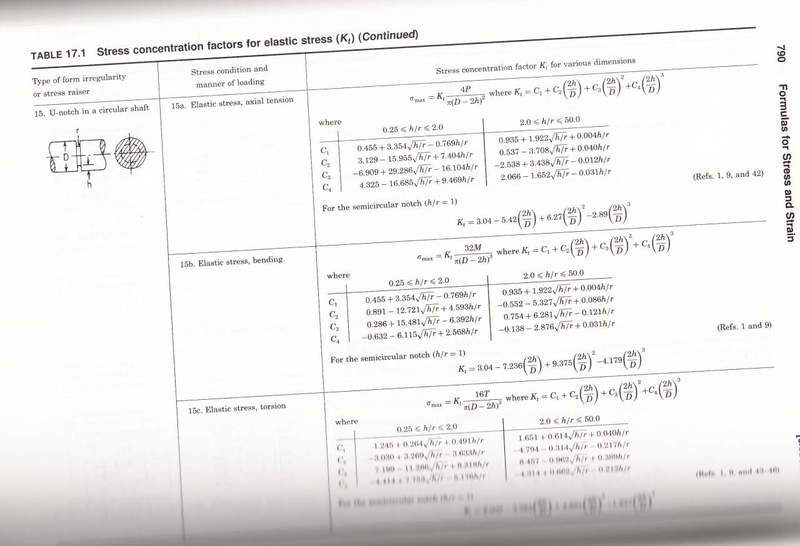
Well, that's a good question. Initially, I thought this was a double shear problem; however, once I realized there was a sizable gap between Components 1 and 3, bending stress would have to enter the picture. I think that at least one of the equations that I will have to use comes from Roark's Formulas for stress concentration. Below is the picture I attached and I am specifically looking at the equations in Box 15b.

Please see Part 2 of the template for this topic. I'm also thinking that if my FEA results and hand calculations are to match up, shear stress and the calculation for equivalent stress are going to enter the picture.
In short, this has been driving me crazy all day and I need help trying to figure out how to approach this problem.
Hi everyone, I am RagingCalm, a mechanical design engineer. I hate to ask for help on my very first post but considering that I am utterly stumped and no one at the office can help me...well...ummm...help, please.
Homework Statement
Please see the attached picture, which I hope is clear considering I handsketched it. I am working on a system that contains 4 main components, each of the components is labeled in the sketch with a circled number.
- Component 1: A 304 stainless steel cylinder with a hole drilled through it. The hole is large enough to fit component 2, a coupling pin, through it with a tight tolerance of around .001".
- Component 2: A 304 stainless steel pin with 2 U-grooves carved into it. These grooves are designed to break, if need be to protect the far more expensive Components 1 and 3. The U-grooves for all intents and purposes, are identical to one another.
- Component 3: A 304 stainless steel hollow cylinder, which also has a tightly toleranced hole for Component 2.
- Component 4: A hollow cylinder, bronze bushing designed to simply separate Components 1 and 3--to keep them from crashing into one another. The tolerancing is very tight at a total of .001".
The set-up is that for all intents and purposes, Component 1 is fixed and cannot rotate or translate. Component 3 is subjected to a moment/torque, which I defined as M. Component 2 is the connecting coupling pin that holds everything together. Component 4 is just acting as a bushing/spacer and does not interact with Component 2 at all.
Components 1, 3, and 4 are all concentric.
The nomenclature that I've defined so far is as follows:
- R1: the radius of Component 1 and the inner radius of Component 4.
- R2: the inside radius of Component 3 and the outside radius of Component 4.
- R3: the outer radius of Component 3.
- D: the diameter of the hole and of the pin (Component 2). For all intents and purposes, I am treating them as the same dimension. The same hole goes through Components 1 and 3.
- r: the radius of the U-groove in Component 2.
- h: the distance from the outermost surface of Component 2, to the bottom of the U-groove.
- d: the center-to-center distance between the 2 U-grooves. It is symmetric about the centerpoint of the system.
- M: the Moment applied to Component 3 by a motor gearbox. The moment causes Component 3 to rotate about the axis going into the picture via the righthand rule.
My problem is that I am trying to accurately predict the stresses in the U-grooves of the pin formulaically such that the answer I get from an equation (or equations) matches my FEA results. Sadly, this is not the case so far. Ideally, I want to create an Excel spreadsheet so I can just change the values of h and r for whatever loading I need them to hold.
2. Homework Equations ?
Well, that's a good question. Initially, I thought this was a double shear problem; however, once I realized there was a sizable gap between Components 1 and 3, bending stress would have to enter the picture. I think that at least one of the equations that I will have to use comes from Roark's Formulas for stress concentration. Below is the picture I attached and I am specifically looking at the equations in Box 15b.
The Attempt at a Solution
Please see Part 2 of the template for this topic. I'm also thinking that if my FEA results and hand calculations are to match up, shear stress and the calculation for equivalent stress are going to enter the picture.
In short, this has been driving me crazy all day and I need help trying to figure out how to approach this problem.