Checking a component for a lathe slideway for straightness

Click For Summary

Discussion Overview

The discussion centers around the methodology for checking the straightness of a component for a lathe slideway using an autocollimator and a reflector carriage. Participants are addressing specific tasks related to data collection, analysis, and interpretation of results, including filling out a table, plotting a graph, and evaluating the suitability of the machine tool based on the findings.

Discussion Character

  • Homework-related
  • Technical explanation

Main Points Raised

  • One participant describes the procedure for obtaining autocollimator readings, emphasizing the arrangement of instruments and the method of recording measurements.
  • Another participant requests the original poster to fill in the table and provide calculations to facilitate further assistance.
  • A later reply reiterates the need for the table to be completed and encourages the original poster to show their work for better guidance.
  • Some participants express confusion about the task and seek clarification on how to proceed with the analysis and calculations.
  • Solutions have been attached by other participants, but the context of these solutions is unclear without the original data being provided.

Areas of Agreement / Disagreement

Participants generally agree on the need for the original poster to complete the table and provide calculations before further assistance can be given. There is no consensus on the specific solutions or methodologies, as the original data is not fully presented.

Contextual Notes

Limitations include the absence of filled tables and calculations, which are necessary for a complete understanding of the problem and for evaluating the suitability of the machine tool based on the autocollimator results.

Who May Find This Useful

This discussion may be useful for students or individuals working on similar homework problems related to precision measurement in engineering contexts, particularly those involving autocollimators and machine tool specifications.

Urika
Messages
8
Reaction score
2
Homework Statement
MANUFACTURE & MATERIALS
Relevant Equations
None
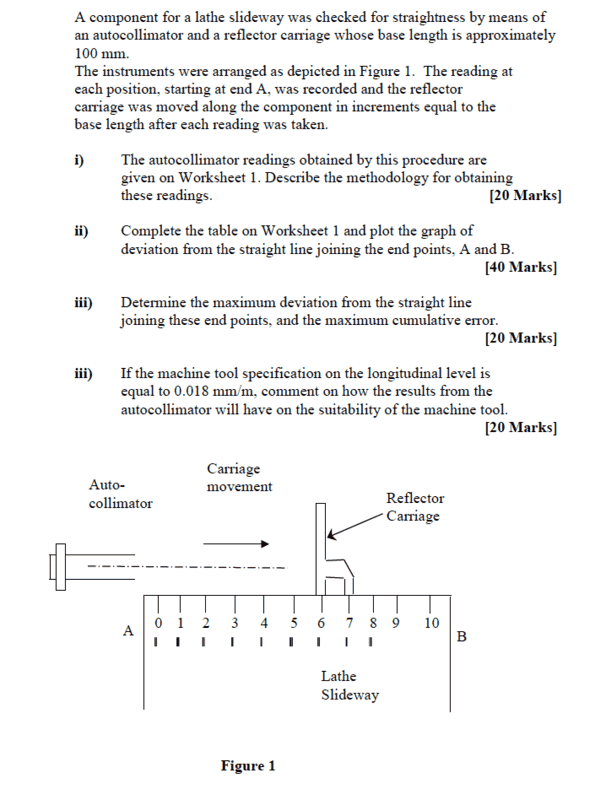
SCREENSHOT OF FIGURE ATTACHED!

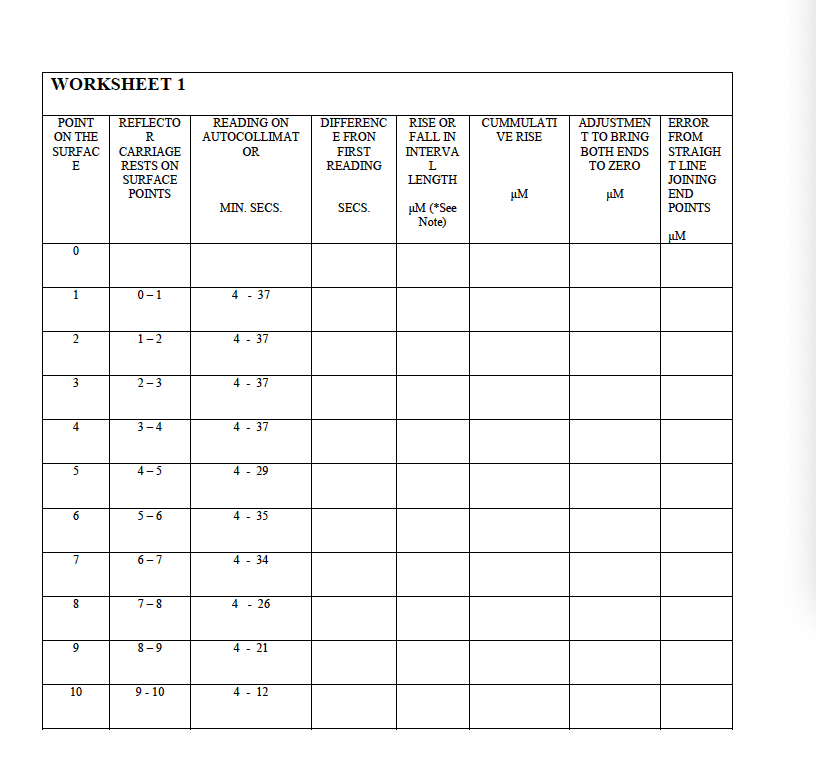
A component for a lathe slideway was checked for straightness by means of an autocollimator and a reflector carriage whose base length is approximately 100 mm.The instruments were arranged as depicted in Figure 1. The reading at each position, starting at end A, was recorded and the reflector carriage was moved along the component in increments equal to the base length after each reading was taken.i) The autocollimator readings obtained by this procedure are given on Worksheet 1. Describe the methodology for obtaining these readings.

ii) Complete the table on Worksheet 1 and plot the graph of deviation from the straight line joining the end points, A and B.

iii) Determine the maximum deviation from the straight line joining these end points, and the maximum cumulative error.
iii) If the machine tool specification on the longitudinal level is equal to 0.018 mm/m, comment on how the results from the autocollimator will have on the suitability of the machine tool.https://www.physicsforums.com/attachments/274451
Screenshot 2020-12-16 at 5.15.08 AM.png
Screenshot 2020-12-16 at 5.15.17 AM.png
https://www.physicsforums.com/attachments/274451
 
Last edited:
Physics news on Phys.org
Welcome to PhysicsForums.

It looks like you still need to fill in the table and show your calculations. Can you do that so we can check your work? Thanks.
 
  • Like
Likes   Reactions: Urika
berkeman said:
Welcome to PhysicsForums.

It looks like you still need to fill in the table and show your calculations. Can you do that so we can check your work? Thanks.

I need help on how to go about it. Please explain me a bit, I'll do it and then you can check.
 
SCREENSHOT OF FIGURE ATTACHED! Pls help me I am very confused

A component for a lathe slideway was checked for straightness by means of an autocollimator and a reflector carriage whose base length is approximately 100 mm.The instruments were arranged as depicted in Figure 1. The reading at each position, starting at end A, was recorded and the reflector carriage was moved along the component in increments equal to the base length after each reading was taken.i) The autocollimator readings obtained by this procedure are given on Worksheet 1. Describe the methodology for obtaining these readings.

ii) Complete the table on Worksheet 1 and plot the graph of deviation from the straight line joining the end points, A and B.

iii) Determine the maximum deviation from the straight line joining these end points, and the maximum cumulative error.
iii) If the machine tool specification on the longitudinal level is equal to 0.018 mm/m, comment on how the results from the autocollimator will have on the suitability of the machine tool..
Screenshot 2020-12-16 at 11.21.13 PM.png
Screenshot 2020-12-16 at 11.21.27 PM.png
 
Solution attached!
28506c89-0e44-47ae-805b-086aeaf1513c.jpeg
 
Solution attached
28506c89-0e44-47ae-805b-086aeaf1513c.jpeg
 
That looks to me like a partly-cropped snapshot of something pre-printed ##-## can you please, as @berkeman advised, provide the table that you showed in post #1, but with the empty cells filled in, and with model or sample expressions for the basis for how a result in a cell of a given type was obtained. Forum rules require that we see a reasonable attempt from you at your own solution, before we can say much about our specfic ideas about how we would get to a correct solution. You can click on the 'Terms' link on the footer of any page to read the PF policy on homework help.
 
  • Like
Likes   Reactions: berkeman

Similar threads

  • · Replies 3 ·
Replies
3
Views
4K
  • · Replies 0 ·
Replies
0
Views
3K
  • · Replies 1 ·
Replies
1
Views
2K
  • · Replies 2 ·
Replies
2
Views
10K
  • · Replies 1 ·
Replies
1
Views
5K
  • · Replies 3 ·
Replies
3
Views
6K
  • · Replies 3 ·
Replies
3
Views
3K
  • · Replies 2 ·
Replies
2
Views
3K
  • · Replies 2 ·
Replies
2
Views
4K