Compound lever: Best fulcrum location to increase mechanical advantage

In summary, the conversation discusses the use of compound levers to increase mechanical advantage and the impact of fulcrum location on this. The speaker presents different configurations of levers and asks for clarification on how the second lever's fulcrum placement affects mechanical advantage. The conversation concludes that regardless of the configuration, mechanical advantage is determined by the ratio of force to distance moved and the optimum lever ratio can be selected based on the load and available force.
  • #1
NewEnglander
6
0
Good morning all,

Ever since I encountered biomass brick presses I've had a renewed fascination with the use of compound levers to increase mechanical advantage. So my question is about the fulcrum location and its impact on MA.
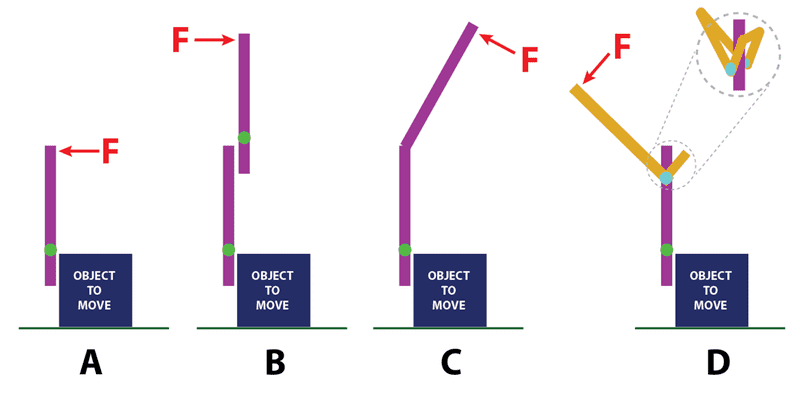
Screen_Shot_2018-06-02_at_10.54.36_AM.png


Let's say we have a simple class 1 lever A and we wish to increase the mechanical advantage of the system. We know one way to accomplish that is by increasing the lever length as I have done with C.

Another way is through the use of a compound lever as shown in B. (Let's ignore the distance the object is moved.)

The levers in A, B and C I understand. These fulcrums are mounted independent of any other.

My question is, what happens in D? If the 2nd lever's fulcrum is mounted on/through the body of the 1st lever, for the purpose of calculating MA will it behave like B or like C? And why?

At first glance, I leaned toward B. Two levers, each with its own fulcrum. But at the moment the 2nd (yellow) lever's load arm comes in contact with the 1st (purple) lever's effort arm it begins to seem more like C to me.

It's one of those times when I know there's a simple explanation and I've been unable to find/see it. Looking forward to your thoughts.
 

Attachments

  • Screen_Shot_2018-06-02_at_10.54.36_AM.png
    Screen_Shot_2018-06-02_at_10.54.36_AM.png
    10.8 KB · Views: 7,217
Last edited by a moderator:
Engineering news on Phys.org
  • #2
No matter what the configuratoin, MA is a ratio. It is the same ratio as the distance moved by the input force F to the distance moved by the "object" O. So you can draw a black box boundary around the whole thing with only F and O sticking out. Whatever is in the box is irrelevant to MA, and your cases A, B, C, and D are all alike. Determine the trajectory of F and of O and take the ratio of the distances moved.
 
  • #3
NewEnglander said:
My question is, what happens in D? If the 2nd lever's fulcrum is mounted on/through the body of the 1st lever, for the purpose of calculating MA will it behave like B or like C? And why?

At first glance, I leaned toward B. Two levers, each with its own fulcrum. But at the moment the 2nd (yellow) lever's load arm comes in contact with the 1st (purple) lever's effort arm it begins to seem more like C to me.

That is correct.

Its a shame people don't have Meccano anymore or you could easily build it and prove it to yourself.
 
  • #4
CWatters said:
That is correct.

Its a shame people don't have Meccano anymore or you could easily build it and prove it to yourself.

An app called Linkage offers similar experimentation but it's Win only and I'm not running a virtual machine or dual boot on my Macs. I did model these in SimScale, Algodoo and Fusion 360 but those apps will only allow limited FEA.

Basically, I concluded that D would perform like C so long as the 2nd lever's fulcrum was attached to the 1st lever.
 
Last edited:
  • #5
anorlunda said:
No matter what the configuratoin, MA is a ratio. It is the same ratio as the distance moved by the input force F to the distance moved by the "object" O. So you can draw a black box boundary around the whole thing with only F and O sticking out. Whatever is in the box is irrelevant to MA, and your cases A, B, C, and D are all alike. Determine the trajectory of F and of O and take the ratio of the distances moved.

I should have been more clear. I understand MA. I included the object mainly as a visual but perhaps it's more of a distraction. My main interest was in understanding whether the configuration shown in D behaves like B or like C...and it appears that it behaves like C. Thank you both very much for responding. I appreciated the insight.
 
  • #6
The ratio of the lever is an impedance matching transformer. It transforms the ratio of force to distance moved.
If you know the load to be moved and the force available, you can select the optimum lever ratio.
 
  • #7
NewEnglander said:
Good morning all,

Ever since I encountered biomass brick presses I've had a renewed fascination with the use of compound levers to increase mechanical advantage. So my question is about the fulcrum location and its impact on MA.

View attachment 226519

Let's say we have a simple class 1 lever A and we wish to increase the mechanical advantage of the system. We know one way to accomplish that is by increasing the lever length as I have done with C.

Another way is through the use of a compound lever as shown in B. (Let's ignore the distance the object is moved.)

The levers in A, B and C I understand. These fulcrums are mounted independent of any other.

My question is, what happens in D? If the 2nd lever's fulcrum is mounted on/through the body of the 1st lever, for the purpose of calculating MA will it behave like B or like C? And why?

At first glance, I leaned toward B. Two levers, each with its own fulcrum. But at the moment the 2nd (yellow) lever's load arm comes in contact with the 1st (purple) lever's effort arm it begins to seem more like C to me.

It's one of those times when I know there's a simple explanation and I've been unable to find/see it. Looking forward to your thoughts.
There is something you appear to be missing: Without the specific lever lengths and ratios you cannot determine which develops the most power. But you can determine that the more axles you have the more mechanical losses are developed.

I am somewhat puzzled by Baluncore's use of the word "impedance" since as an electronics engineer I am only used to seeing its use in electronic or sound conducting principles. Impedance comes from the word "impede" or to hold back. I suppose in a very general way you could say that this is impedance matching alla "Give me a lever long enough and I could move the Earth." (Archimedes)
 
  • #8
Tom Kunich said:
There is something you appear to be missing: Without the specific lever lengths and ratios you cannot determine which develops the most power. But you can determine that the more axles you have the more mechanical losses are developed.

I am somewhat puzzled by Baluncore's use of the word "impedance" since as an electronics engineer I am only used to seeing its use in electronic or sound conducting principles. Impedance comes from the word "impede" or to hold back. I suppose in a very general way you could say that this is impedance matching alla "Give me a lever long enough and I could move the Earth." (Archimedes)

Hi Tom,

I assumed Baluncore was referring to mechanical impedance...in this context it's basically a techie way of saying size the lever to achieve the desired result with the available force.

I think folks got hung up on specifics (lever lengths) whereas I was most interested in the behavior of the levers. I was asking if the combination of levers labeled D in my diagram would behave more like B or like C for the purpose of comparison. After reading some of the comments, and revisiting some of my earlier thoughts, I concluded that D would behave like C.
 
Last edited:
  • #9
Mechanical Advantage is only the force multiplication component.
There is also a proportionate reduction in distance moved.

The product of force by distance moved is energy, which is work done.
Power is the rate of flow of energy. It involves time.

The ratio of force to distance is “impedance” in the same way that volts / amps = ohms.
When voltage is present, without current flow, there is no energy transferred.
When a force is present, without movement, there is no energy transferred.

Your arm has an optimum, or maximum product of load by distance.
You need sufficient MA to be able to move the load with the force available.
Ideally you will match the impedance of your arm to the impedance of the load.

Maximising MA is not good in itself, because the load will not move.
It is better to optimise the impedance matching, by adjusting the MA.
 
  • #10
NewEnglander said:
Hi Tom,

I assumed Baluncore was referring to mechanical impedance...in this context it's basically a techie way of saying size the lever to achieve the desired result with the available force.

I think folks got hung up on specifics (lever lengths) whereas I was most interested in the behavior of the levers. I was asking if the combination of levers labeled D in my diagram would behave more like B or like C for the purpose of comparison. After reading some of the comments, and revisiting some of my earlier thoughts, I concluded that D would behave like C.
Wouldn't you think that force multiplication of D would more match B since in both cases the travel of the levers is short. Though C allows you slightly more travel than B. The lever travel of C is quite long. A and C appear to be the same save for something like 4 times the force for four times the travel.
 
  • #11
NewEnglander said:
So my question is about the fulcrum location and its impact on MA.
All diagrams in post #1 show the fulcrum part way along the lever, with the load at the closest end.
If you place the load at the end of the lever, you reverse the direction of movement.
If you place the fulcrum at the end of the lever you get more MA for the same length of lever.

Assume your lever in post #1 has a length of 4 from the input end to the fulcrum, then 1 to the load.
The MA will be –4.0
If you swap the position of the load and fulcrum you get MA = +5.0

A. Applies a force to the load with MA = –4.0
B. Applies a force to the load with MA = ( –4.0 )2 = +16.0
C. Lengthens the lever arm, but then requires less force with more distance of input movement.
D. Again lengthens the lever arm, as there is still only one fulcrum.
 
  • #12
Baluncore said:
All diagrams in post #1 show the fulcrum part way along the lever, with the load at the closest end.
If you place the load at the end of the lever, you reverse the direction of movement.
If you place the fulcrum at the end of the lever you get more MA for the same length of lever...

I understood how to run the calculations for A, B and C. But still, I appreciate your examples. Thank you.

Initially, I had difficulty wrapping my mind around what was going on with D. I mistakenly thought I was dealing with two fulcrums (a compound lever similar to B, with it's multiplier effect). But I finally grasped that there was really only one fulcrum when I visualized D as similar to interlocking a box end wrench into an open end wrench to extend the length of the lever arm. One of those lightbulb moments I wish had come earlier on.

I'm liking this forum already. Thank you all for being so helpful. I appreciate it.

[As an aside, Baluncore thank you for pointing out the advantage of a 2nd class lever of same length...I'll definitely keep that in mind.]
 
  • #13
Baluncore said:
All diagrams in post #1 show the fulcrum part way along the lever, with the load at the closest end.
If you place the load at the end of the lever, you reverse the direction of movement.
If you place the fulcrum at the end of the lever you get more MA for the same length of lever.

Assume your lever in post #1 has a length of 4 from the input end to the fulcrum, then 1 to the load.
The MA will be –4.0
If you swap the position of the load and fulcrum you get MA = +5.0

A. Applies a force to the load with MA = –4.0
B. Applies a force to the load with MA = ( –4.0 )2 = +16.0
C. Lengthens the lever arm, but then requires less force with more distance of input movement.
D. Again lengthens the lever arm, as there is still only one fulcrum.
I guess we are looking at it differently. I see that you have a force which you apply to the levers. This is multiplied by the length of the lever divided by the length of the short end of a class 1 lever to the long end from the fulcrum. Although in operation it would make a difference which direction the levers move, for this discussion it would be pointless to add signs.

I am in agreement with you with A. and B. As for C. and D. I explain it differently since I see that the added force is a man's arm and the added leverage increases the "load" that could be moved the same distance. D. is not a single fulcrum but a double fulcrum lever as B. is. I should add that both B. and D. move the load a shorter distance because of leverage multiplication. BTW, the tilt in the lever arm D. is a little confusing without measuring the distance of the long end to the short end since it is the length of the total lever length but the tilt modifies the actual leverage.
 
  • #14
NewEnglander said:
I understood how to run the calculations for A, B and C. But still, I appreciate your examples. Thank you.

Initially, I had difficulty wrapping my mind around what was going on with D. I mistakenly thought I was dealing with two fulcrums (a compound lever similar to B, with it's multiplier effect). But I finally grasped that there was really only one fulcrum when I visualized D as similar to interlocking a box end wrench into an open end wrench to extend the length of the lever arm. One of those lightbulb moments I wish had come earlier on.

I'm liking this forum already. Thank you all for being so helpful. I appreciate it.

[As an aside, Baluncore thank you for pointing out the advantage of a 2nd class lever of same length...I'll definitely keep that in mind.]
Well, perhaps with the picture with better resolution in front of you it appears to be a solid piece but to me it is plainly a pair of levers with a Y joint going around the bottom lever. Though not an exact representation think of a claw hammer pulling out a nail. In this case the bottom lever is the nail.
 
  • #15
Tom Kunich said:
I... D. is not a single fulcrum but a double fulcrum lever as B. is. I should add that both B. and D. move the load a shorter distance because of leverage multiplication. BTW, the tilt in the lever arm D. is a little confusing without measuring the distance of the long end to the short end since it is the length of the total lever length but the tilt modifies the actual leverage.

My fault here for not providing a clearer diagram. Sorry about that. I purposely left angles and distances out of the diagram to (I thought) focus on the way the levers behave as force is applied to them.

You've fallen into the same sort of trap as I did previously with D. At first it really does seem similar to B. However, there's one key difference. With B, the levers are completely independent of each other...a true compound lever. With D, one lever's "fulcrum" is attached to the other lever...ultimately causing it to behave like C. That is to say D is just a longer lever arm...if that makes sense.
 
  • #16
NewEnglander said:
My fault here for not providing a clearer diagram. Sorry about that. I purposely left angles and distances out of the diagram to (I thought) focus on the way the levers behave as force is applied to them.

You've fallen into the same sort of trap as I did previously with D. At first it really does seem similar to B. However, there's one key difference. With B, the levers are completely independent of each other...a true compound lever. With D, one lever's "fulcrum" is attached to the other lever...ultimately causing it to behave like C. That is to say D is just a longer lever arm...if that makes sense.
If that is the case then indeed it acts like a solid lever. However, a class 1 lever works with the distance between the lever ends and the fulcrum. This gives C considerably more leverage than D.
 
  • #17
If I understand the sketches correctly D is mechanically the same as C. In both cases the effective input lever length would be the distance from the effort fulcrum. It looks to me like the yellow lever in D rotates on an axle until the stirrup contacts the end of lever C. That doesn't change the math. In C, it doesn't matter how the input end is bent or curved, the effective length is the distance from the effort to the fulcrum.
 
  • #18
It is my assumption the forked axle leaves out the attachment points of the axles since it would block the view. However the drawing simply isn't detailed enough to tell. This makes it impossible to differentiate D from either B or C.
 

FAQ: Compound lever: Best fulcrum location to increase mechanical advantage

What is a compound lever?

A compound lever is a simple machine made up of multiple levers connected together to increase the mechanical advantage of a single lever.

What is mechanical advantage?

Mechanical advantage is the ratio of the output force to the input force in a machine.

How does the location of the fulcrum affect the mechanical advantage of a compound lever?

The location of the fulcrum is crucial in determining the mechanical advantage of a compound lever. Placing the fulcrum closer to the load will result in a higher mechanical advantage, while placing it closer to the effort will result in a lower mechanical advantage.

What is the best fulcrum location to increase mechanical advantage in a compound lever?

The best fulcrum location to increase mechanical advantage in a compound lever is as close to the load as possible, while still maintaining stability and balance in the lever.

How can the mechanical advantage of a compound lever be calculated?

The mechanical advantage of a compound lever can be calculated by dividing the distance from the fulcrum to the load by the distance from the fulcrum to the effort. This is known as the mechanical advantage ratio.

Back
Top