PF Photography: Tips, Tricks, & Photo Sharing

Click For Summary
The discussion revolves around photography tips and sharing personal experiences with capturing images. Participants offer advice on hosting photos, suggesting platforms like ImageShack and emphasizing the importance of image size to maintain thread readability. Several users share their photos, including pets and wildlife, discussing composition, focus, and post-processing techniques. There is a focus on improving image quality through tools like GIMP for editing, with discussions about color balance and white balance settings to enhance photos. Users also exchange feedback on each other's work, highlighting the importance of constructive criticism for growth in photography skills. Additionally, there are mentions of joining photography groups for more in-depth critiques and learning opportunities. The conversation touches on the challenges of capturing wildlife and the technical aspects of photography, such as aperture settings and lens choices, while fostering a supportive community for beginners and experienced photographers alike.
  • #121
neutrino said:
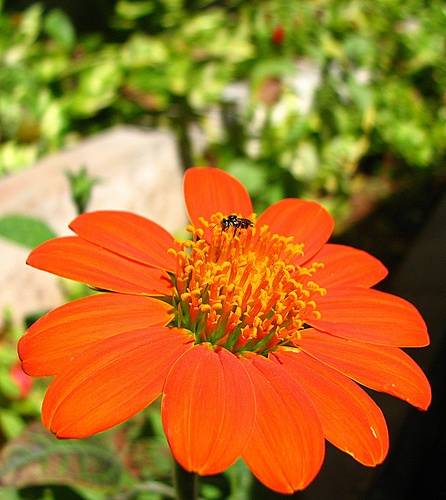
Here's another shot from the same batch as the previous photo. (please wear a pair of sunglasses before viewing the flower. :blushing: :biggrin:)

2275036578_b53d9d4a09.jpg


Crop and unsharp mask. Does any of you think the background stuff on top is distracting?
Very nice again!

I'd crop the top third just above the top petal.

Try darkening the background. I'm not as adept or skilfull as larkspur, but it would be interesting to darken the background, as if the flower was on a dark table.
 
Physics news on Phys.org
  • #122
binzing said:
Nice shots Larkspur.
Thanks binzing!
 
  • #123
larkspur said:
Playing with my light tent. Here are a few shots:
2273437934_2c367ef68b_o.jpg


2273445332_09c710a828_o.jpg


The other one is posted in the still life thread.
WOW! Those are really super images.
 
  • #124
Astronuc said:
WOW! Those are really super images.

Thanks Astro!
 
  • #126
Last edited by a moderator:
  • #127
larkspur said:
It seems the detail in the petals have been lost somewhat. Needs a tiny bit of yellow in the reds(selective color).
turbo-1 said:
If you have some post-processing software like Photoshop or The Gimp you may be able to improve the range of colors in the petals and increase the sharpness of the veins by playing with color curves or other adjustments or filters.

I'd try, but I won't know where to stop. :confused:

Edit: I am NOT good at post-processing, nor do I have the patience for tweaking over and over again... OK I'm hooked on photography, but I'm a pretty lazy Photoshopper.

That sounds like a description of me. Especially the part in bold. :biggrin:

As you say, the "tweaking over and over again" part really bugs me.
Astronuc said:
Very nice again!

I'd crop the top third just above the top petal.

Try darkening the background. I'm not as adept or skilfull as larkspur, but it would be interesting to darken the background, as if the flower was on a dark table.

Thanks, Astro. That's a nice idea about darkening the background! Doesn't it have something to do with layers and stuff? (I haven't ventured beyond the very basic techniques of post-processing.)
 
  • #128
neutrino said:
Thanks, Astro. That's a nice idea about darkening the background! Doesn't it have something to do with layers and stuff? (I haven't ventured beyond the very basic techniques of post-processing.)
Yeah, I believe it has to do with layers, but I am not proficient at editing pictures. I defer to larkspur as to the technique.

Take the plunge! I was thinking about how larkspur takes flowers and places them against dark backgrounds.
 
  • #129
Astronuc said:
Yeah, I believe it has to do with layers, but I am not proficient at editing pictures. I defer to larkspur as to the technique.

Take the plunge! I was thinking about how larkspur takes flowers and places them against dark backgrounds.
The way I do that is to put a sheet of black felt behind it when I take the shot...:smile: Don't know how to do it with photoShop yet. That would be a question for one of those forums I listed in an earlier post.
The selective color is an easy one but I need PS in front of me(I'm at work now) to step by step it.
 
  • #131
Astronuc said:
Nice pic vincent. It evokes a warm feeling.

Thanks man, I'm debating on whether to by a more expensive camera, i don't do much photography, but the more i play with taking pictures the more i can see myself purchasing something higher end.


turbo-1 said:
That's an interesting perspective and DOF. It works for me.

Yea, i was bored, i also have a black and white version, i'll post it when i get home. :smile:
 
  • #132
larkspur said:
The way I do that is to put a sheet of black felt behind it when I take the shot...:smile: Don't know how to do it with photoShop yet. That would be a question for one of those forums I listed in an earlier post.
The selective color is an easy one but I need PS in front of me(I'm at work now) to step by step it.
In PS -----Edit, Adjustments, Selective color, Yellow---lighten, Red add yellow.
 
  • #133
vincentm said:
Christmas Table setting taken at home with 6 megapixel Sanyo camera i picked up at Wal-mart.

http://img204.imageshack.us/img204/9209/sany0197ou4.th.jpg

An interesting idea an nice colors. Would be neat to do a close up of those red shoes using aperture priority wide open(lower f number).

Take lots of photos with your point and shoot before deciding on a digital SLR because once you take the plunge you will find so many more must have add ons. I have sunk lots of $$ on add'l lenses, filters, flash modules, light tent, lights...the list goes on...:cry:
 
Last edited by a moderator:
  • #134
Goddam dial-up. I'd love to post some of my best, but yeah.
 
  • #135
neutrino said:
Here's another shot from the same batch as the previous photo. (please wear a pair of sunglasses before viewing the flower. :blushing: :biggrin:)

2275036578_b53d9d4a09.jpg


Crop and unsharp mask. Does any of you think the background stuff on top is distracting?

As to darkening the background in this shot, its all layers and selection. Your flower is definitely in a different color range to the background, so use a color selection method to select most of the flower (I found the Magic Wand with a tolerance of 112 to be fine), then switch to QuickMask mode and paint in the green parts near the pistil and erase the little part of the background that is in range (use soft edges). You could also use standard selection tools with "additive selection" turned on. Switch back out when you're done to get back your selection, then go to Layer > New > Layer via Copy. On the Layers palette, switch to the Background layer and go to Layer > New Adjustment Layer > Hue/Saturation and adjust the saturation/lightness sliders until you get the darkened effect you want. Since this is a layer, the original background image is still untouched and you can keep changing the properties however you want. (If you notice glaring errors in your flower layer, you can further refine your edges by Ctrl+clicking on that layer to "select visible" then either using Select>Modify>Feather..., feathering the edge by 3 or more pixels then Select > Inverse and deleting the feathered inverse, or by manual correction using any of the selection tools (although QuickMask does a very good job of making sure your edges are not unrealistically sharp since you can use soft brushes and erasers and you are able to see your soft selection before committing to it).
 
  • #136
_Mayday_ said:
L]

Here is a photo I took a bit earlier, I am having so much trouble with my focus, I keep getting it slightly wrong, the flowers themselves may not look spectacular but I wanted a simple shot of the flower and the rain drops. :smile:

http://img444.imageshack.us/img444/1827/flower10in4.jpg
[/URL]

Please tell me a little about your method for this photo. Was the camera set on Program, Aperture priority, Shutter priority etc? I have found that for still life a tripod is a must use for pin sharp focus. Also, use the shutter delay option(self timer) or shutter release cable so no hands are on the camera when the the shot is taken. Play around with the manual focus and see if you can get more reliable results. When shooting with a wide aperture get the camera as close to the subject as possible to get the best background blur. I love the colors Fuji cameras are able to produce.
 
Last edited by a moderator:
  • #137
neutrino said:
Here's one from Sunday last.

2267252946_f515aef895.jpg


I just increased the contrast a little bit and used unsharp mask. I didn't crop the picture, since I couldn't get the nice portrait dimensions with just the flower.

And yeah, the focus is a bit away from the centre of the flower. :(
This is a nice shot but you are right it would be better if the whole flower were in focus for this angle. What f stop was used?
 
  • #138
binzing said:
Goddam dial-up. I'd love to post some of my best, but yeah.
If you ever get them uploaded I would love to see them!
 
  • #139
larkspur said:
In PS -----Edit, Adjustments, Selective color, Yellow---lighten, Red add yellow.

slider142 said:
As to darkening the background in this shot, its all layers and selection. Your flower is definitely in a different color range to the background, so use a color selection method to select most of the flower (I found the Magic Wand with a tolerance of 112 to be fine), then switch to QuickMask mode and paint in the green parts near the pistil and erase the little part of the background that is in range (use soft edges). You could also use standard selection tools with "additive selection" turned on. Switch back out when you're done to get back your selection, then go to Layer > New > Layer via Copy. On the Layers palette, switch to the Background layer and go to Layer > New Adjustment Layer > Hue/Saturation and adjust the saturation/lightness sliders until you get the darkened effect you want. Since this is a layer, the original background image is still untouched and you can keep changing the properties however you want. (If you notice glaring errors in your flower layer, you can further refine your edges by Ctrl+clicking on that layer to "select visible" then either using Select>Modify>Feather..., feathering the edge by 3 or more pixels then Select > Inverse and deleting the feathered inverse, or by manual correction using any of the selection tools (although QuickMask does a very good job of making sure your edges are not unrealistically sharp since you can use soft brushes and erasers and you are able to see your soft selection before committing to it).

Thank you very much. Now I've just got to translate those instructions to the GIMP. :)

larkspur said:
This is a nice shot but you are right it would be better if the whole flower were in focus for this angle. What f stop was used?

F3.2
 
  • #140
neutrino said:
Thank you very much. Now I've just got to translate those instructions to the GIMP. :)


F3.2

http://www.mydamnchannel.com/Big_Fat_Brain/You_Suck_at_Photoshop/YouSuckatPhotoshop1_398.aspx" :biggrin:
 
Last edited by a moderator:
  • #141
Photo shoot

Aspen was somewhat cooperative in the modified light tent this afternoon.
2289488450_261aa316ac.jpg
 
  • #142
I shot this at a zoo the other day:

monkeys.JPG


Could be more crisp but it was 432 mm SLR equivalent, available light, 100 asa f5.6 1/60 sec. Try that without stabilisation.
 
Last edited:
  • #143
Andre said:
I shot this at a zoo the other day:

Could be more crisp but it was 432 mm SLR equivalent, available light, 100 asa f5.6 1/60 sec. Try that without stabilisation.

funny hair do's...but seriously I've done photography with 1/10th shutterspeed so 1/60'th is nothing... I just lean on the glass and hope it doesn't break XD
 
  • #144
Andre said:
I shot this at a zoo the other day:

monkeys.JPG


Could be more crisp but it was 432 mm SLR equivalent, available light, 100 asa f5.6 1/60 sec. Try that without stabilisation.
Cool looking monkeys Andre. Thanks for sharing.
 
  • #145
I love the monkeys! But someone does need to talk to the hairdressers. A little lipstick wouldn't hurt either.
 
  • #146
~christina~ said:
funny hair do's...but seriously I've done photography with 1/10th shutterspeed so 1/60'th is nothing... I just lean on the glass and hope it doesn't break XD

Right, but the problem is the focal length. With the old SLR the rule of thumb was that shutter speed should be at least equal to the inverse of the focal length. So 50mm lens = 1/60 sec. 135mm lens is 1/125 shutter speed. 400mm lens is 1/500th sec. Actually it's the magnification that increases the blur. So indeed push the lens against the glass and hopefor the best.
 
  • #147
Andre said:
Right, but the problem is the focal length. With the old SLR the rule of thumb was that shutter speed should be at least equal to the inverse of the focal length. So 50mm lens = 1/60 sec. 135mm lens is 1/125 shutter speed. 400mm lens is 1/500th sec. Actually it's the magnification that increases the blur. So indeed push the lens against the glass and hopefor the best.

It's quite difficult to push the lens on the glass with a zoom lens since the lens tends to have lens creep thus the focus becomes off. :frown:

yeah and I broke that rule so many times I can't count...I was using a 55mm lens at 1/10 and even less for the moon shots I took (eclipse) [most of the time you do need to though indoors at the zoo]
and my lens' don't have image stabilization but the 300mm lens that I'm eyeing has it so It should be better.
 
Last edited:
  • #148
larkspur said:
Aspen was somewhat cooperative in the modified light tent this afternoon.
2289488450_261aa316ac.jpg

Love that...it's a magical shot!
 
  • #149
~christina~ said:
It's quite difficult to push the lens on the glass with a zoom lens since the lens tends to have lens creep thus the focus becomes off. :frown:

Actually I screwed a large tube around the lens, that is directly and ridgidly connected to the housing, not to the moving parts. It is used to screw on filters, conversion lenses and solar caps. You can push that against the window without harm.

See here
 
Last edited:
  • #150
lisab said:
Love that...it's a magical shot!
Thanks lisab!
 

Similar threads

  • · Replies 40 ·
2
Replies
40
Views
3K
  • · Replies 23 ·
Replies
23
Views
3K
  • · Replies 12 ·
Replies
12
Views
3K
  • · Replies 23 ·
Replies
23
Views
2K
  • · Replies 21 ·
Replies
21
Views
3K
  • · Replies 19 ·
Replies
19
Views
2K
  • · Replies 12 ·
Replies
12
Views
2K
Replies
22
Views
3K
  • · Replies 12 ·
Replies
12
Views
2K
  • · Replies 10 ·
Replies
10
Views
2K