Potential Mistake in Free-Body Diagram

  • Thread starter Thread starter TRB8985
  • Start date Start date
  • Tags Tags
    Normal force
Click For Summary
SUMMARY

This discussion focuses on the correct setup of free-body diagrams (FBD) for stacked blocks in physics. The user initially combined the forces acting on block B, including weights and normal forces, which led to concerns about the accuracy of their FBD representation. Feedback clarified that for accurate FBDs, internal forces should be ignored, and each block should be treated as an isolated system. The consensus emphasizes the importance of proper notation and representation to avoid confusion in more complex scenarios.

PREREQUISITES
  • Understanding of free-body diagrams (FBD)
  • Knowledge of Newton's laws of motion
  • Familiarity with forces such as weight and normal force
  • Basic skills in drawing and interpreting diagrams
NEXT STEPS
  • Study the principles of drawing accurate free-body diagrams
  • Learn about the implications of internal vs. external forces in physics
  • Explore examples of FBDs in different equilibrium scenarios
  • Practice using software tools like LaTeX for creating physics diagrams
USEFUL FOR

Students in physics, educators teaching mechanics, and anyone interested in mastering the representation of forces in static systems.

TRB8985
Messages
74
Reaction score
15
Homework Statement
No homework statement; conceptual question only.
Relevant Equations
W = mg
I had a question on the way I've set up my free-body diagrams in the past and was wondering if I've been making mistakes in the setup (despite arriving at the correct answer).

Imagine a very simple situation of stacked blocks, like the the following:
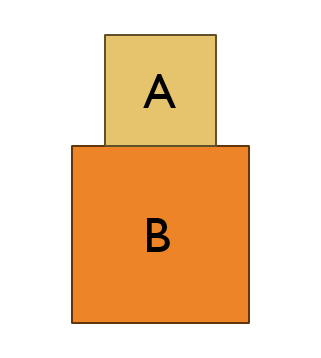
scenario.png


When drawing the free-body diagram of such a situation, previously I was combining the forces of the weights and the normal force acting on B, like this:
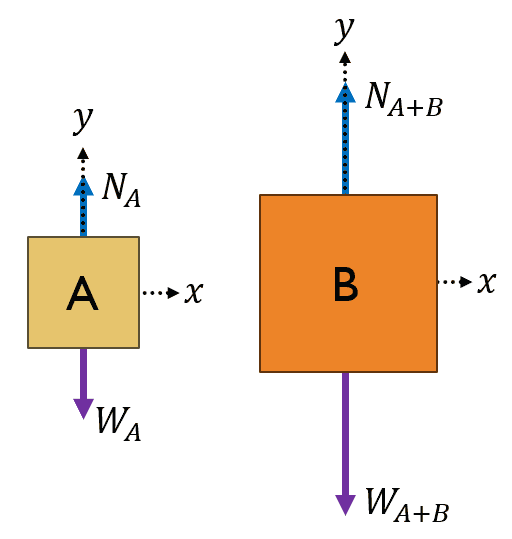
FBD.png


Here's my question: Is this equivalent to the "standard" way of drawing an FBD for this scenario as seen below?
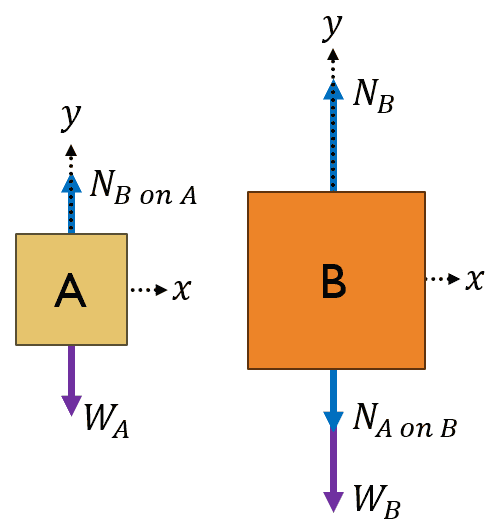
FBD2.png


My concern is that, while I was achieving the correct answer, I was being lazy in the setup/notation. Would appreciate any feedback, thanks!
 
Physics news on Phys.org
TRB8985 said:
Homework Statement: No homework statement; conceptual question only.
Relevant Equations: W = mg

I had a question on the way I've set up my free-body diagrams in the past and was wondering if I've been making mistakes in the setup (despite arriving at the correct answer).

Imagine a very simple situation of stacked blocks, like the the following:

View attachment 338891

When drawing the free-body diagram of such a situation, previously I was combining the forces of the weights and the normal force acting on B, like this:

View attachment 338892

Here's my question: Is this equivalent to the "standard" way of drawing an FBD for this scenario as seen below?

View attachment 338893

My concern is that, while I was achieving the correct answer, I was being lazy in the setup/notation. Would appreciate any feedback, thanks!
If you take ##N_{A+B}##, and ##W_{A+B}## the you haven’t actually “freed” block B from block A. They are a taken together as a single system. The diagram does not accurately represent the isolated system(s) you actually chose.
 
  • Like
Likes   Reactions: hutchphd and jbriggs444
Makes total sense and verifies my suspicion of being incorrect, thank you! Will avoid doing it that way in the future.
 
  • Like
Likes   Reactions: erobz
You might get away with it while problems are less demanding, but the inconsistency will likely cause you grief down the road if you didn’t address it. Good job for doing so.
 
  • Like
Likes   Reactions: hutchphd
Hi @TRB8985. I'd like to add this.

Assuming equilibrium (no acceleration, e.g. B resting on the ground)) then perhaps it’s worth noting the following:

For a FBD of A&B considered as a single object, we ignore internal forces. So there would be just two FBD forces: the total weight and the normal force from the ground.

For A considered alone, there are two FBD forces: its weight and the normal force of B on A.

For B considered alone, there are three FBD forces: its weight, the normal force of A on B and the normal force from the ground.

My personal preferences are to draw:
- each weight-arrow starting from the centre of gravity (approx);
- each contact force-arrow starting or ending on on the appropriate surface;
- each arrow’s length corresponding to the magnitude of the force (approx., if known);
- non-overlapping arrows.

For example my FBD for block B would be:
fbd.jpg

Edit. My diagram is not the best. The arrow for ##F_{ground~on~B}## is too short; its length should be the sum of the lengths of the 2 other arrows. And the weight arrow should start nearer B's centre (assuming B is uniform).
 
Last edited:
  • Like
Likes   Reactions: Delta2, Lnewqban, SammyS and 2 others
No worries, I understand exactly what you're trying to convey there. I had difficulty drawing them in the post LaTeX too - thankfully Powerpoint and screenshots worked nicely!

Thank you for the insight on that, appreciated.
 
  • Like
Likes   Reactions: Steve4Physics

Similar threads

  • · Replies 31 ·
2
Replies
31
Views
2K
  • · Replies 25 ·
Replies
25
Views
2K
Replies
9
Views
2K
  • · Replies 4 ·
Replies
4
Views
2K
  • · Replies 5 ·
Replies
5
Views
1K
Replies
4
Views
1K
Replies
7
Views
2K
  • · Replies 14 ·
Replies
14
Views
3K
  • · Replies 7 ·
Replies
7
Views
4K