Fixing Picture Placement Below Margin

In summary, the picture is being rendered 2 inches below the margin because of the $z$ node. Removing the $z$ node will move the picture to the top. To fix this issue, the placement of the $z$ node can be specified by placing it after the point or using options like [above]. This can be found in the TikZ 2.10 manual, chapter 14.
  • #1
Dustinsfl
2,281
5
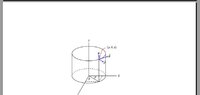
This picture is on a blank piece of paper but is rendered 2in below the margin. Why is this happening? I want it to be at the top of page right below the margin.
The $z$ node is causing the problem. If I remove the $z$ node, the picture moves back to the top. What can I do about this?
Code:
\begin{center}
\begin{tikzpicture}[scale = 1.25]
\draw (0,0) -- (0,3);
\draw (0,0) -- (2.5,0);
\draw (0,0) -- (-1,-1.7);
\draw (-1.5,0) arc (180:360:1.5cm and .5cm);
\draw[dashed] (-1.5,0) arc (180:0:1.5cm and .5cm);
\draw (-1.5,0) -- (-1.5,2);
\draw (1.5,0) -- (1.5,2);
\draw (-1.5,2) arc (180:360:1.5cm and .5cm);
\draw (-1.5,2) arc (180:0:1.5cm and .5cm);
\draw -- node {$y$} (2.1in,0);
\draw -- node {$z$} (0,2.5in);
\draw -- node {$x$} (-.86in,-1.5in);
\end{tikzpicture}
\end{center}
 
Last edited:
Physics news on Phys.org
  • #2
As you can see there is huge gap from where the 1in margin is to the start of the tikz picture
View attachment 544
 

Attachments

  • tikzissue.jpg
    tikzissue.jpg
    8.8 KB · Views: 65
  • #3
dwsmith said:
Code:
\draw (0,0) -- (0,3);
...
\draw -- node {$z$} (0,2.5in);
This is a strange way to write "z". I did not know it is possible to omit the first point in the \draw command. Apparently, the second \draw command above is equivalent to

Code:
\path (0,0) -- node {$z$} (0,2.5in);

The command \path without options does not draw anything. "The only effect is that the area occupied by the picture is (possibly) enlarged so that the path fits inside the area. To actually “do” something with the path, an option like draw or fill must be given somewhere on the path" (TikZ 2.10 manual, chapter 14). The command \draw is a contraction for \path[draw].

Next, by default when "node" is specified before the second point, the node is placed midway on the line (section 16.9). So what happens is the picture is enlarged to encompass the point (0,2.5in), but "z" is drawn only at (0,1.25in).
 
  • #4
Evgeny.Makarov said:
This is a strange way to write "z". I did not know it is possible to omit the first point in the \draw command. Apparently, the second \draw command above is equivalent to

Code:
\path (0,0) -- node {$z$} (0,2.5in);

The command \path without options does not draw anything. "The only effect is that the area occupied by the picture is (possibly) enlarged so that the path fits inside the area. To actually “do” something with the path, an option like draw or fill must be given somewhere on the path" (TikZ 2.10 manual, chapter 14). The command \draw is a contraction for \path[draw].

Next, by default when "node" is specified before the second point, the node is placed midway on the line (section 16.9). So what happens is the picture is enlarged to encompass the point (0,2.5in), but "z" is drawn only at (0,1.25in).

I am confused. What is going wrong?
 
  • #5
Because of the instruction

\draw -- node {$z$} (0,2.5in);

your picture includes the point (0,2.5in), but "z" is drawn at (0,1.25in). Thus, there is 1.25in of white space above (the center of) "z". You can see this if you add the line

\draw (current bounding box.north west) rectangle (current bounding box.south east);

before "\end{tikzpicture}". You can also replace

\draw -- node {$z$} (0,2.5in);

with

\draw (0,0) -- node {$z$} (0,2.5in);

to see that the top end of the line lies on the top edge of the bounding box and "z" is directly in the middle of that line.
 
  • #6
Evgeny.Makarov said:
Because of the instruction

\draw -- node {$z$} (0,2.5in);

your picture includes the point (0,2.5in), but "z" is drawn at (0,1.25in). Thus, there is 1.25in of white space above (the center of) "z". You can see this if you add the line

\draw (current bounding box.north west) rectangle (current bounding box.south east);

before "\end{tikzpicture}". You can also replace

\draw -- node {$z$} (0,2.5in);

with

\draw (0,0) -- node {$z$} (0,2.5in);

to see that the top end of the line lies on the top edge of the bounding box and "z" is directly in the middle of that line.

Ok I understand. I had to adjust as such to get z in the correct place though. How else can I specify it?
 
  • #7
dwsmith said:
Ok I understand. I had to adjust as such to get z in the correct place though. How else can I specify it?
Yes, I should have said this earlier. When "node {...}" is placed not between "--" and a point, but after a point, then the node is placed at that point. You can also specify options like [above] after "node". So, you can get the same result, but without the extra space above if you replace

Code:
\draw (0,0) -- (0,3);

with

Code:
\draw (0,0) -- (0,3) node[above] {$z$};

This is described in sections "Placing nodes on a curve explicitly" and "Placing nodes on a curve implicitly" (or something like that) in the manual.
 

1. Why is my picture placed below the margin?

There could be a few reasons for this. One possibility is that the picture's size is larger than the margin, causing it to be pushed down. Another reason could be that there is not enough space for the picture to fit within the margin, so it is automatically placed below.

2. How can I fix the picture placement below margin?

To fix this issue, you could try adjusting the size of the picture to fit within the margin. You can also increase the margin size to accommodate the picture. Another solution is to use the "float" property in CSS to position the picture within the margin.

3. Will fixing the picture placement affect the rest of my webpage's layout?

It depends on how you fix the issue. If you adjust the picture's size or margin, it could affect the overall layout of the webpage. However, using the "float" property in CSS should not have a significant impact on the rest of the webpage's layout.

4. Can I use any picture size with any margin size?

Technically, yes, you can use any picture size with any margin size. However, it is best to choose picture sizes and margin sizes that are proportional to each other to avoid any issues with placement.

5. Is there a way to prevent pictures from being placed below the margin?

Yes, there are a few ways to prevent this issue. One way is to use responsive design techniques, such as setting max-widths for pictures or using percentage-based margins. You can also use CSS to set a specific minimum margin size for pictures to ensure they always fit within the margin.

Similar threads

  • MATLAB, Maple, Mathematica, LaTeX
Replies
2
Views
1K
  • MATLAB, Maple, Mathematica, LaTeX
Replies
2
Views
1K
  • MATLAB, Maple, Mathematica, LaTeX
Replies
1
Views
5K
  • MATLAB, Maple, Mathematica, LaTeX
Replies
3
Views
4K
  • MATLAB, Maple, Mathematica, LaTeX
Replies
1
Views
2K
  • MATLAB, Maple, Mathematica, LaTeX
Replies
2
Views
887
  • Poll
  • General Math
Replies
1
Views
2K
Replies
1
Views
776
  • MATLAB, Maple, Mathematica, LaTeX
Replies
2
Views
4K
  • MATLAB, Maple, Mathematica, LaTeX
Replies
4
Views
2K
Back
Top