cdasjdnas
- 2
- 0
- TL;DR
- For a DIY acrylic laptop stand (made from 1 bent acrylic sheet), the dimensions need to be found in order to hold a 2kg laptop.
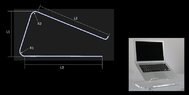
I am planning to build my own laptop stand with an acrylic sheet. The final product should look like the one in the attached image (bottom right)
Material: most laptop stands are made with 6mm acrylic thickness, hence this is what I will use. Also I already have this material at home.
I am stuck on how to calculate the necessary dimensions for the stand. The stand is in contact with the table only via the bottom side aka. the floor side. What lengths L1, L2 and L3 do I need to ensure that the stand does not fall forwards when a laptop of max. 2kg is placed on it?
I am not asking for somebody to calculate it for me. I am asking for somebody to guide me through the steps so that I can calculate it myself.
I have a rough idea on what is needed, however do not know how to start with the calculation process.
The laptop max weight is 20N which is acting downwards. Then there is the friction force acting up along the laptop stand surface where the laptop is placed on.