Multiple integral to find the contact surface area of a bolt thread

In summary: I also used a MaxMotte screw and it was very strong.The thread engagement efficiency may be more important than the error resulting from my simplification. Do not expect to get equal loading all along the threads, and as the loading builds up there will also be deflection/distortion that will modify the loading throughout the engaged length of the threads.
  • #1
Action_Man
6
0
I'm trying to determine the contact surface area of a threaded bolt so that I can make some changes to the design and maintain the same contact surface so as not to affect the performace in other ways.

This presents itself as a helix, and my initial guess was that it may be best to work this out using a two or three stage integral incorporating the radius, rotation and translation along the axis, but I can't quite get my head around how it all fits together.

My main confusion lies in the starting point. I've pus my sketches below which will hopefully help. Any direction or further understanding anyone can offer on this would be great.
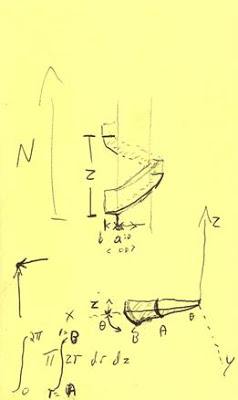
ThreadSketch.jpg
 
Engineering news on Phys.org
  • #2
hmm, no response... Am I missing something?

Did I not make my question clear, which is - What is the best way to go about deriving an acurate formula for the upward facing area of a heliacle screw-thread?

Am I posting this in the wrong forum. If you think there's somewhere else I may get a bit more of a response, could you let me know please?

Thanks
 
  • #3
Yeah, you're posting in the number theory forum. Isn't there one for engineering?
 
  • #4
I've moved this to the engineering section although "Calculus" might also have been appropriate.
 
  • #5
Why don't you try unwinding the helix such that it becomes an inclined plane and use simple geometry. Find the area for 1 full revolution and then determine the number of threads engaged.
 
  • #6
Thanks Guys.

Dick L: Are you sugesting that I simply, calculate the circumferance of the inner and outer diameter, average the two for an x dimention, then use the incline in one thread revolution as a y dimention, and work out the full thread distance by pythagerous?

Will that be accurate enough as a measure of surface area? My aim with this that I intend to change the fillet radius of a drive screw on a very large (5600T) forge press. The current OD is around 300mm diameter. When the internal fillet radius on the thread is increased though, it will reduce the amount of surface area available for contact with the nut. This component is a piece of moving machinery, not a stationary bolt, and it is directly responsible for the [power output on the press, so I need to be as accurate as possible in my calculation of surface area. hence the integral approach.

I will use this as an initial guess, but if anyone can offer any further understanding on the integral approach, please let me know.
 
  • #7
Yes, that is my suggestion, unless the need is for a high precision result. I suspect that the thread engagement efficiency may be more important than the error resulting from my simplification. Do not expect to get equal loading all along the threads, and as the loading builds up there will also be deflection/distortion that will modify the loading throughout the engaged length of the threads.

As you consider changes to the thread profile, the area of bearing will change as well, and that needs to enter your analysis.

As to estimating the thread engagement / load sharing efficiency, I'm afraid I can't give you any informed guidance.
 
  • #8
My suggestion is to take z=0, as if the helix were a stack of cones.

Because if you have z=10mm and D=300mm, the hypotenuse is 300.17mm and a resistance computation isn't as accurate. Even better: z raises the surface a little bit but orients the pressure less favourably, and both compensate.

For the same reason, the 30° slope on traditional threads increases the surfaces but needs an force increased in the same proportion because of the cos(30°) lost in force orientation.

So you can just take the surface projected perpendicularly to the screw's axis and multiply by the number of turns. Of course, the detailed profile of the thread gives an answer very different from simple formulas.

-----

As a guideline (or a final value!) for the minimum depth, you could take the biggest standard diameter (is it 64mm?) and its depth (5mm pitch?) and scale both, but then you may need a depth exceeding the standard, for which no turning tool exists.

In any case, raising the height of the nut to compensate fillet depth doesn't work properly, because the screw stretches under tension, and this loads only the first turns.

Some screws manufacturers (Max Mothes?) propose higher strength (would be equivalent to 14.9 or 16.9) by tempering low-alloyed steel at a lower temperature. Switching to X35NiCr6 or X35NiCrMo16 would make hard screws even at D=300mm; it's available from Boehler for aircraft, then it guarantees properties after unusual tempering.

If using non-standard profiles, it would be reasonable to try the screws before putting pressure at the press. Will you tell us how you tightened them?
 
  • #9
Stupid me, I've found again finally why you shouldn't worry.

Fillet depth has no influence on the contact pressure if you stick to standard profile, because as the contact width shrinks, the number of turns per unit length increases by the same amount, keeping the contact area identical.

This is why DIN and EN standards say "keep 5mm pitch above D=64mm" (poor memory, please check). Simply because it works. So you can use standard tools to turn the fillets - keeping the absolute diameter tolerance, not a relative one.

The only criterion is the length of the nut, as compared with the diameter.

-----

I believe strong steel is interesting for your big screws. For one, it reduces the core area; but better, it allows to put the smaller screws closer to an other, so you can have more screws, even smaller. As the tightening torque goes like D3, it helps.

List of Boehler's aircraft steel http://www.bohler.at/deutsch/891.php
and their 42NiCrMo6 "V124SC" guarantees 1500MPa but NOT at D=300mm:
http://www.bohler.at/deutsch/files/downloads/V124SC.pdf
forget the unaffordable Maraging. And if using stainless martensitic, it will gall, so you need a coating layer.

You could search for 35NiCrMo16 = 1.2766 or ask a forge.
 
Last edited by a moderator:
  • #10
Oops. I hadn't read properly "drive screw".

So much of my frenzy here above is useless. My apologies.

I would still take z=0 to compute the area because z increases the area but makes the pressure's direction less efficient in the same proportion.
For the same reason, I'd take the area projected perpendicularly to the axis.
And then, the integral reduces to a pair of disk areas.
 
  • #11
Wow!

Thanks, all of you :)

I'm overwealmed by the support and informative responses I've got. All useful information, despite me not doing the best job of describing my situation.

I have made some initial calculations based on the idea of un-coiling the thread contact area into a 2d trapezium. I can probably use the same basic calculations to boil it down to an integral approach later.

However, thanks for the good point aboput the contact efficiency. I will have to do some dimensional annalysis on the Nut too to confirm the actual contact surface.

Also, the fact that the first threads are subject to the highest load due to tension and compression had crossed my mind, though I am not sure how to easily account for this.

I'm not sure I understand the point about the root radius not effecting the contact area, so let me explain my situation a little more:

|\
\_\____
|
|
______|
/ /
| /

The thread protrusions on this screw are almost perpendicular to the axis of the screw itself. The internal angle on the root of the thread is about 92 degrees. There is a radius at the root, which is currently 3mm. Some FEA annalysis we have done on the design, suggests that minimum over-all stresses on the screw & thread occur when the root radius is increased to 8mm.

By increasing the root radius, I am increasing the internal diameter of the available contact area on the thread by 5mm on each side (10mm over all). I think this is where I havn't been clear, and perhapse you have assumed that I was increasing the over-all radius of the screw. I am in fact doing this, but only as a concequence of increasing the root radius on the thread profile.

Hope this is slightly clearer. Would be interested in any further insight.

Thanks again for the help
 
  • #12
Screw elongation has consequences, but these are difficult to evaluate, as this elongation must be absorbed by the elastic deformation of the thread. I suppose a finer thread is less able to spread the force over the nut height. With the usual coarse thread, books consider it's not a worry if the steel nut height equals the screw diameter. But if you overstress an assembly, you can see the first turns bent more than the last ones.

One might perhaps - ho knows - maybe - bizarre idea - mismatch the screw's pitch at rest (0.3% at 700MPa!), so it matches the nut at normal stress. But I'd prefer to make the nut's cross-area as big as the screw and hold the nut at its top if the screw is loaded at its bottom, so both deform by the same amount. The screw and the nut should even be tapered, with little area at the unloaded end. Even spread of load then, no length limit, fun.

Edit: your screw will be used at varied positions, so you can't optimize its tapering, pity. But you can taper the nut and load it at its top.

I hadn't got properly your explanation, so my reply is largely off. In case you want to increase the fillet radius to reduce stress concentration and accept for that purpose to reduce the contact area and increase the contact pressure or the screw's size:

The analysis with contact pressure ans stress concentration has already been done and optimized at standard profiles ( which include profiles tilted so the pressure surface is perpendicular to the axis, thus minimizing the expanding force at the nut as well as the tightening torque - your choice if I understand properly). And because they're already optimized, I'd stick to standard profiles. Be careful that most FEM software fails to compute stress concentration at contacts.

Also, most contacting parts, especially screws, work with loads exceeding locally the elastic limit, and work well because the material accepts it, and because the plastic deformation occurs only once to accommodate the matching parts. This is very difficult to predict, and isn't acceptable if the load varies many times - this lost some aeroplanes and let airframe designers try to prevent it with very specific methods.

To evaluate the contact area, I really believe you need only to project it perpendicularly to the desired force. That is, if pressure P works perpendicularly (thanks to slip) on the local surface element S that has the angle A with the desired force, the contribution is P*S*cos(A), and in S*cos(A) you recognize the projected area - where the angle A includes all contributions: pitch, fillet angle...

Did you consider a hollow screw? Removing some metal at the centre would lose very little area, and would help a lot to quench the steel. Ask your heat treatment contractor if this suffices to the water flow, but a ID=100mm hole in a OD=300mm cylinder slashes the thickness to 100mm, and then many cheaper steel compositions give you tempered 1000MPa: stronger than 700MPa at full D=300.
 
  • #13
The holed screw, and tapered nut (click to enlarge):
 

Attachments

  • TaperHoled.png
    TaperHoled.png
    1.1 KB · Views: 536
  • #14
Thanks for the diagram, Enthalpy - makes sense.

The screw in consideration already has a centre hole which is used for lubrication feeds. Unfortunateley, altering the diameter of the internal hole is not acceptable in this application, as it will restrict the oil feed.

The tapred nut would be a good idea if the screw were only stressed in one direction. However, this is a drive screw for a forge screw press, and is worked in both directions over the course of a forge 'blow'.

Thanks for the insight.
 

1. What is a multiple integral?

A multiple integral is a type of integral that involves solving for the area, volume, or other higher-dimensional quantities of a function over multiple variables. It is used in many fields of science and engineering, including physics, mathematics, and engineering.

2. How is a multiple integral used to find the contact surface area of a bolt thread?

The contact surface area of a bolt thread is calculated by taking a double integral of the thread profile over the surface of the thread. This involves taking into account the shape and dimensions of the thread, as well as the material properties of the bolt.

3. What is the benefit of using a multiple integral to find the contact surface area of a bolt thread?

The use of a multiple integral allows for a more accurate calculation of the contact surface area compared to other methods. It takes into account the curvature of the thread and can be adjusted for different thread profiles and sizes.

4. Are there any limitations to using a multiple integral for this calculation?

One limitation of using a multiple integral for finding the contact surface area of a bolt thread is that it assumes the thread profile is a perfect shape and does not account for any imperfections or deformations in the thread. Additionally, it may be more complex and time-consuming compared to other methods.

5. Can a multiple integral be used for other types of calculations in engineering?

Yes, multiple integrals are commonly used in engineering for various calculations such as determining volume, center of mass, and moment of inertia. They are also used in many other fields of science and mathematics, making them a versatile and powerful tool for solving complex problems.

Similar threads

  • Mechanical Engineering
Replies
2
Views
5K
  • Calculus and Beyond Homework Help
Replies
16
Views
8K
  • Mechanical Engineering
Replies
1
Views
3K
  • Calculus and Beyond Homework Help
Replies
12
Views
3K
  • Mechanical Engineering
Replies
15
Views
805
Replies
4
Views
3K
  • Calculus and Beyond Homework Help
Replies
12
Views
6K
  • Calculus and Beyond Homework Help
Replies
2
Views
8K
Replies
10
Views
2K
Back
Top