Why does my sensor show "gaps" every 16 units of resolution?

AI Thread Summary
The discussion revolves around a motor/torque sensor exhibiting measurement gaps every 16 resolution units, leading to missing torque values in the data output. Participants suggest that this issue may stem from a mismatch between the sensor's resolution and the graph's rendering resolution, potentially causing an artifact rather than an actual measurement error. It is also proposed that the problem could originate from the analog-to-digital (AD) converter, which might not be linear, resulting in gaps or overlaps in its transfer characteristic. Suggestions include performing a statistical frequency analysis on the raw data and generating a slow linear ramp in torque to identify the cause of the missing values. The consensus emphasizes the need for a thorough examination of the measurement setup and equipment to isolate the issue.
mazzo532
Messages
7
Reaction score
0
TL;DR Summary
Why does my sensor shows "gaps" every 16 units of resolution? SEE IMAGE
Hello Gentlemen,

I'm not an EE engineer, yet trying to help my colleagues. I would like to get a general feeling of what could be going on.
Probably trivial for some of you.

Background
We have a motor/torque sensor device that is measuring torque values. We get out digital signals for Torque and Position.
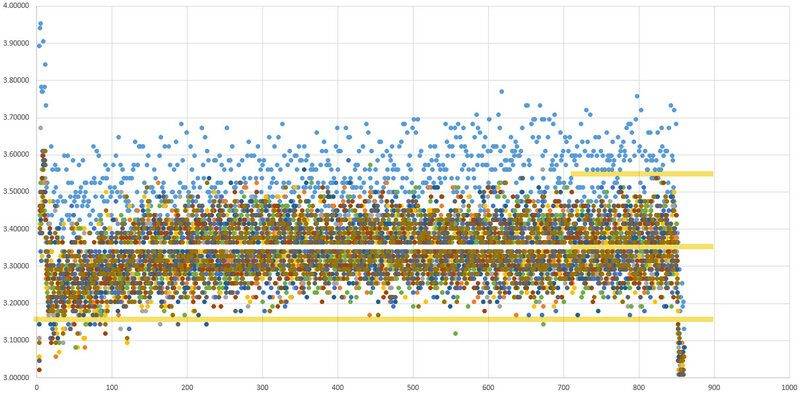
Below you can find a simple plot of a bunch of torque curves (several repetitions of the same experiment).
Plots are simply Torque vs sampling point count.

Question/issue
As you can notice from the the torque curves, there seems to be torque values that are "not used" by our sensor. Empty bands, no matter what.
I could define them as "gaps in the measurement resolution".

The only remarkable detail is that I seem to see 1 "resolution gap" every 16 resolution points exactly.

In other words, if resolution was 0.1Nm our measurement system would acts like this:
1. Can measure 0.0Nm
2. Can measure 0.1Nm
3. Can measure 0.2Nm
...
15. Can measure 1.4Nm
16. GAP --> Cannot measure 1.5Nm
...
and so on
I have the feeling this phenomenon is super trivial
What could that be?
What are good keywords to search info about such a phenomenon in the web?
I'm sorry for the basic formulation. Any hint appreciated.
Thank you in advance!
Gaps_in_Resolution.jpg
 
Engineering news on Phys.org
Look at the actual data before it is scaled for the plot. Are there gaps in the data?
It could be a beat between the quantisation of your data and the vertical axis of the scale.
 
I know nothing about EE sensors, and there are way more knowledgeable people here - so take this for what it's worth - but this pattern looks familiar to me from other contexts.

If the sensor's resolution is not the same as the graph's resolution - for example the sensor outputs 15 subdivisions per unit, and the diagram's resolution is 16 increments per unit, the renderer may be rounding the numbers, causing it to skip one.

Here's a really crude analogy with a TV volume display:
A TV's software might have 10 increments on its volume control. i.e. 10 different actual settings.
But the screen display for volume is actually 12 pixels in height.
So a volume increment is equal to 6/5ths of a pixel.
Every 5 increments, the displayed volume bar will jump by 2 instead of 1.
1644429167246.png

(I muffed it up a little but you get the idea.)The upshot is that, ostensibly, it is only an artifact of graph rendering, not an error in measurement.

Solution: play with the rendering - esp. the vertical scale - until the artifact goes away.


[Yeah, @Baluncore expressed it much more eloquently.]
 
Last edited:
  • Like
Likes Klystron, russ_watters, Tom.G and 1 other person
DaveC426913 said:
[...]

The upshot is that, ostensibly, it is only an artifact of graph rendering, not an error in measurement.

Solution: play with the rendering - esp. the vertical scale - until the artifact goes away.


[Yeah, @Baluncore expressed it much more eloquently.]

Hi Dave,

thank you for your fast feedback.
I gave a look in the meanwile: the data showed you is already my raw output from our bench (as raw as I have access to).

I just placed it in a simple Excel scatterplot and magnified to see those bands clearly.Could it be that there's a similar upscaling/rendering issue in the measurement system itself?
Is it common, to have a measurement device hooked up to a "controller" that has a different resolution --> leading to this "aliasing" kind of issue?Thanks again!
 
mazzo532 said:
Could it be that there's a similar upscaling/rendering issue in the measurement system itself?
Yes. That is almost certainly the case.
mazzo532 said:
Is it common, to have a measurement device hooked up to a "controller" that has a different resolution --> leading to this "aliasing" kind of issue?
No, because the problem would be identified and fixed. That is what you must do now. It could be a fault in an AD converter. What type of AD converter is used? Is there another system somewhere you could borrow to do an exchange test to isolate faulty equipment?

Can you attach a copy of the initial data file, before you loaded it into excel. I would like to see the data you got from the sensor so I could do a statistical frequency analysis. That might give a clue to the quantisation forbidden zones at 3.15, 3.35 and 3.55 .

Please provide a better description of your setup. A block diagram of the test bed with instrument make and model showing data flow.

Also, can you generate a long slow change in physical torque to produce a slow linear numerical ramp. Ideally two to ten identical values before the next. Those numbers can help to identify the reason for the missing codes.
 
  • Like
Likes russ_watters
Baluncore said:
It could be a fault in an AD converter. What type of AD converter is used?
I think that could be the problem. If the ADC is not linear, in as far as it has gaps or overlaps in its transfer characteristic then there will be input analogue levels that either don't appear at all or which are duplicated.
Baluncore said:
Also, can you generate a long slow change in physical torque to produce a slow linear numerical ramp. Ideally two to ten identical values before the next
There are many different possible designs for ADCs but this application seems to be pretty undemanding. The in/out curve should always be monotonic (maybe not a straight line) and with no gaps.

I'm not a big fan of 'valve changing' - a technique (old valve sets) of problem solving which used to consist of changing the valve that goes most often, then go for the next most likely etc.. Can you change the ADC conveniently?
 
sophiecentaur said:
I'm not a big fan of 'valve changing' - a technique (old valve sets) of problem solving which used to consist of changing the valve that goes most often, then go for the next most likely etc.. Can you change the ADC conveniently?
I am not suggesting a swap of an A-D chip, but a complete instrument swap to see if the fault moves with one particular instrument. I tend to design parallel systems using duplicated modules, since that enables swapping modules as a way of substitute testing.
 
  • Like
Likes Klystron and sophiecentaur
Back
Top