Simple Stress Analysis: Flat Plate with Hole

In summary, Salad is trying to figure out what analysis he can do on a part that has a .144 dimension that is to be reduced to .070. He is looking at Roark's Formulas for Stress and Strain and Shigley's to get an idea. He also mentions that the part will not be changing in weight and only the tool used to lift it is changing. He is thinking of using Tolbert and Hackett's "Experimental Investigation of Lug Stresses and Failures."
  • #1
Saladsamurai
3,020
7
Hello All,

I have a fixture that is used for lifting an engine. See attached image for the part in question. You can see in the 'front' view the hole where a pin passes through the part and the lifting lug of the engine. You can also see the loading.

We want to machine the part down such that the .144 dimension goes down to .070. I am just wondering what king of analysis I can do on this? I have a view with the assumed simplified area for analysis. Here is what I am thinking of doing:

1. Shear stress on front face. Do I use only the blue-shaded area? Or do I use the full area with some sort of consideration for the hole? If the latter, do you know where I can learn about such a model?

2. The pin makes contact with the hole along its thickness so I would need to look at the normal stress on the inside of the hole. The surface is cylindrical so I am wondering if there is a common practice for this? If so, where can I see it?


I am going through "Roark's Formulas for Stress and Strain" and "Shigley's" to see what I can come up with, but if someone with some experience could chime in, that would be great. I don't have a lot of support at my company (yet, we're hiring some experience now).

Thank you for your time.
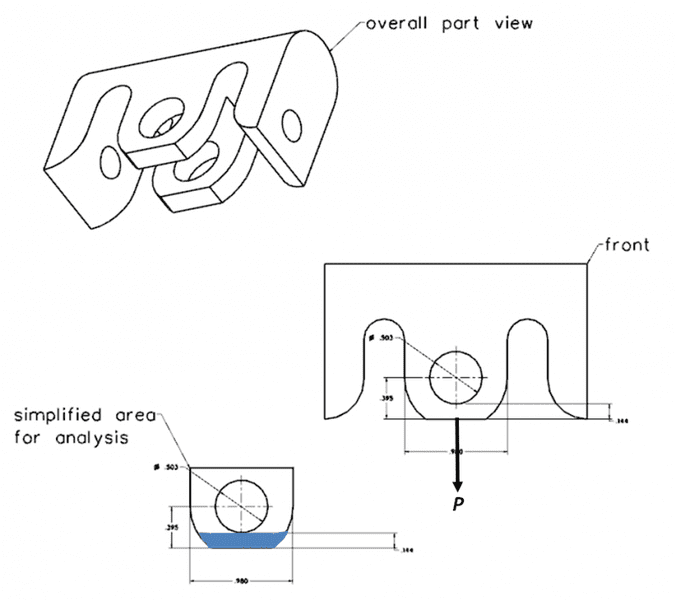


analysis_sketch_zpsb56d7462.png
 
Engineering news on Phys.org
  • #2
What reduction in max. P load are you willing to accept?
 
  • #3
The loading will not be changing. The engine will not change weight. Only the tool used to lift it is changing. I am going for FS = 2 for now.

I am currently looking at Tolbert and Hackett's "Experimental Investigation of Lug Stresses and Failures" and modeling it as a lug. Any thoughts on that approach?
 
  • #4
Hi Salad. I'm assuming this is for an industrial case, not a school project? If so, you should be aware of the standards that govern this. I'm not an expert in lifting but I know ASME BTH-1 applies in the US, especially paragraph 3-3.3 (attached). See if you can get a copy of the standard and go through that.
 

Attachments

  • DOC.pdf
    399.5 KB · Views: 2,700
  • #5
I find it hard to believe anyone in industry would make a part with corners like that and then want to thin it out more so I'm assuming this is a homework question.

Shigley should have some charts in the stress concentration/notch sensitivity chapter which you can use.
 
  • #6
Q_Goest said:
Hi Salad. I'm assuming this is for an industrial case, not a school project? If so, you should be aware of the standards that govern this. I'm not an expert in lifting but I know ASME BTH-1 applies in the US, especially paragraph 3-3.3 (attached). See if you can get a copy of the standard and go through that.

Indeed it is an industrial case. Thanks for the reference. I am going through BTH-1 now.

Jupiter6 said:
I find it hard to believe anyone in industry would make a part with corners like that and then want to thin it out more so I'm assuming this is a homework question.

Shigley should have some charts in the stress concentration/notch sensitivity chapter which you can use.

It's from 1977 and they are trying to make it work with a newly designed engine. And they want to spend as little as possible and of course they want it yesterday :-p
 
  • #7
Units , please. Plate thickness? USA units??
 
  • #8
The drawing looks like it is in inch units. OP never stated what material it was made of.
 
  • #9
PhanthomJay said:
Units , please. Plate thickness? USA units??

SteamKing said:
The drawing looks like it is in inch units. OP never stated what material it was made of.

Why does it matter about units? I'm just looking for methods here. It's inches by the way and it's about .200 in thick. But I am pretty sure the method of analysis would be independent of units wouldn't it?
 
  • #10
A plate with a distance of about 1/16 inch from the edge of the plate to the edge of the hole (or about 5/16 inch from the center of the hole to the edge of the plate) seems very flimsy to me. Most codes require a greater 'edge' distance of about 3/4 inch minimum from the 1/2 inch hole center to the plate edge. But since you are looking for method only, you need to check shear tearout stress which is a function of the load, plate thickness, and edge thickness. Bearing pressure on the plate and bolt at the pin hole depends on projected bolt diameter of the bolt and plate thickness in determining bearing area. Do a web search on "Shear Tearout Stress".
 
  • #11
PhanthomJay said:
A plate with a distance of about 1/16 inch from the edge of the plate to the edge of the hole (or about 5/16 inch from the center of the hole to the edge of the plate) seems very flimsy to me. Most codes require a greater 'edge' distance of about 3/4 inch minimum from the 1/2 inch hole center to the plate edge. But since you are looking for method only, you need to check shear tearout stress which is a function of the load, plate thickness, and edge thickness. Bearing pressure on the plate and bolt at the pin hole depends on projected bolt diameter of the bolt and plate thickness in determining bearing area. Do a web search on "Shear Tearout Stress".

Hi PhantomJay. Which codes are you referring to? I am trying to gather resources on this. I have been looking at ASME BTH-1 in section 3.3 as recommended by Q above. I used the equations for the allowable loads given by the equations (3-45), (3-49) & (3-50) in the attached sheet. The schematic for the equations is shown below.

Since they do not have the flat face as I do, I treated my lug as a curved lug but with the dimensions of my flat lug. So I believe it is a little conservative in the sense that I am calculating allowable loads for a smaller area in shear.

Schematic:

BTH-1-schematic_zpsad7bbb23.png
 

Attachments

  • ASME BTH-1 2011-page-25.pdf
    5.2 KB · Views: 1,966
  • #12
Saladsamurai said:
Hi PhantomJay. Which codes are you referring to? I am trying to gather resources on this. I have been looking at ASME BTH-1 in section 3.3 as recommended by Q above. I used the equations for the allowable loads given by the equations (3-45), (3-49) & (3-50) in the attached sheet. The schematic for the equations is shown below.

Since they do not have the flat face as I do, I treated my lug as a curved lug but with the dimensions of my flat lug. So I believe it is a little conservative in the sense that I am calculating allowable loads for a smaller area in shear.
Oh I can't open your ASME attachment but since I am a structural engineer and not an ME I am not familiar with that spec anyway so maybe one of the other responders can help. I (sometimes) use the AISC steel code, which specifies minimum edge distances from the center of the hole to the edge of the plate, there are several different formulas to check to see which governs, but the minimum might be in the order of 1.5 times the hole diameter, sometimes I just go from memory, which means a half inch diameter hole should be centered about 3/4 inch from the edge, maybe the ME's have different minimums. But I suppose if the load P is small enough, maybe you can cheat on the edge distance, but I wouldn't...
Now anyway, to calculate shear tearout stress, I would take the load, P, and divide it by 2 since the bolt is in double shear, to get the load on each end plate. Then divide that load by 2 again since there are 2 shear planes, each with an area of e*t , where e is the distance from the center of the hole to the edge, and t is the thickness of the plate. So, we have for shear stress: [itex]\tau = P/4et [/itex].
What does an engine weigh, 1000 pounds or so? Throw a large safety factor on it and call it say 6000 pounds . Then for P =6000 pounds, t = 0.2 inch. and e = .32 inch, solve for shear stress = 24000 psi and compare it to the ultimate allowable shear stress for your material.

But again, to place a hole so close to the edge with such a relatively thin plate is a recipe for disaster, in my opinion.
 
  • #13
Hi Jay. Thanks again for your input. I have included a screenshot of the ASME sheet below. They define the allowable load (they actually call it allowable 'strength' but it has units of Force so I call it allowable load) as the minimum of Pt (tensile load), Pb (fracture strength) and Pv (double plane shear strength).

I do agree that the design is less than ideal. But it might work. The rated load for the sling is 700 lbs and there are two of the parts shown in the OP that are carrying the engine. Here is a crude schematic of the sling. Note that ONLY the part carrying R2 is being machined down. In addition, only ONE of the 'lugs' is being machined down (as shown in the projected view). So in summary, there are 4 lugs carrying a total of 700 lbs. After solving for the reactions, I find that R2=290 lbs which is split between the 2 lugs (only one of which is machined down).

Comparing this to the max allowable load from the BTH calculations of 2400 lbf (note we are using SAE 17-4 condition H1075 which has an ultimate strength of 145 ksi and yield strength of 125 ksi).


(crude) Schematic of Engine Sling:
analysis_sketch_2_zps6dfb5129.png


ASME BTH pg 25:
BTH-1-sheet-25_zpsae01a5d9.png
 
  • #14
Well I suppose if your loads are that small and the steel is of such high strength, the stresses check out ok. However, I have seen numerous cases with greater edge distances than yours where the hole 'slots' down due to wear, vibrations, and movement of the part repeatedly over time. The minimal savings in weight may not be worth fooling with it. I wouldn't sign off on it. But maybe someone would. Would you?
 
  • #15
Saladsamurai said:
Since they do not have the flat face as I do, I treated my lug as a curved lug but with the dimensions of my flat lug. So I believe it is a little conservative in the sense that I am calculating allowable loads for a smaller area in shear.

Saladsamurai said:
... So in summary, there are 4 lugs carrying a total of 700 lbs. After solving for the reactions, I find that R2=290 lbs which is split between the 2 lugs (only one of which is machined down).

Comparing this to the max allowable load from the BTH calculations of 2400 lbf (note we are using SAE 17-4 condition H1075 which has an ultimate strength of 145 ksi and yield strength of 125 ksi).
It sounds to me like you've done the analysis correctly. The key things are to assume the worst case for thickness as you seem to have done and then look at individual loads on each portion of the lifting device. From what you're saying, the load this should be capable of is around 2400 pounds and it's only being subjected to 290 pounds. That's not much weight. Even a 1/4" threaded eye bolt can easily handle that much load and the one lug has more meat on it than that I would think, plus a higher stress allowable.

Once you feel confident that you've done the analysis correctly, you'll want to perform a load test on it. BTH-1 refers to BTH B30.20 for testing. In particular, look at para. 20-1.3.8 for testing requirements. If you think the lifting lug really has that much excess capacity, consider performing the test at a higher level than what it needs to be rated for. In other words, if it only needs to be rated for 290 pounds, but the engine weighs 700 pounds and it might be good for as much as 2400 pounds, rate the lug at a higher level (say 1000 pounds) and test it per BTH B30.20 which looks like you would need to support a test load of 1250 pounds to pass. If it can support that much weight during test, I think you should feel pretty safe. (edit: I would only rate it at the load you need so it doesn't get used at the higher rating. But test at a higher level that you still feel comfortable with.)

Create a testing document and document the results of testing as required by the codes. Take photos as if someone might get hurt in the future and you might have to prove in court what you've done to test the adequacy of the design. Maintain those documents for as long as the part is in service, or for whatever period of time is required by the codes, if any. Generally, we have an inspector sign off and a witness also sign off on these kinds of tests.
 
Last edited:

1. What is simple stress analysis?

Simple stress analysis is a method used to determine the stress and strain on a structural component, such as a flat plate, under a given load. It involves calculating the internal forces and deformations within the component and using them to determine the stress and strain at various points.

2. What is a flat plate with a hole?

A flat plate with a hole is a common structural component that is used in many applications, such as in bridges, buildings, and machinery. It is a flat, rectangular sheet of material with a circular hole or cutout in the center.

3. Why is a flat plate with a hole used in stress analysis?

A flat plate with a hole is used in stress analysis because it is a simple and common structural element that can be easily modeled and analyzed. It also allows for the study of stress concentration, which is important in determining the strength and durability of a component.

4. How is a flat plate with a hole analyzed in stress analysis?

In stress analysis, a flat plate with a hole is typically modeled using finite element analysis (FEA), which involves dividing the plate into smaller, simpler elements. The internal forces and deformations within each element are then calculated and combined to determine the stress and strain on the entire plate.

5. What are some common factors that affect the stress analysis of a flat plate with a hole?

Some common factors that can affect the stress analysis of a flat plate with a hole include the size and shape of the hole, the material properties of the plate, the type and magnitude of the applied load, and the boundary conditions of the plate.

Similar threads

  • Mechanical Engineering
Replies
1
Views
909
  • Mechanical Engineering
Replies
2
Views
1K
  • Mechanical Engineering
Replies
9
Views
1K
Replies
8
Views
4K
  • Mechanical Engineering
Replies
2
Views
901
  • Mechanical Engineering
Replies
16
Views
1K
Replies
4
Views
1K
  • Mechanical Engineering
Replies
2
Views
2K
  • Mechanical Engineering
Replies
3
Views
2K
  • Mechanical Engineering
Replies
12
Views
1K
Back
Top