How can I draw a free body diagram of a rotating wheel?

Click For Summary
SUMMARY

This discussion focuses on performing a failure analysis of an A356 Aluminum alloy wheel subjected to rotational loading, specifically analyzing stress concentrations that lead to crack formation after 1.3 million rotations under a maximum load of 650 kgf and a torque of 4600 Nm. The participants emphasize the importance of drawing a free body diagram and applying the method of sections to identify forces acting on the wheel. They recommend using Finite Element Analysis (FEA) for accurate results, with SolidWorks Premium identified as a suitable tool for this analysis. The discussion also highlights that maximum stresses may arise from cornering forces if the wheel is mounted on a motor vehicle.

PREREQUISITES
  • Understanding of free body diagrams and method of sections
  • Knowledge of stress analysis and fatigue failure in materials
  • Familiarity with Finite Element Analysis (FEA) concepts
  • Experience with SolidWorks Premium software
NEXT STEPS
  • Research the application of the method of sections in stress analysis
  • Learn how to perform Finite Element Analysis using SolidWorks Premium
  • Study the effects of cornering forces on wheel stress concentrations
  • Explore design modifications to mitigate stress concentrations in wheel designs
USEFUL FOR

Mechanical engineers, materials scientists, and automotive designers involved in failure analysis and stress optimization of rotating components, particularly wheels.

Gevorg
Messages
7
Reaction score
0
I am currently performing failure analysis on an A356 Aluminum alloy wheel subjected to rotational loading, with a maximum load of 650 kgf and a torque of 4600 Nm. Cracks formed in the wheel after 1.3*10^6 rotations.

My job is to perform a stress analysis to determine the regions of maximum stress concentration under such loading conditions. I figured it is first necessary to draw a free body diagram of the entire wheel and then apply the method of sections, in which I would make cuts along specific regions of the wheel and determine the forces acting on them.

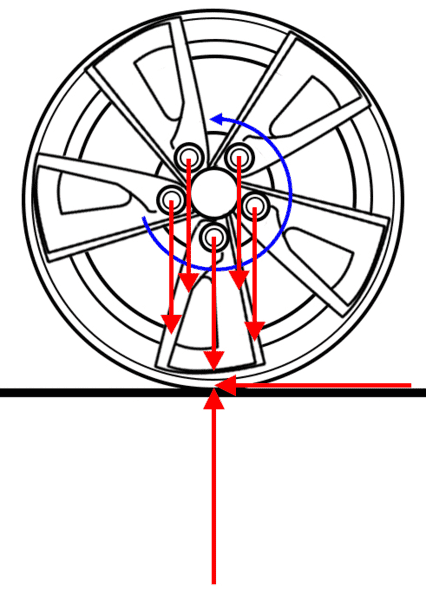
Below I've drawn a free body diagram of the wheel. The sum of the forces acting on the 5 holes should equal 650 kgf. The up pointing arrow is equal in magnitude to their sum. The applied torque, shown in blue, should be equal in magnitude to the torque generated by the left pointing force of friction in order for the wheel to rotate at a constant angular velocity.

I still feel that something is missing and can't quite put my finger on it. Could someone provide some insight?
upload_2017-11-12_18-42-27.png
 

Attachments

  • upload_2017-11-12_18-42-27.png
    upload_2017-11-12_18-42-27.png
    30.7 KB · Views: 2,209
Physics news on Phys.org
Your diagram looks good for a metal wheel running on a hard (steel or concrete) surface. The moment could be applied as five forces on the bolt holes, each force in a circumferential direction. If that wheel has a pneumatic tire on it, the vertical and tangential forces are applied around the rim.
 
After further thought, the cracks tell you the location(s) of the maximum fatigue stresses. And the total number of load cycles until cracks appear tells you the magnitude of the stresses.

If this wheel is on a motor vehicle, then the maximum stresses may come from cornering forces. That would require a completely different free body diagram.

The complexity of the wheel make hand calculations difficult, and of questionable accuracy. This problem is best solved using FEA. It does not need a high end FEA package, the SolidWorks Premium package will easily handle this job.
 
  • Like
Likes   Reactions: Gevorg
JRMichler said:
After further thought, the cracks tell you the location(s) of the maximum fatigue stresses. And the total number of load cycles until cracks appear tells you the magnitude of the stresses.

If this wheel is on a motor vehicle, then the maximum stresses may come from cornering forces. That would require a completely different free body diagram.

The complexity of the wheel make hand calculations difficult, and of questionable accuracy. This problem is best solved using FEA. It does not need a high end FEA package, the SolidWorks Premium package will easily handle this job.

You are right, JRMichler; cracks form at the locations of maximum stress. To the best of my knowledge, the wheel was not subject to cornering forces. I unfortunately don't have any background in FEA; however, simple calculations should be enough to prove that stress concentrations occur where the cracks formed and allow me to suggest design modifications.
 

Similar threads

  • · Replies 7 ·
Replies
7
Views
2K
  • · Replies 22 ·
Replies
22
Views
5K
  • · Replies 19 ·
Replies
19
Views
2K
  • · Replies 81 ·
3
Replies
81
Views
14K
  • · Replies 14 ·
Replies
14
Views
3K
  • · Replies 2 ·
Replies
2
Views
2K
  • · Replies 4 ·
Replies
4
Views
1K
  • · Replies 6 ·
Replies
6
Views
3K
  • · Replies 29 ·
Replies
29
Views
8K
  • · Replies 5 ·
Replies
5
Views
7K