- #1
- 3,374
- 2,601
The Little Rocket That Could
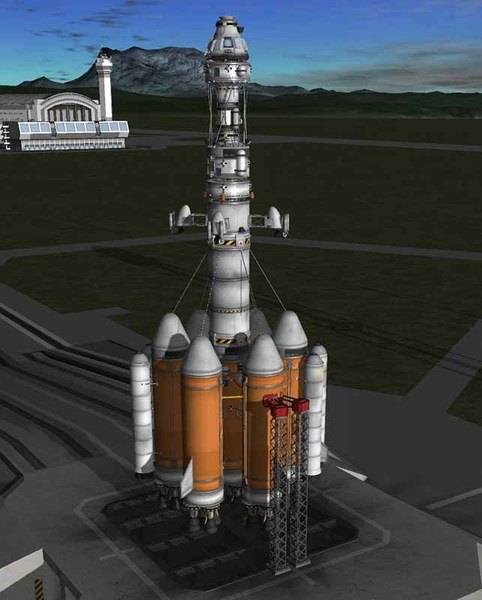
[Figure 1. Check this out.]
This post illustrates an example of KSP rocket design. The following are the rocket's design goals:
Pros:
Mid/upper stage section
Figure 2. shows the upper stage of the rocket. This consists of the two parts really, the lander module and the command/service module. The science payload is a little tricky, since it gets shuffled between the two; it starts out on the lander module, and is later to be transferred to the command module.
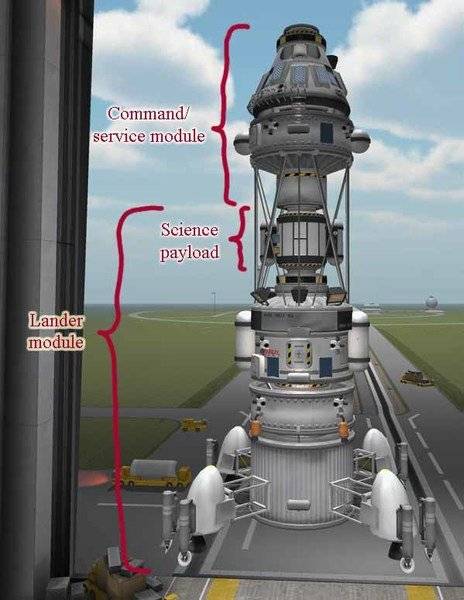
[Figure 2. Upper stage of the rocket. This is the stuff we wish to get in close proximity to the Mun.]
When designing the rocket, start with the mission's end, and then work backwards. Since this ship is broken into two parts, it's slightly more complicated, but I'll start with the command module since that will be returning to Kerbin.
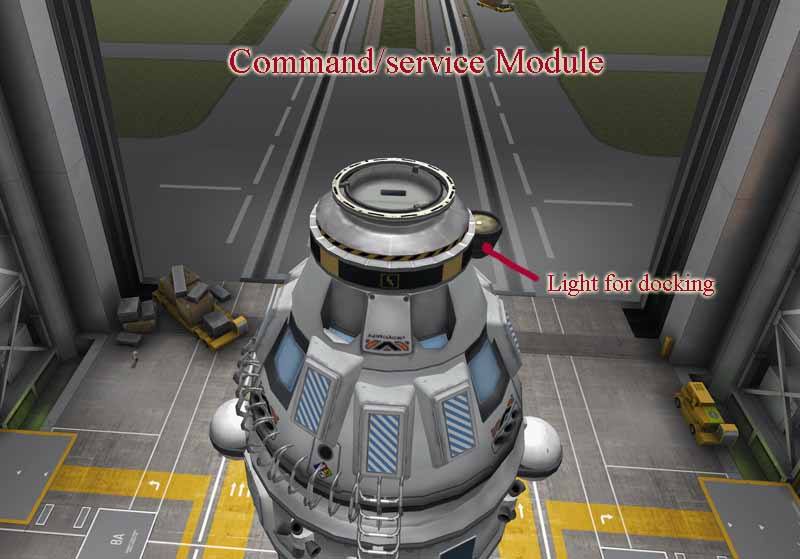
[Figure 3. Command/service module, top view. The command module is based on the Mk1-2 Command Pod.]
Notice the docking port on top (Figure 3). That's how it should look when attached to the command pod (more on that later). Figure 4 details the parts.
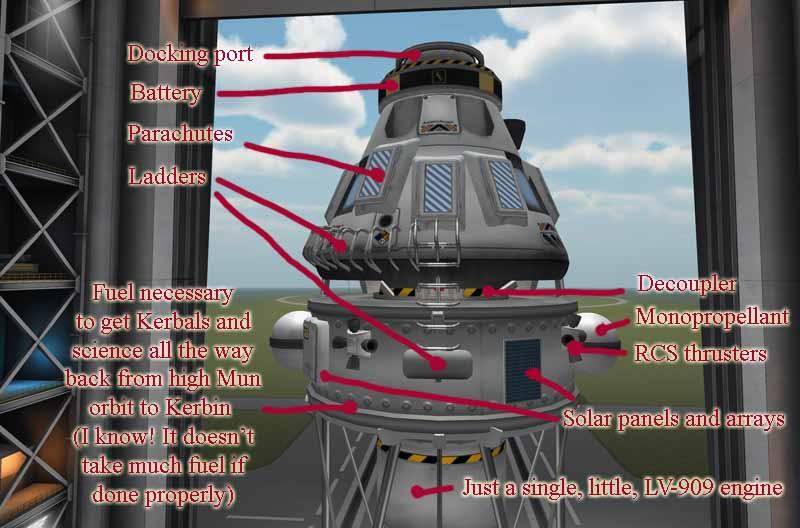
[Figure 4. Command/service module.]
Figures 5 and 6 show and detail the lander module.
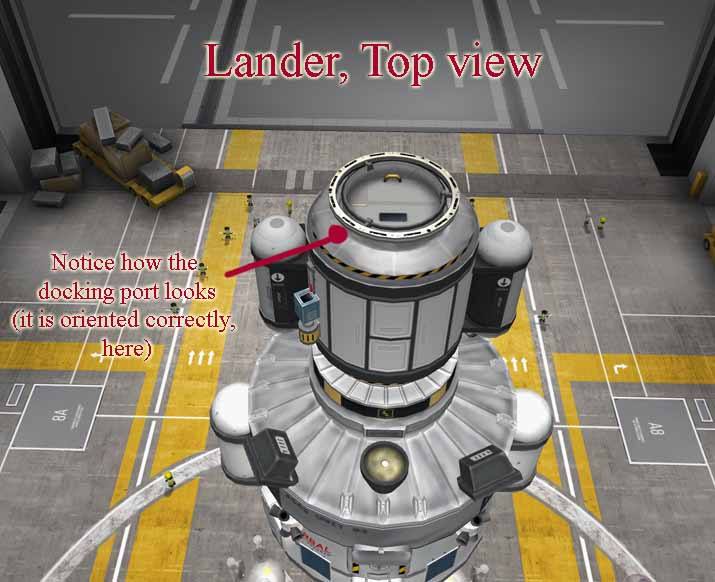
[Figure 5. Lander module, top view.]
I make note of the docking ports because it's really not clear in the game's instructions which side is the docking side and which side permanently attaches to the rocket. I've had to de-orbit an entire space station because I accidentally put the docking ports on backwards. If placed correctly, you should see a black line and some sort of metal looking handle thing. If you see a yellow triangle, you've got it on backwards. This is true for the regular sized, Clamp-O-Tron Docking Port, and the larger, "Senior" version. (For the smaller, "junior" version refer to the regular sized version, since they share the same basic shape).
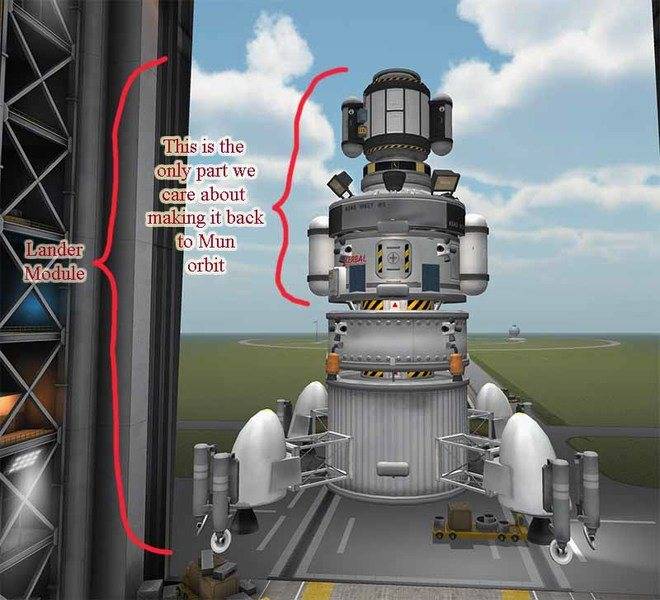
[Figure 6. Lander module.]
Let's break that down into smaller pieces. Recall that when designing a craft, work backwards. Since we've already discussed the vessel getting back to Kerbin (from the Mun's high orbit), let's discuss the part of the lander that needs to dock with the command/service module. This core of the lander is shown in Figure 7.
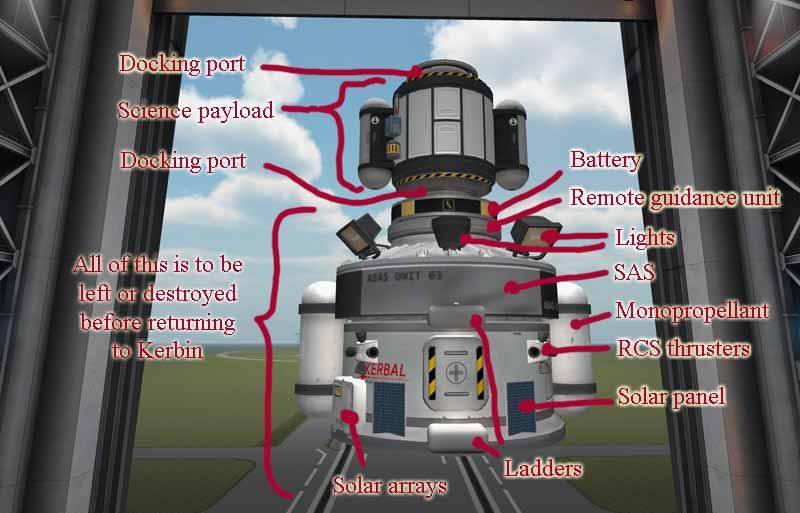
[Figure 7. Lander core. The lander core is based around the Mk2 Lander-can.]
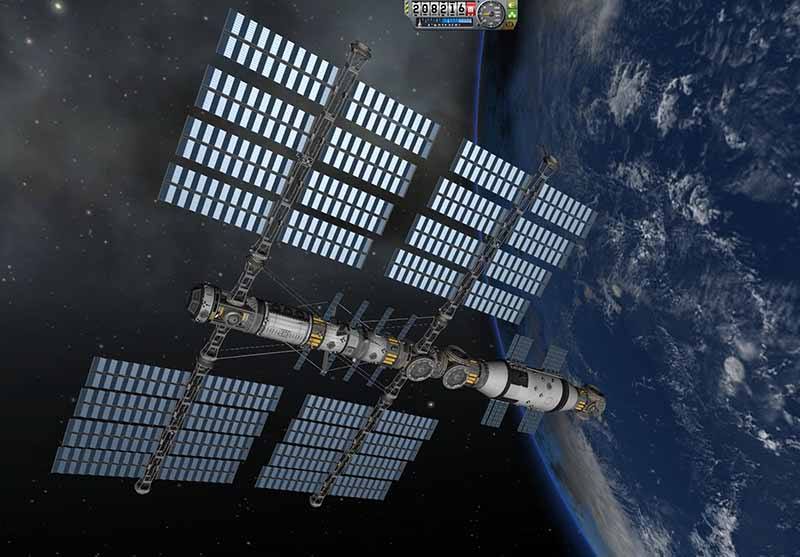
[Figure 8. Kerbin Station, but that's another story.]
Back to our design. So now we've designed the ship to go from low Munar orbit, all the way back to Kerbin. Now we need to design what's needed to get off the Mun's surface, and at least into the Mun's orbit. That's shown in Figure 9.
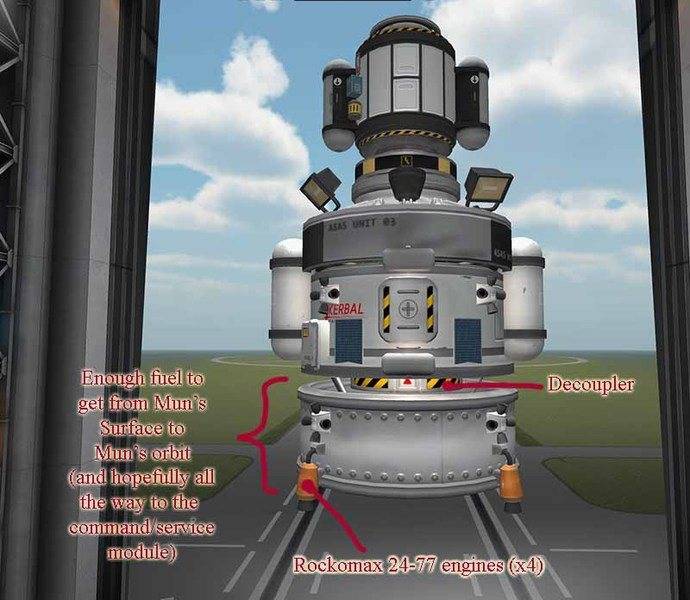
Figure 9. Munar launch engines and fuel tank]
Notice that there is decoupler involved. If all works out well, we won't even use it. It is there just in case we run out of fuel and resort to RCS thrusters. Dropping the tank reduces mass. Reducing mass increases acceleration for a given force.
Now we need the capability de-orbit and land on the Mun. We can't use atmospheric breaking, so all the fuel necessary to de-orbit and land, we need to bring with us. That equipment is shown in Figure 10.
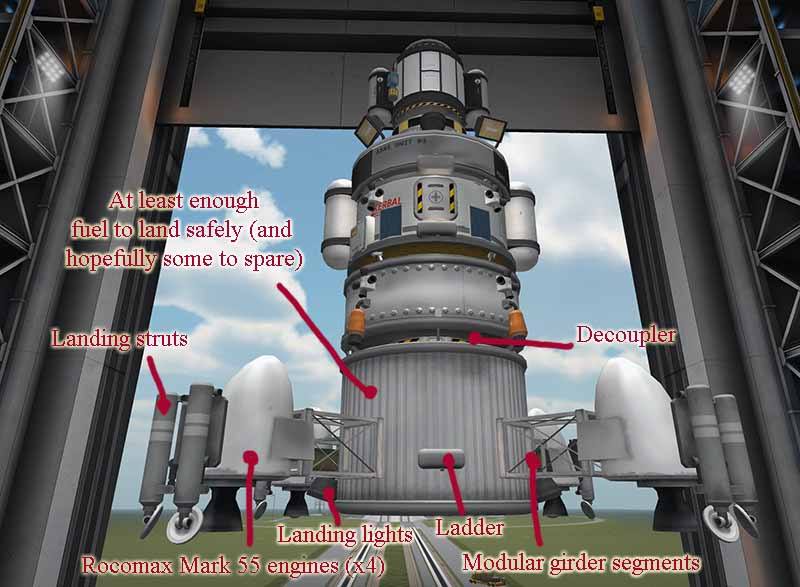
[Figure 10. Mun landing tank and equipment.]
So now we need to design necessary components to get from Kerbin's orbit to the Mun. That's described in Figure 11.
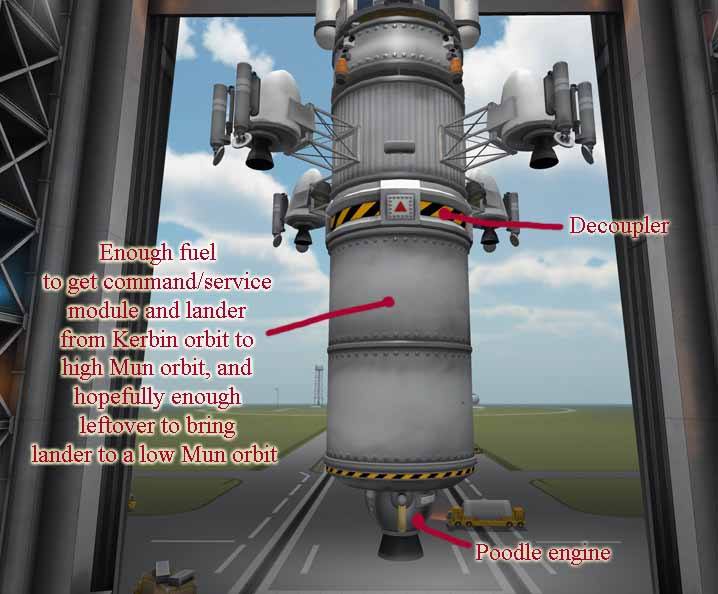
[Figure 11. Rocket, mid-stage.]
The purpose of the mid-stage is as follows:
So now we're ready to build the launch vehicle.
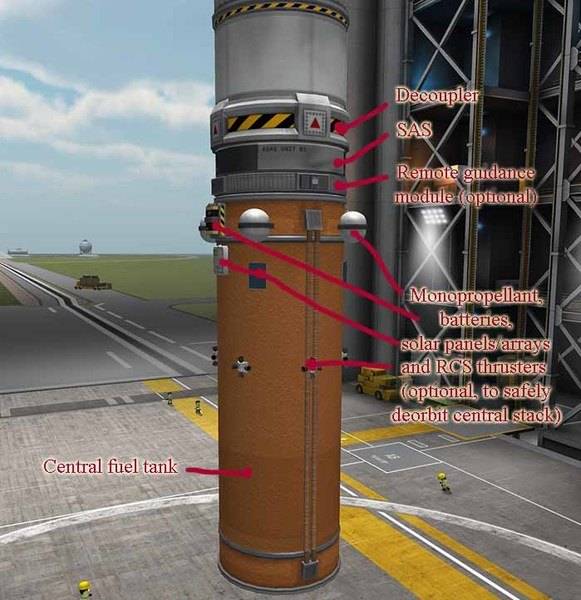
[Figure 12. Launch vehicle, center tank]
All the extra stuff in Figure 12 is optional. This tank and its engines (more below) will almost assuredly reach orbit. Which means if there is no way to de-orbit it, it's going to get left as orbiting space junk.
If you haven't unlocked parts such as the remote guidance unit, there are other options. (a) Before bringing the rocket's periapsis up to above 70,000 m, separate from the stage whether or not it has any fuel left. You might need to "fly" it later from the tracking station, because KSP seems to presently ignore atmospheric drag unless the thing in question is being "flown." It might take awhile for the orbit to decay, but it is an option. Or, (b) leave it as space junk and clean it up later with a special space-junk-cleaning mission, once you unlock the advanced grabbing unit (AGU), and efficient engine like the atomic rocket motor. Or (c) just leave it as orbiting space junk, if you don't mind orbiting space junk.
Before moving on, allow me to describe how to build an efficient engine "cluster." Start with the smallest, Rocomax 200 sized tank.
Engine cluster section
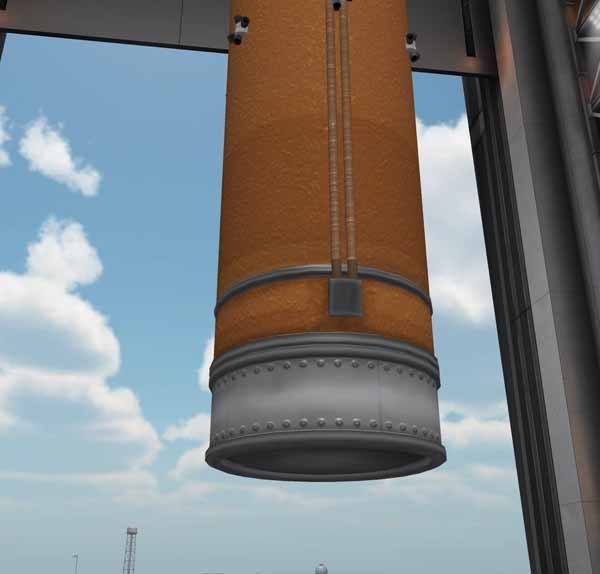
[Figure 13. Engine cluster part 1]
Attach a small, structural cube thing (Cubic Octagonal Strut) to the bottom edge of the tank.
Surprisingly, this small, cube strut (Cubic Octagonal Strut) is the most advanced item in the technology tree that I'm including in this design. If you haven't unlocked it yet, feel free to skip this whole cluster section, and replace them with Mainsail engines.
The clusters have an advantage over the Mainsail engines do to the clusters' greater thrust, higher efficiency, and greater design flexibility. But it's not a huge difference. The Mainsail's lighter mass makes up for a good part of the difference. The Mainsail engines will still get this rocket into orbit.
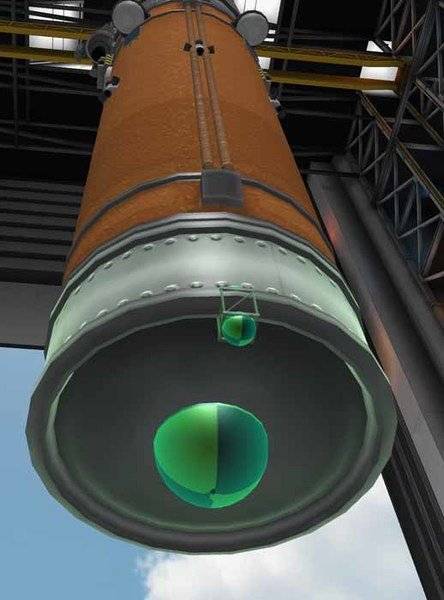
[Figure 14. Engine cluster part 2]
Place a LV-T30 Engine on the strut. (This is the more powerful, lighter engine of the two LV-T engines; it's the one without gimballing/thrust vectoring).
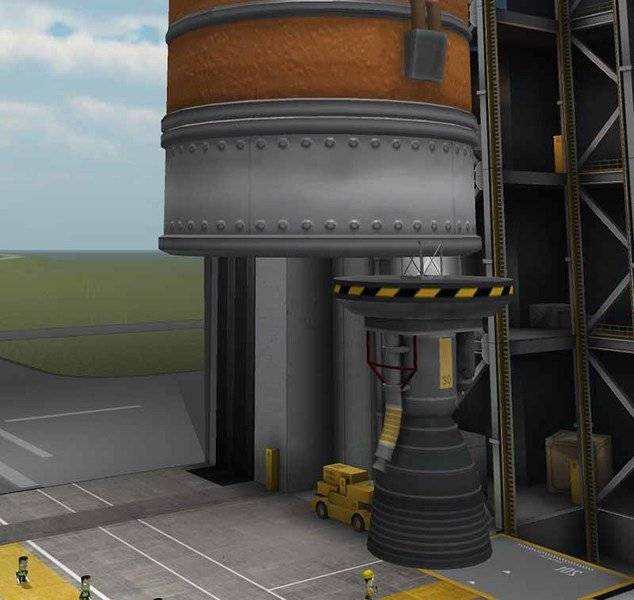
[Figure 15. Engine cluster part 3]
Place a structural adapter on top for aesthetic purposes (optional). Note that this is completely cosmetic. The element actually adds weight and drag. Skip it if desired.
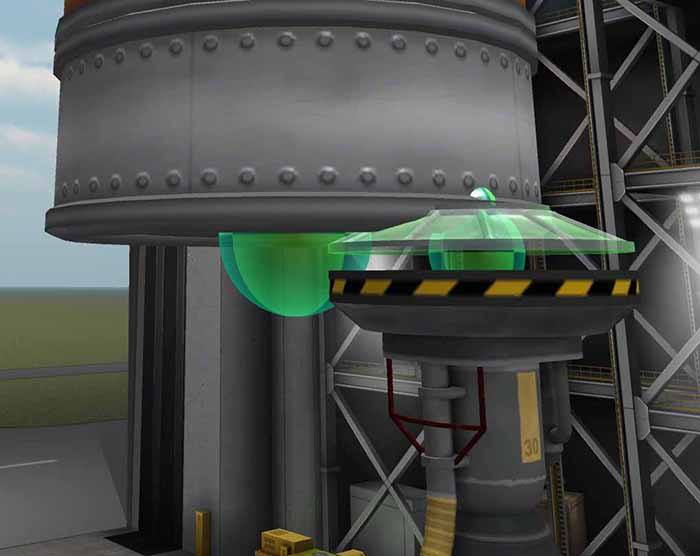
[Figure 16. Engine cluster part 4 (optional)]
Now grab the assembly by the original strut and place it aside. (Don't worry, there is some reason behind this madness.)
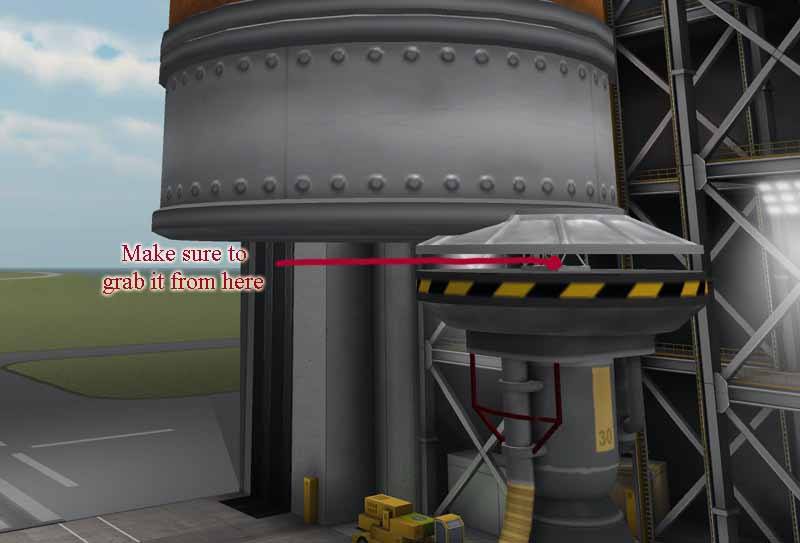
[Figure 17. Engine cluster part 5]
Now put another strut and engine in the center. But this time, use the LV-T45 Engine. The "45" engine adds a little thrust vectoring which can help us steer (when the engine is on). Although it's heavier and less powerful than its "30" sister.
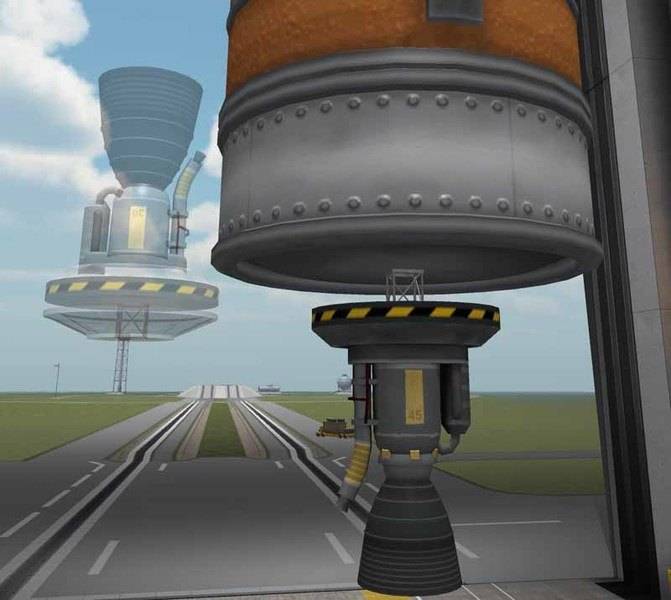
[Figure 18. Engine cluster part 6]
Now grab that other "30" assemby that you put aside a moment ago, and begin to put it back were it was. But before actually placing it back ...
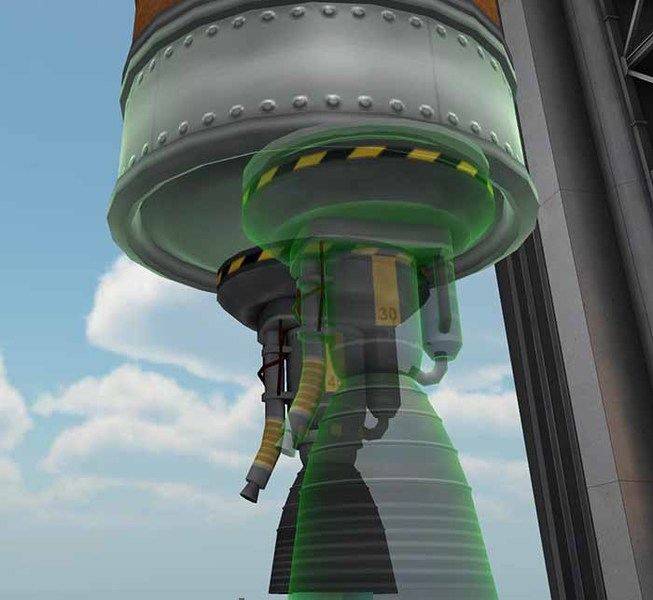
[Figure 19. Engine cluster part 7]
... Before clicking it back to position, hit the "x" key to cycle through different symmetries.
Instead of putting the LV-T30 assembly aside, you may be tempted to turn on the symmetry at the beginning, and place all the parts in groups of 4. There is a problem with doing it that way. The game will often not let you put the part on. If it rejects anyone of the four parts you are adding, you will not be able to put any on.
I find it much easier to build up just one, single assembly first. Then cycle the symmetry at the very end, once the first assembly is complete. That trick save a lot of time and frustration.
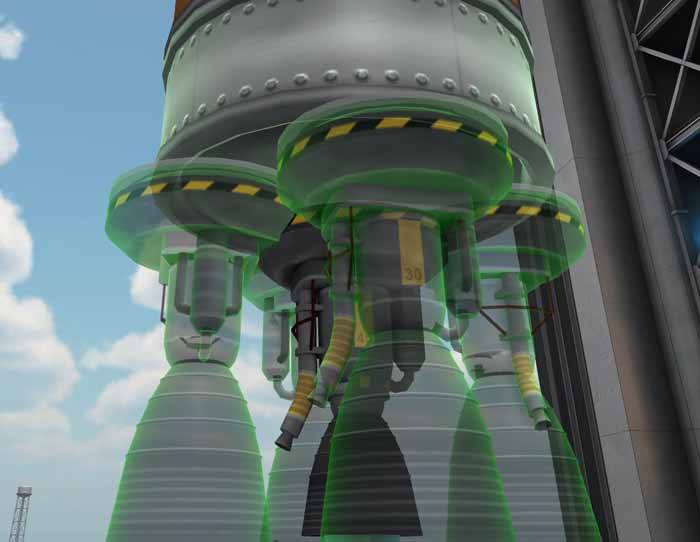
[Figure 20. Engine cluster part 8]
I chose the x4 symmetry for this rocket. But you could surround the center engine by 2, 3, 4, or even 6 engines. Six surrounding engines is overkill for this particular rocket; More thrust than we need. We're better off here with less mass/weight via using only four surrounding.
[Figure 21. Engine cluster part 9]
Once completed, grab the small fuel tank and place the entire thing in its own Vehicle Assembly part. That way, you can easily reuse it, without having to rebuild it.
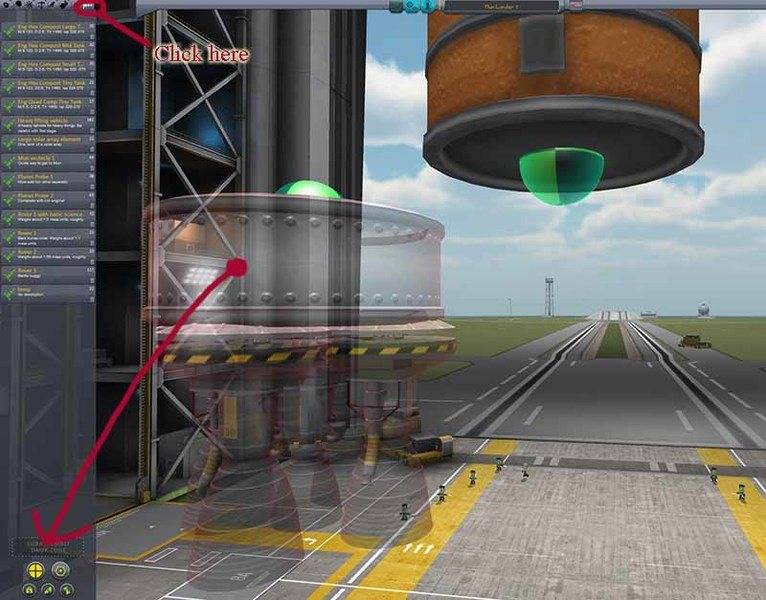
[Figure 22. Engine cluster part 10]
Note that there are many different combinations. If you want more steering capability, put the LV-T30 in the center and surround it with LV-T45 engines. I chose the LV-T45 in the center surrounded by LV-T30 engines, because that cluster is a little more powerful and lighter. Most of these engines are used when we're going straight up and don't need a lot of steering anyway.
Although engine clusters have higher thrust and greater efficiency than the Mainsail engine, they are much heavier. Clusters make great first stage engines and first stage boosters. But due to their weight, keep them away from all upper stages. You're better off with the conventional, stock engines for any engine that's not firing immediately at take-off.
Asparagus staging section
Asparagus staging offers advantages in KSP, and even in real-life (SpaceX Falcon Heavy uses the concept to some extent. http://www.spacex.com/falcon-heavy).
The idea behind asparagus staging is this: as long as you are carrying around engines, you might as well use them. And once a given pair of fuel tanks are empty, drop them and their associated engines to reduce weight. And finally, cross-feed the propellent such that the remaining tanks remain full (or at least fuller than otherwise) at the time of separation.
We start with making a single booster, and then we'll hit the symmetry button ("x") later, to add on the asparagus stages in pairs.
We start off in Figure 23 with the girder and radial decoupler.
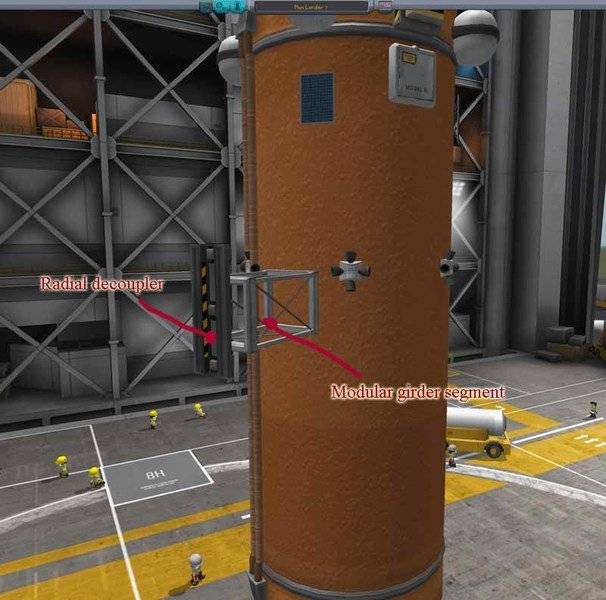
[Figure 23. Asparagus staging, part 1]
Add a tank.
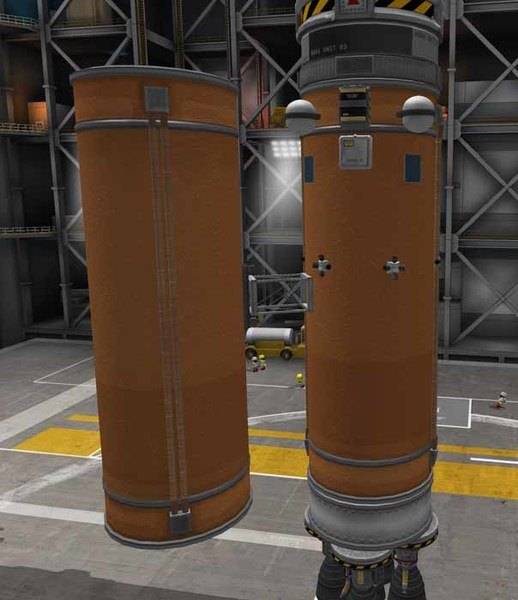
[Figure 24. Asparagus staging, part 2]
Add a nosecone and engine cluster. Note: The nosecone is completely cosmetic. It actually adds mass and drag. (At least for this version of KSP, until the developers redo their treatment of aerodynamics). Skip the nosecone if you wish.
Then click on the girder, and hit "x" to cycle to by-2 symmetry. We will put these asparagus stages on in pairs.
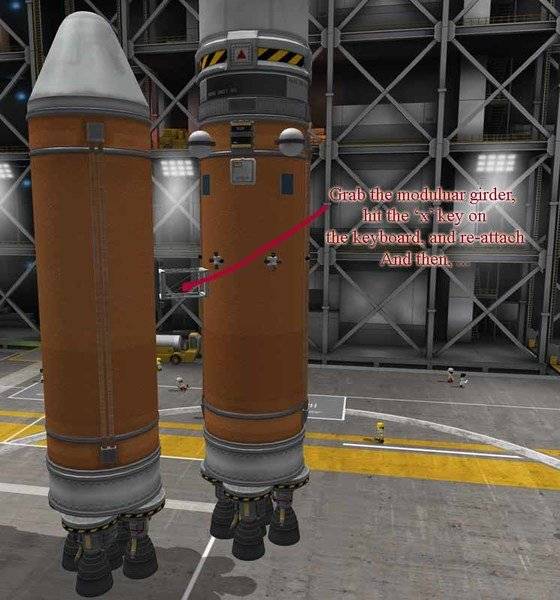
[Figure 25. Asparagus staging, part 3]
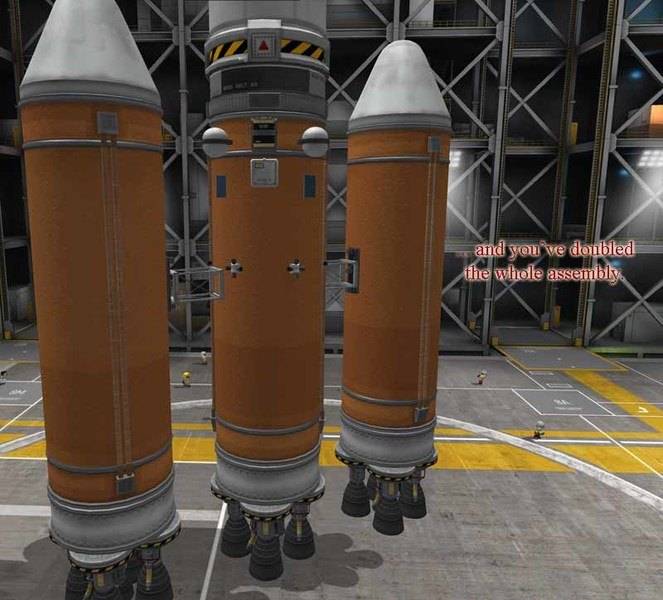
[Figure 26. Asparagus staging, part 4]
Press and hold the Alt key for copy-click.
"Alt" specifically if you on a PC.
"Option" specifically for the Mac.
"Win" specifically if you're on a Linux system.
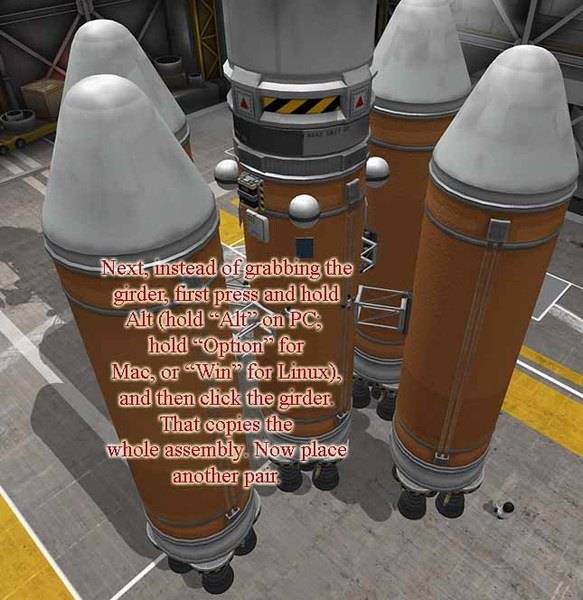
[Figure 27. Asparagus staging, part 5]
Repeat that step until you have three pairs of asparagus stages.
Then click on the FTX-2 External Fuel Duct to indicate the direction of the fuel transfer.
Keep the "x2" symmetry on, and it will automatically take care of the both engines in a given pair at once.
With the FTX-2 Fuel Duct selected, click on one of the first asparagus stage tanks and then on of the second asparagus stage tanks. Notice the arrow. That indicates the direction of fuel flow.
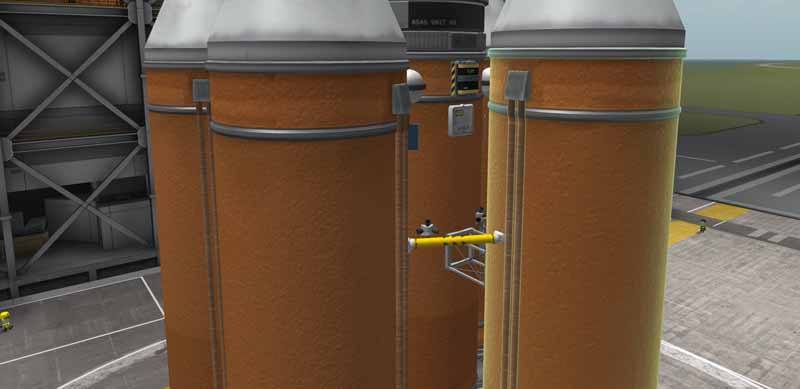
[Figure 28. Asparagus staging, part 6]
Do that again, but this time go from the asparagus second stage to the asparagus third stage.
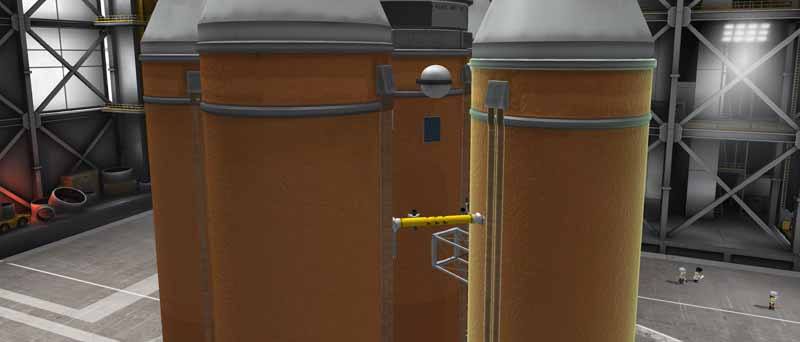
[Figure 29. Asparagus staging, part 7]
One more time, but go from the asparagus third stage to the center tank.
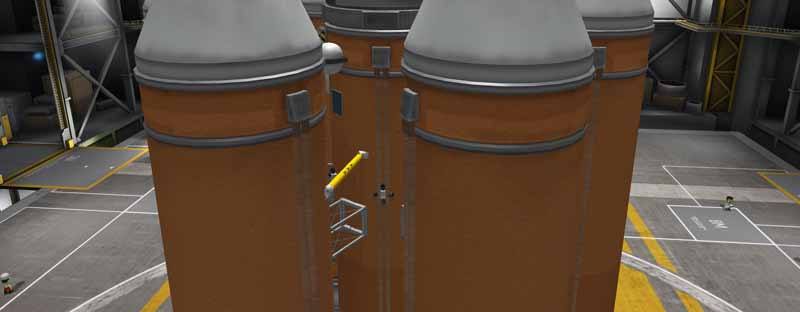
[Figure 30. Asparagus staging, part 8]
At this point, check the staging on the right and side, and make sure things get staged in the correct order. You might need to move things around substantially.
Then add some struts. Don't strut together asparagus stages to each other though! It will cause problems when the second asparagus stage separates; struts can pull the second asparagus stage tanks into the third, possibly causing damage. Only connect struts from the asparagus stages to the center stack.
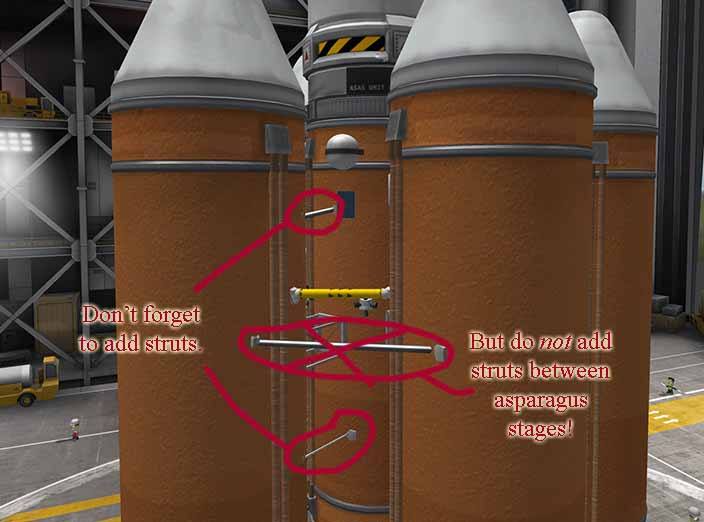
[Figure 31. Asparagus staging struts]
Finish off by adding a couple of solid rocket boosters (SRBs) and some wings/fins. Recall, for the engine cluster configuration, I chose power/efficiency over thrust vectoring. We're going to need to steer this thing, which is why I added the wings/fins. they'll be useful as long as we're in the atmosphere.
I also added a SAS module atop each of the asparagus stage 3 boosters. We're going to need to steer this thing when the pitch-over/gravity turn happens.
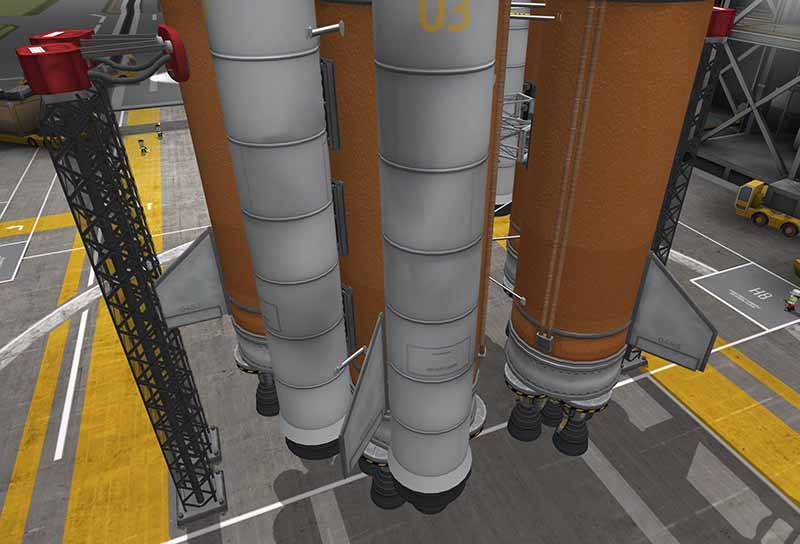
[Figure 32. Final touches]
When it comes to the staging of the SRB's, there's a problem. We don't really know when the SRBs will be depleted relative to the asparagus stages. For that reason, I put control of the SRBs' radial decouplers using the "Action groups." Then in my staging order, I moved the SRBs' radial decouplers up high.
Action groups can be extremely useful for things like this. You can use them for things like this (unconventional staging), or to group many items to work together as a group.
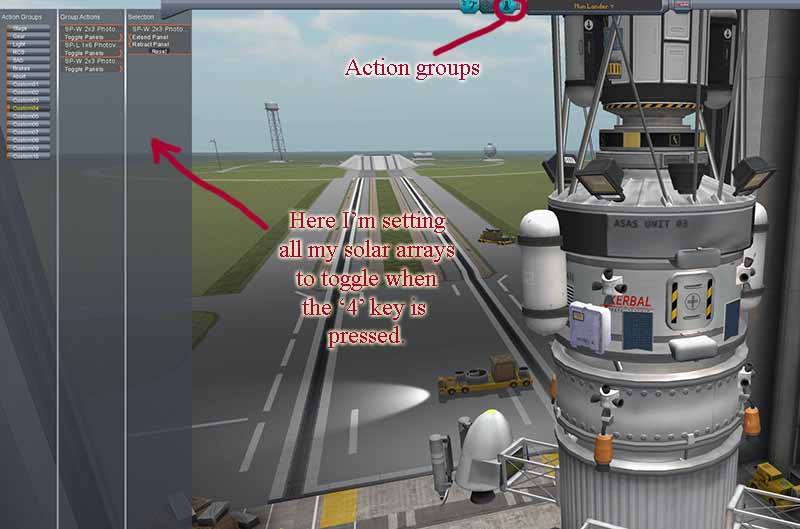
[Figure 33. Action groups]
I use Action Groups in the following way.
Pressing '1' causes the SRB separation.
Pressing '2' toggles the Rocomax 24-77 engines on the lander module.
Pressing '3' toggles the Mark 55 engines on the lander (the main, lander engines).
Pressing '4' toggles all solar arrays on the vessel.
Pressing '5' toggles all extendable ladders on the vessel.
Eventually, that lander is going to be docked with the command/service module, but it's engines then face the opposite direction. In this situation, it is important to disable the lander module's engines if you want the service module engines to do anything useful. (you could disable them individually by right clicking on them one at a time. But Action Groups makes this much easier).
And our rocket is complete.
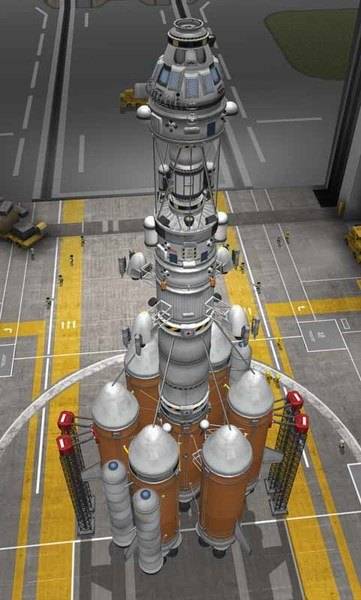
[Figure 34. Rocket is complete]
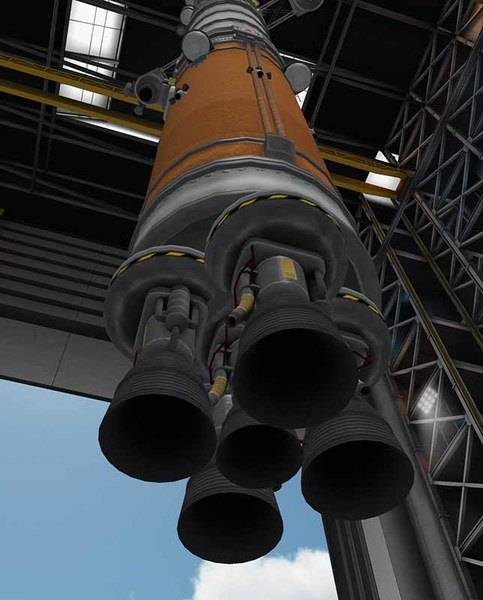
Here it is on the launch pad, from below ('looks kinda ominous from this perspective).
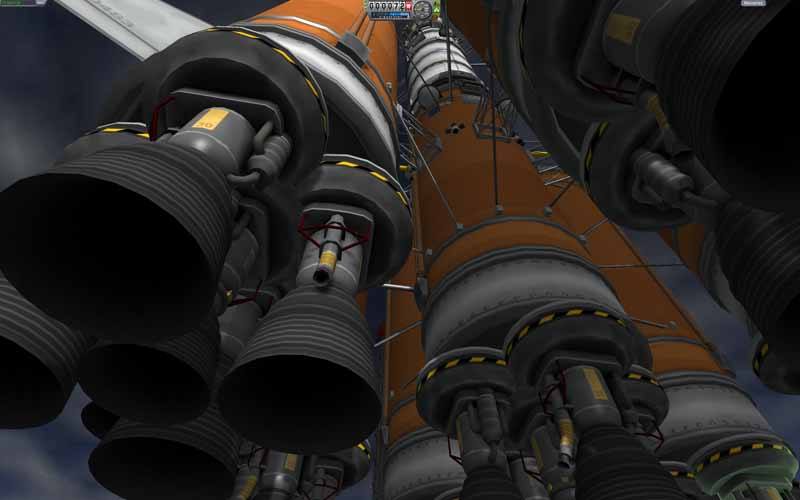
[Figure 35. Rocket from below]
But it's really a pretty small rocket. Sure, it looks big when compared to Jeb...
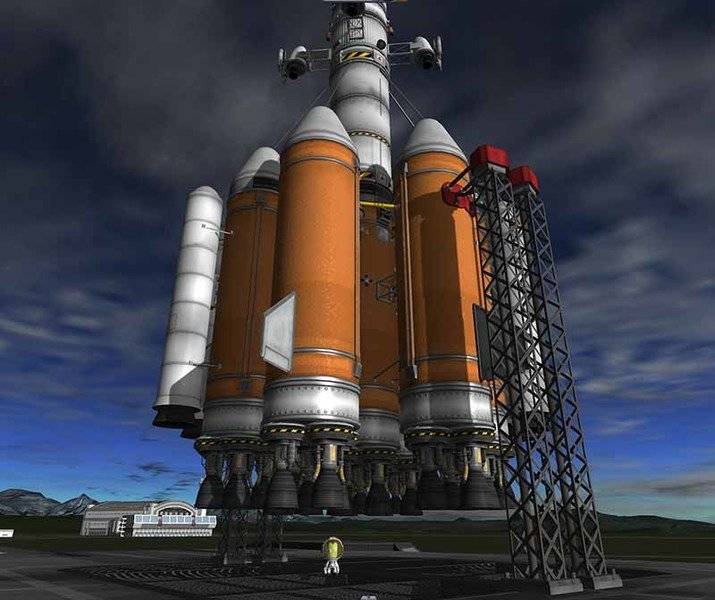
[Figure 36. Rocket compared to Jeb]
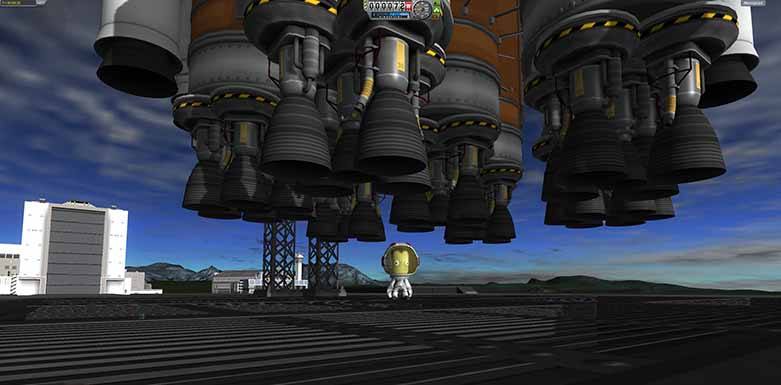
[Figure 37. Jeb posing with rocket]
... But it's really not that big after all.
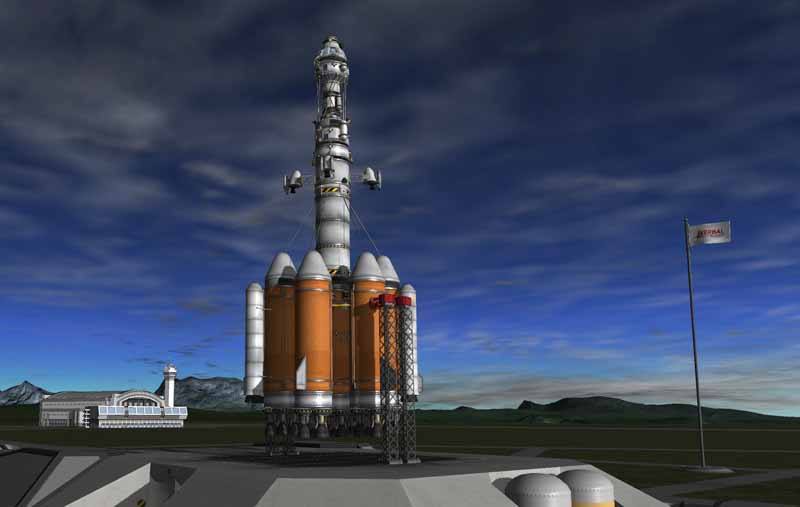
[Figure 38. Ready to launch]
(Trip to the Mun coming soon!)
Full Series
Part 1: Introduction and Basics
Part 2: Efficient Launch Into Orbit
Part 3: Rocket Design Basics
https://www.physicsforums.com/threads/kerbal-space-program-rocket-design-and-orbital-mechanics.970334/
https://www.physicsforums.com/threads/kerbal-space-program-getting-to-the-mun.970335/
https://www.physicsforums.com/threads/kerbal-space-program-getting-to-the-mun-part-2.970336/
https://www.physicsforums.com/threads/kerbal-space-program-preparing-to-land-on-the-mun.970337/
https://www.physicsforums.com/threads/kerbal-space-program-mun-touchdown.970338/
https://www.physicsforums.com/threads/kerbal-space-program-staying-on-the-moon.970339/
https://www.physicsforums.com/threads/kerbal-space-program-preparing-to-leave-lander.970340/
https://www.physicsforums.com/threads/kerbal-space-program-walking-on-the-mun.970341/
https://www.physicsforums.com/threads/kerbal-space-program-leaving-the-mun.970342/
https://www.physicsforums.com/threads/kerbal-space-program-rendezvous-and-docking.970343/
https://www.physicsforums.com/threads/kerbal-space-program-prograde-retrograde-and-approach.970344/
https://www.physicsforums.com/threads/kerbal-space-program-prepare-for-docking.970345/
https://www.physicsforums.com/threads/kerbal-space-program-docking-and-lander-reunion.970346/
https://www.physicsforums.com/threads/kerbal-space-program-heading-home.970347/
https://www.physicsforums.com/threads/kerbal-space-program-entering-Earth's-orbit.970348/
Part 19: Landing Back on Earth
Part 20: Launch for Duna
https://www.physicsforums.com/threads/kerbal-space-program-duna-probe-launch.970351/
Part 22: Duna Rocket Launch
https://www.physicsforums.com/threads/kerbal-space-program-duna-burn-and-periapsis.970354/
https://www.physicsforums.com/threads/kerbal-space-program-duna-oberth-effect.970355/
https://www.physicsforums.com/threads/kerbal-space-program-duna-mid-course-corrections.970356/
https://www.physicsforums.com/threads/kerbal-space-program-using-gravity-to-orbit-duna.970357/
https://www.physicsforums.com/threads/kerbal-space-program-landing-on-duna.970358/
https://www.physicsforums.com/threads/kerbal-space-program-exploring-duna.970359/
https://www.physicsforums.com/threads/kerbal-space-program-launching-off-duna.970360/
https://www.physicsforums.com/threads/kerbal-space-program-fast-return-path-from-duna.970361/
Part 31: Advanced Duna Flight Math
https://www.physicsforums.com/threads/kerbal-space-program-burn-2-to-escape-duna.970363/
Part 33: Returning to Earth From Duna
[Figure 1. Check this out.]
This post illustrates an example of KSP rocket design. The following are the rocket's design goals:
- Get three kerbals and a bunch of science items to the Mun, in an Apollo style mission: such that two kerbals (and science) land on the surface, one remaining in orbit.
- All three kerbals are to return.
- The science equipment must also land on the Mun and be returned to Kerbin.
- The rocket should get the job done comfortably, and have carry enough fuel to cover a margin of error, in case things don't go according to plan, or modifications need to be made to the flight plan.
- While the rocket design is not minimal, it shouldn't be wasteful either. It should be designed to get to the Mun comfortably, with a reasonable margin of extra fuel, but no more.
- Only stock parts allowed on the rocket. i.e., no modded parts.
- Effort is placed on only using parts that are on the early and mid tier levels of the technology tree, with only a few exceptions, discussed individually below.
Pros:
- There is the potential to save a little bit of fuel, since it is not necessary to land and re-orbit the fuel required for the return trip (and thus, also, the extra fuel required to move the fuel). It turns out this is not that big deal for the Mun due to such low gravity, and close proximity to Kerbin (still within Kerbin's gravity well). But it is a factor none the less.
- It is good practice for interplanetary voyages involving planets with higher gravity, where a two-ship system's advantages are greater.
- It's good practice for docking.
- It let's me demonstrate concepts involved in rendezvous and docking, in a subsequent post.
- It's kinda cool? I don't know.
- An Apollo style mission is inherently more complicated because it involves "docking" in orbit. If you are just starting out in KSP, a rendezvous with another ship in orbit, followed by docking, is one of the more advanced aspects of KSP. On the other hand, if you can rendezvous and dock with another ship in orbit, you can do pretty much anything in KSP.
Mid/upper stage section
Figure 2. shows the upper stage of the rocket. This consists of the two parts really, the lander module and the command/service module. The science payload is a little tricky, since it gets shuffled between the two; it starts out on the lander module, and is later to be transferred to the command module.
[Figure 2. Upper stage of the rocket. This is the stuff we wish to get in close proximity to the Mun.]
When designing the rocket, start with the mission's end, and then work backwards. Since this ship is broken into two parts, it's slightly more complicated, but I'll start with the command module since that will be returning to Kerbin.
[Figure 3. Command/service module, top view. The command module is based on the Mk1-2 Command Pod.]
Notice the docking port on top (Figure 3). That's how it should look when attached to the command pod (more on that later). Figure 4 details the parts.
[Figure 4. Command/service module.]
- Docking port: This will eventually dock with one of the two science payload's docking ports, together with whatever is left of the lander.
- Battery: You can use any battery; just use a lower tech one if you haven't unlocked this one. Put it anywhere on the command/service module (it doesn't even need to go on the command pod itself, just somewhere on the command pod side of the science payload). Various instruments need electrical charge to operate, and a battery is good for those times where the sunlight is obstructed. When one first starts playing KSP, it usually happens that the craft will suddenly lose attitude control, and the player will say, "hey, craft won't respond to my keypresses. Maybe it's a bug," but more likely the craft simply ran out of electrical power. SAS (stability augmentation system) needs electricity to work.
- Parachutes: Parachutes do need to be attached to the command pod.
- Ladders: For kerbals to crawl around on. They will be handy for when kerbals are transferred to and fro the lander module. They're not absolutely necessary, since kerbals can use their jetpacks, but they are convenient.
- Decoupler: Allows jettisoning the fuel tank and engine before re-entry (fewer parachutes required that way, if for no other reason).
- Monopropellant: That's the RCS thruster fuel.
- RCS thrusters: Stands for "reaction control system." This is actually a real acronym (not just in the game). These are the maneuvering thrusters for attitude control and can also function for lateral movement. Since we are going to rely on the command pod's built in reaction wheels (SAS, stability augmentation system) for attitude control, we will use these mostly for lateral movement. They are almost essential for docking (docking without RCS is masochistic at best). The plan is to maneuver the lander for docking maneuvers, but it's good to have RCS capabilities on the command/service module too, just in case.
- Solar panels and arrays: Various instruments require electricity to operate (such as SAS). These generate that electrical power. Why both? Extending the solar arrays requires electricity. The solar panels are there so just in case I forget to extend the solar arrays early on, I'll at least have enough power to extend the arrays.
- Engine: The engine is one of the smaller engines. That's all that is needed.
Figures 5 and 6 show and detail the lander module.
[Figure 5. Lander module, top view.]
I make note of the docking ports because it's really not clear in the game's instructions which side is the docking side and which side permanently attaches to the rocket. I've had to de-orbit an entire space station because I accidentally put the docking ports on backwards. If placed correctly, you should see a black line and some sort of metal looking handle thing. If you see a yellow triangle, you've got it on backwards. This is true for the regular sized, Clamp-O-Tron Docking Port, and the larger, "Senior" version. (For the smaller, "junior" version refer to the regular sized version, since they share the same basic shape).
[Figure 6. Lander module.]
Let's break that down into smaller pieces. Recall that when designing a craft, work backwards. Since we've already discussed the vessel getting back to Kerbin (from the Mun's high orbit), let's discuss the part of the lander that needs to dock with the command/service module. This core of the lander is shown in Figure 7.
[Figure 7. Lander core. The lander core is based around the Mk2 Lander-can.]
- Upper, science payload, docking port: This will dock to the command module on the return trip.
- Science payload: This is just a bunch of stuff for accumulating science points. Load it up with whatever science stuff you've unlocked (except for the barometer and atmosphere stuff. There's not atmosphere on the Mun. On the other hand, you might be able to use the barometer and atmospheric stuff on the final, Kerbin descent).
- Lower, science payload, docking port: This could be substituted with a decoupler. But a docking port has advantages. It's lighter, and also will allow the command module to have a docking port on its nose, in case the crew decide to get some R&R at Kerbin Station (Figure 8) on the way back. But that's another story.
- Battery: Once again, feel free to pick a different battery type if desired, or if the type I chose isn't unlocked.
- Remote Guidance Unit: The Remote guidance unit is completely optional. I included it so that we can hurl the remainder of the lander at the moon before returning to Kerbin (to reduce orbiting space junk/debris). It is not necessary though. We should have plenty of fuel left to take the remainder of the lander back to Kerbin with us, and drop it in Kerbin's atmosphere. Include it if you want.
- SAS (stability augmentation system). The lander pod already has some built-in SAS, so why have another module? Two reasons: (a), it gave me a place to attach the ladder, and (b) SAS helps keep the rocket from tipping over. I'm not the best at landing, and sometimes there's significant horizontal velocity when the craft touches down. SAS helps prevent the craft from flipping over in such situations. If the craft flips over, nobody will be coming back, barring a rescue mission. So, what is SAS really? Think of it has three, big gyroscopes, one for each axis that can control the ships attitude. This is not science fiction. Humans have this technology. However, the Kerbal's versions are more powerful.
- Lights: The light pointed upward is for docking. The other lights are just to illuminate the surroundings on the Mun's surface.
- Monopropellant: That's the RCS thruster fuel.
- RCS thrusters: In case you didn't catch this above, "RCS" stands for "reaction control system." This is actually a real acronym (not just in the game). These are the maneuvering thrusters for attitude control and can also function for lateral movement. Since we are going to rely on SAS (stability augmentation system) for attitude control, we will use these mostly for lateral movement. They are almost essential for docking (docking without RCS is masochistic at best).
- Solar panels and arrays: These generate that electrical power.
- Ladders: Easier to move kerbals around.
- Antenna/transmitter/communication system (not shown in the figure): You also might want to put some sort of communication system on the craft. They're useful for things like multiple EVA reports and crew reports.
[Figure 8. Kerbin Station, but that's another story.]
Back to our design. So now we've designed the ship to go from low Munar orbit, all the way back to Kerbin. Now we need to design what's needed to get off the Mun's surface, and at least into the Mun's orbit. That's shown in Figure 9.
Figure 9. Munar launch engines and fuel tank]
Notice that there is decoupler involved. If all works out well, we won't even use it. It is there just in case we run out of fuel and resort to RCS thrusters. Dropping the tank reduces mass. Reducing mass increases acceleration for a given force.
Now we need the capability de-orbit and land on the Mun. We can't use atmospheric breaking, so all the fuel necessary to de-orbit and land, we need to bring with us. That equipment is shown in Figure 10.
[Figure 10. Mun landing tank and equipment.]
- Decoupler: One way or another, we will separate this section before reaching reaching Munar orbit on ascent. We might just leave it on the Mun before starting ascent. Either way, this section is destined to stay on the Mun, be it in one, solid piece or many broken pieces.
- Landing struts: Well, that's sort of obvious.
- Lights: Those landing lights can be quite useful. They give you an indication when the Mun's surface is approaching indicating that it's time to pour on the thrust (or if its already too late). They are also pretty essential for landing on the dark side of the Mun or in a dark crater.
- Rocomax Mark 55, radial mounted engines: They have a good amount of thrust for their weight. Sometimes when landing, that Munar surface can come at you pretty quickly. Not to mention, that higher thrust is more efficient, since it reduces gravity losses again (there will be a component of the thrust vector parallel [technically anti-parallel] with the gravitational force vector). Once again, we're in a situation where higher thrust is good.
- Modular girder segments: Gives the lander a nice, wide stance. I'm paranoid about the landers tipping over on landing, and a wide stance is always welcome.
So now we need to design necessary components to get from Kerbin's orbit to the Mun. That's described in Figure 11.
[Figure 11. Rocket, mid-stage.]
The purpose of the mid-stage is as follows:
- Burn at Kerbin's orbit to transfer to Mun's gravity well.
- Burn at Mun's gravity well to create a high, Munar orbit.
- Bring lander module to a low, Munar orbit. (Hopefully)
- If there is any fuel left, aid landing module in initial descent to Mun. (Optional, but would be nice.)
So now we're ready to build the launch vehicle.
[Figure 12. Launch vehicle, center tank]
All the extra stuff in Figure 12 is optional. This tank and its engines (more below) will almost assuredly reach orbit. Which means if there is no way to de-orbit it, it's going to get left as orbiting space junk.
If you haven't unlocked parts such as the remote guidance unit, there are other options. (a) Before bringing the rocket's periapsis up to above 70,000 m, separate from the stage whether or not it has any fuel left. You might need to "fly" it later from the tracking station, because KSP seems to presently ignore atmospheric drag unless the thing in question is being "flown." It might take awhile for the orbit to decay, but it is an option. Or, (b) leave it as space junk and clean it up later with a special space-junk-cleaning mission, once you unlock the advanced grabbing unit (AGU), and efficient engine like the atomic rocket motor. Or (c) just leave it as orbiting space junk, if you don't mind orbiting space junk.
Before moving on, allow me to describe how to build an efficient engine "cluster." Start with the smallest, Rocomax 200 sized tank.
Engine cluster section
[Figure 13. Engine cluster part 1]
Attach a small, structural cube thing (Cubic Octagonal Strut) to the bottom edge of the tank.
Surprisingly, this small, cube strut (Cubic Octagonal Strut) is the most advanced item in the technology tree that I'm including in this design. If you haven't unlocked it yet, feel free to skip this whole cluster section, and replace them with Mainsail engines.
The clusters have an advantage over the Mainsail engines do to the clusters' greater thrust, higher efficiency, and greater design flexibility. But it's not a huge difference. The Mainsail's lighter mass makes up for a good part of the difference. The Mainsail engines will still get this rocket into orbit.
[Figure 14. Engine cluster part 2]
Place a LV-T30 Engine on the strut. (This is the more powerful, lighter engine of the two LV-T engines; it's the one without gimballing/thrust vectoring).
[Figure 15. Engine cluster part 3]
Place a structural adapter on top for aesthetic purposes (optional). Note that this is completely cosmetic. The element actually adds weight and drag. Skip it if desired.
[Figure 16. Engine cluster part 4 (optional)]
Now grab the assembly by the original strut and place it aside. (Don't worry, there is some reason behind this madness.)
[Figure 17. Engine cluster part 5]
Now put another strut and engine in the center. But this time, use the LV-T45 Engine. The "45" engine adds a little thrust vectoring which can help us steer (when the engine is on). Although it's heavier and less powerful than its "30" sister.
[Figure 18. Engine cluster part 6]
Now grab that other "30" assemby that you put aside a moment ago, and begin to put it back were it was. But before actually placing it back ...
[Figure 19. Engine cluster part 7]
... Before clicking it back to position, hit the "x" key to cycle through different symmetries.
Instead of putting the LV-T30 assembly aside, you may be tempted to turn on the symmetry at the beginning, and place all the parts in groups of 4. There is a problem with doing it that way. The game will often not let you put the part on. If it rejects anyone of the four parts you are adding, you will not be able to put any on.
I find it much easier to build up just one, single assembly first. Then cycle the symmetry at the very end, once the first assembly is complete. That trick save a lot of time and frustration.
[Figure 20. Engine cluster part 8]
I chose the x4 symmetry for this rocket. But you could surround the center engine by 2, 3, 4, or even 6 engines. Six surrounding engines is overkill for this particular rocket; More thrust than we need. We're better off here with less mass/weight via using only four surrounding.
[Figure 21. Engine cluster part 9]
Once completed, grab the small fuel tank and place the entire thing in its own Vehicle Assembly part. That way, you can easily reuse it, without having to rebuild it.
[Figure 22. Engine cluster part 10]
Note that there are many different combinations. If you want more steering capability, put the LV-T30 in the center and surround it with LV-T45 engines. I chose the LV-T45 in the center surrounded by LV-T30 engines, because that cluster is a little more powerful and lighter. Most of these engines are used when we're going straight up and don't need a lot of steering anyway.
Although engine clusters have higher thrust and greater efficiency than the Mainsail engine, they are much heavier. Clusters make great first stage engines and first stage boosters. But due to their weight, keep them away from all upper stages. You're better off with the conventional, stock engines for any engine that's not firing immediately at take-off.
Asparagus staging section
Asparagus staging offers advantages in KSP, and even in real-life (SpaceX Falcon Heavy uses the concept to some extent. http://www.spacex.com/falcon-heavy).
The idea behind asparagus staging is this: as long as you are carrying around engines, you might as well use them. And once a given pair of fuel tanks are empty, drop them and their associated engines to reduce weight. And finally, cross-feed the propellent such that the remaining tanks remain full (or at least fuller than otherwise) at the time of separation.
We start with making a single booster, and then we'll hit the symmetry button ("x") later, to add on the asparagus stages in pairs.
We start off in Figure 23 with the girder and radial decoupler.
[Figure 23. Asparagus staging, part 1]
Add a tank.
[Figure 24. Asparagus staging, part 2]
Add a nosecone and engine cluster. Note: The nosecone is completely cosmetic. It actually adds mass and drag. (At least for this version of KSP, until the developers redo their treatment of aerodynamics). Skip the nosecone if you wish.
Then click on the girder, and hit "x" to cycle to by-2 symmetry. We will put these asparagus stages on in pairs.
[Figure 25. Asparagus staging, part 3]
[Figure 26. Asparagus staging, part 4]
Press and hold the Alt key for copy-click.
"Alt" specifically if you on a PC.
"Option" specifically for the Mac.
"Win" specifically if you're on a Linux system.
[Figure 27. Asparagus staging, part 5]
Repeat that step until you have three pairs of asparagus stages.
Then click on the FTX-2 External Fuel Duct to indicate the direction of the fuel transfer.
Keep the "x2" symmetry on, and it will automatically take care of the both engines in a given pair at once.
With the FTX-2 Fuel Duct selected, click on one of the first asparagus stage tanks and then on of the second asparagus stage tanks. Notice the arrow. That indicates the direction of fuel flow.
[Figure 28. Asparagus staging, part 6]
Do that again, but this time go from the asparagus second stage to the asparagus third stage.
[Figure 29. Asparagus staging, part 7]
One more time, but go from the asparagus third stage to the center tank.
[Figure 30. Asparagus staging, part 8]
At this point, check the staging on the right and side, and make sure things get staged in the correct order. You might need to move things around substantially.
Then add some struts. Don't strut together asparagus stages to each other though! It will cause problems when the second asparagus stage separates; struts can pull the second asparagus stage tanks into the third, possibly causing damage. Only connect struts from the asparagus stages to the center stack.
[Figure 31. Asparagus staging struts]
Finish off by adding a couple of solid rocket boosters (SRBs) and some wings/fins. Recall, for the engine cluster configuration, I chose power/efficiency over thrust vectoring. We're going to need to steer this thing, which is why I added the wings/fins. they'll be useful as long as we're in the atmosphere.
I also added a SAS module atop each of the asparagus stage 3 boosters. We're going to need to steer this thing when the pitch-over/gravity turn happens.
[Figure 32. Final touches]
When it comes to the staging of the SRB's, there's a problem. We don't really know when the SRBs will be depleted relative to the asparagus stages. For that reason, I put control of the SRBs' radial decouplers using the "Action groups." Then in my staging order, I moved the SRBs' radial decouplers up high.
Action groups can be extremely useful for things like this. You can use them for things like this (unconventional staging), or to group many items to work together as a group.
[Figure 33. Action groups]
I use Action Groups in the following way.
Pressing '1' causes the SRB separation.
Pressing '2' toggles the Rocomax 24-77 engines on the lander module.
Pressing '3' toggles the Mark 55 engines on the lander (the main, lander engines).
Pressing '4' toggles all solar arrays on the vessel.
Pressing '5' toggles all extendable ladders on the vessel.
Eventually, that lander is going to be docked with the command/service module, but it's engines then face the opposite direction. In this situation, it is important to disable the lander module's engines if you want the service module engines to do anything useful. (you could disable them individually by right clicking on them one at a time. But Action Groups makes this much easier).
And our rocket is complete.
[Figure 34. Rocket is complete]
Here it is on the launch pad, from below ('looks kinda ominous from this perspective).
[Figure 35. Rocket from below]
But it's really a pretty small rocket. Sure, it looks big when compared to Jeb...
[Figure 36. Rocket compared to Jeb]
[Figure 37. Jeb posing with rocket]
... But it's really not that big after all.
[Figure 38. Ready to launch]
(Trip to the Mun coming soon!)
Full Series
Part 1: Introduction and Basics
Part 2: Efficient Launch Into Orbit
Part 3: Rocket Design Basics
https://www.physicsforums.com/threads/kerbal-space-program-rocket-design-and-orbital-mechanics.970334/
https://www.physicsforums.com/threads/kerbal-space-program-getting-to-the-mun.970335/
https://www.physicsforums.com/threads/kerbal-space-program-getting-to-the-mun-part-2.970336/
https://www.physicsforums.com/threads/kerbal-space-program-preparing-to-land-on-the-mun.970337/
https://www.physicsforums.com/threads/kerbal-space-program-mun-touchdown.970338/
https://www.physicsforums.com/threads/kerbal-space-program-staying-on-the-moon.970339/
https://www.physicsforums.com/threads/kerbal-space-program-preparing-to-leave-lander.970340/
https://www.physicsforums.com/threads/kerbal-space-program-walking-on-the-mun.970341/
https://www.physicsforums.com/threads/kerbal-space-program-leaving-the-mun.970342/
https://www.physicsforums.com/threads/kerbal-space-program-rendezvous-and-docking.970343/
https://www.physicsforums.com/threads/kerbal-space-program-prograde-retrograde-and-approach.970344/
https://www.physicsforums.com/threads/kerbal-space-program-prepare-for-docking.970345/
https://www.physicsforums.com/threads/kerbal-space-program-docking-and-lander-reunion.970346/
https://www.physicsforums.com/threads/kerbal-space-program-heading-home.970347/
https://www.physicsforums.com/threads/kerbal-space-program-entering-Earth's-orbit.970348/
Part 19: Landing Back on Earth
Part 20: Launch for Duna
https://www.physicsforums.com/threads/kerbal-space-program-duna-probe-launch.970351/
Part 22: Duna Rocket Launch
https://www.physicsforums.com/threads/kerbal-space-program-duna-burn-and-periapsis.970354/
https://www.physicsforums.com/threads/kerbal-space-program-duna-oberth-effect.970355/
https://www.physicsforums.com/threads/kerbal-space-program-duna-mid-course-corrections.970356/
https://www.physicsforums.com/threads/kerbal-space-program-using-gravity-to-orbit-duna.970357/
https://www.physicsforums.com/threads/kerbal-space-program-landing-on-duna.970358/
https://www.physicsforums.com/threads/kerbal-space-program-exploring-duna.970359/
https://www.physicsforums.com/threads/kerbal-space-program-launching-off-duna.970360/
https://www.physicsforums.com/threads/kerbal-space-program-fast-return-path-from-duna.970361/
Part 31: Advanced Duna Flight Math
https://www.physicsforums.com/threads/kerbal-space-program-burn-2-to-escape-duna.970363/
Part 33: Returning to Earth From Duna
Last edited by a moderator: