Laser Interferometer-Need advice/opinions about design.

In summary: The laser interferometer system you have designed to measure flatness and level a stainless steel plate has several shortcomings. The first is that it is very expensive and requires a high-quality collimation lens and a very large area to be measured. Additionally, it is difficult to measure an area less than 12" in size with accuracy. Finally, the system cannot move laterally to measure flatness, necessitating the use of linear stages that maintain accuracy but are prohibitively expensive.
  • #1
adamjts
24
0
Laser Interferometer--Need advice/opinions about design.

Hey Everyone,

I'm in the midst of designing a laser interferometry system to measure flatness and to level a stainless steel plate. It's a really simple design and I'm wondering what the drawbacks are for this type of system. I'm just in high school my understanding is more limited.

Requirements:
-Must detect a z axis displacement of 10 microns or less
-be able to determine the flatness of a surface to within 10 microns across a 12x12" plate


What I have so far:
A laser points downward and shines a beam of light through a collimating lens. The lens collimates the beam. The beams of light pass through a beam splitter angled 135° to the horizontal. The beams continue on to reflect off of the stainless steel plate and passes through the beam splitter again. The beams of light then pass through a collimating lens and into the imaging system.

I attached a simple sketch of the design.

I'm wondering:
-How effectively can the system measure flatness by moving laterally.
-How can the system measure how level the plate is. Would the system have to rotate in order to determine how level the plate is?

I'd be extremely grateful if someone could offer some brief feedback and let me know if something doesn't quite look right with this design. THANKS!
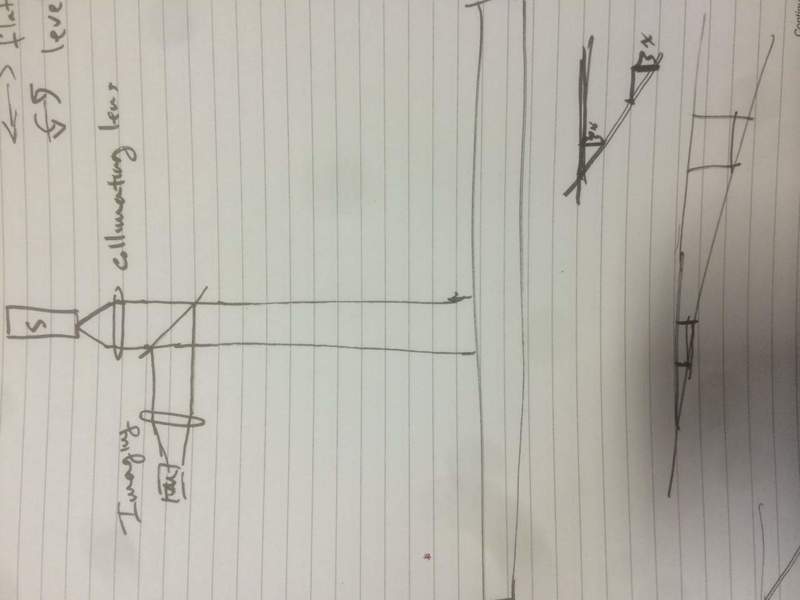

photo (3).jpg
 
Last edited:
Engineering news on Phys.org
  • #2
Hi adamjts,

Hopefully I’ll be able to address some your questions, but feel free to respond with more.

How effectively can the system measure flatness by moving laterally.

How are you translating laterally? You can find linear stages that can maintain flatness of travel to 10 microns or less, but at the cost of 10’s of thousands of dollars or more. Ideally, you would measure the entire surface of the plate at once. But this would require a collimating lens that is also 12” in diameter and of high enough quality to meet your requirements. This too will cost you thousands of dollars. If you were to still use an interferometer and measure an area that is less than 12”, you could try a method known as sub-aperture stitching. This requires a lot of measurements, with each measurement overlapping enough that you can try to “stitch” all of the measurements together into one continuous measurement. This can be difficult and may not be the most elegant solution for what you are trying to do.

How can the system measure how level the plate is. Would the system have to rotate in order to determine how level the plate is?

What are you measuring the plate with respect to? Are you levelling it to gravity? Or are you levelling it to the surface on which you are mounting the plate?


Now let me try to actually offer some solutions. This is a brief list off the top of my head, maybe someone else can chip in, but do you have a collimating lens that is larger? Perhaps a beam expander. Maybe you have access to an optical flat, then you can use it in a Fizeau configuration. If you have a precision granite slab you could possibly use a dial indicator and run it across like a stylus. Or an autocollimator and run a smaller test mirror across the surface and look at the slope changes, from which you can determine height changes.

And your drawing for an interferometer is close, but you’re missing a few key elements. I would start by looking up Twyman-Green interferometers.
 
  • Like
Likes 1 person
  • #3
Hi borkborkbork. Welcome to PF.

Adamjts.
Lasers are not the answer to everything. There are many traditional ways to make things flat and level. How you test the flatness and level of your stainless steel plate will depend on what you are using it for. What are you using it for ?

A few of examples;
Three plates can be worked against each other to produce three accurate flat surface plates. A plate can be made flat by scraping or lapping. You can use blue dye or alcohol to see the contact errors.

A mirror mounted on a right angle plate can be moved across your flat plate. Any angular deviation can then be measured with an autocollimator. http://en.wikipedia.org/wiki/Autocollimator

An engineers level can be used to set a plate level. By reversing the level you can correct any error in the level. Engineers levels are cheap from China, or easy to make by using a very slightly arched glass tube on a flat base.

Warnings;
Stainless steel will twist over time whereas cast iron is more dimensionally stable. Granite is better than both. Stone age technology often works very well.

To maintain 10um accuracy you will need a temperature stabilised room without windows that allow direct sunlight to enter.
 
  • #4
THanks for you replies.

Just to clarify, I intend to level the steel plate with respect to the stage on which the interferometer is set up. The stage should suspend the interferometer above the plate and move it parallel to the surface of the plate.

If I did have a stage that could maintain a flatness of 10um or less, would a michelson setup work? -- the laser would be on and have the interferometer move parallel to the stage... This way we could count the number of cycles the interference pattern goes through as it goes from one end of the plate to another, no?
 
  • #5
So you are trying to make the two plates parallel in a least squares way. Neither the x – y stage, nor the plate will be truly flat. The sum of all errors will show up in your interferometer measurements. The normals to the two surfaces will not necessarily be parallel.

Rather than using a laser interferometer for the Z axis range measurement, you might be better using a stage supported, RF capacitance gauge, with a separation below 1 mm. The area of the gauge sensor will average the distance variation over a small area. Testing just 4 points at say 20% and 80% of the plate X and Y dimensions will give a good estimate of deviation from parallel.
 
  • #6
my only concern with that type of setup is accuracy. would the capacitance gauge not have different levels of capacitance as it moves about the stage? There are other metal pieces and electronics nearby
 
  • #7
You can screen other metal objects if necessary. The capacitance gauge sensitivity to the near plate will dominate the capacitance measurement.

Once upon a time an air gauge would have been used with a manometer as the readout.
 
  • Like
Likes 1 person
  • #8
Adamjts, I have to ask, what is your goal? Is it only to measure how flat this steel plate is? I get the impression that levelling is a secondary requirement to avoid a tilt term showing up in your measurements.
 

FAQ: Laser Interferometer-Need advice/opinions about design.

1. What is a laser interferometer and how does it work?

A laser interferometer is a scientific instrument used to measure the distance between two points with extremely high precision. It works by splitting a laser beam into two beams and then recombining them to create an interference pattern. By measuring the changes in this pattern, the instrument can accurately determine small changes in distance.

2. What are the main components of a laser interferometer?

The main components of a laser interferometer are a laser source, a beam splitter, a reference mirror, a measurement mirror, and a detector. The laser source produces a coherent beam of light, which is then divided by the beam splitter. The reference mirror reflects one beam back to the beam splitter, while the measurement mirror reflects the other beam to the detector. The detector measures the interference pattern and converts it into a distance measurement.

3. What factors should be considered when designing a laser interferometer?

When designing a laser interferometer, it is important to consider the type of laser source, the type of beam splitter, the length of the measurement arm, the sensitivity of the detector, and the stability of the entire system. Other factors to consider include environmental conditions, such as temperature and vibration, and the intended application of the interferometer.

4. What are some common applications of laser interferometers?

Laser interferometers have a wide range of applications in various fields, including precision measurement, nanotechnology, semiconductor manufacturing, and astronomy. They are often used in metrology for calibration and quality control, as well as in research and development for measuring small movements or vibrations in objects.

5. Are there any limitations or challenges when using laser interferometers?

One of the main limitations of laser interferometers is their sensitivity to environmental factors, such as temperature and vibrations. These factors can affect the accuracy and stability of the measurements. Additionally, the cost and complexity of the equipment can be a challenge for some applications. However, advancements in technology have led to more compact and affordable laser interferometers in recent years.

Similar threads

Replies
1
Views
458
Replies
24
Views
2K
Replies
1
Views
992
Replies
0
Views
1K
Replies
1
Views
928
Replies
1
Views
796
Back
Top