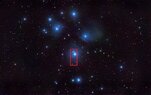
The Phantom Galaxy (M74) in the constellation Pisces. The galaxy is about 32 million light years away. Imaged from my back patio. Total integration time: 59.78 hours. Bortle Class 7 skies (maybe 8).
Figure 1. Phantom Galaxy (Messier 74)
I started the first night of imaging by warming up some fish tacos in the back of the fridge that were about to go bad. I also cooked up a batch of off-brand fishsticks to go with the half-empty bottle of tarter sauce that's been in the fridge since the before times. This will become important later.
The Phantom Galaxy (M74) is arguably called the "phantom" because it is perhaps the most difficult of the Messier objects for amateur astronomers to observe, due to its low surface brightness.
A few hours into the first night of imaging, my gastrointestinal system started making all sorts of noises. There were high pitched screeches, baritone groans, and even some falsetto squawks. It was like an opera going on in there!
Equipment:
Meade 10" LX200-ACF on a equatorial wedge
Optec Lepus 0.62x focal reducer
Astronomik RGB filters
Astronomik Ha filter
Optolong L-Pro filter
ZWO ASI1600MM-COOL monochrome camera
Software:
Nighttime Imaging 'N' Astronomy (N.I.N.A.)
PixInsight
Topaz Labs Denoise AI
GNU Image Manipulation Program (GIMP)
Before the first night was over, my digestive tract released several gaseous, ethereal, fish taco phantoms into the realm of the living. Although mostly invisible, they made their presence known and continued to linger around for what seemed like forever.
With the Phantom Galaxy's (M74's) low surface brightness, it took about 13 clearish nights to get this image. You might think that with nearly 60 hours of integration time, that it would turn out better. But keep in mind that I'm imaging from Bortle Class 7 (maybe 8) skies, and that's not even counting the neighborhood glare, of which there's plenty.
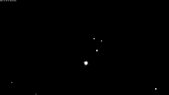
Here is an image of the telescope struggling with the Phantom Galaxy (M74). That glow in the sky isn't twilight: this snapshot was taken around 10 PM (22:00), roughly.
Figure 2. Telescope struggling with all the light pollution
The "Little Phantoms," as I came to call them, continued to hang around as the nights passed. They would float around and play games and curiously inspect the telescope. Inquisitive little things, they were. I think by the end, they quite interested in astronomy, and even offered to help out, in whatever strange way they could.
Integration:
L-Pro: 28.85 hours
R: 7.46 hours
G: 8.55 hours
B: 5.78 hours
Ha: 9.15 hours
Total: 59.78 hours
By the end of the imaging, I encouraged the Little Phantoms go out into the world on their own. They grow up so fast! They were reluctant at first. Then I put in a Star Wars movie, Episode I (the one where Anakin was a kid), and that seemed to convince them. We agreed that they are always welcome to come back to visit anytime in future seasons, particularly when the Phantom Galaxy (M74) is revisited. And we'll always have the fish tacos.


 .
.