Understanding Engineering Drawings: Deciphering Front and Bottom Views

  • Thread starter Thread starter hunter300
  • Start date Start date
  • Tags Tags
    Engineering
AI Thread Summary
The discussion focuses on understanding engineering drawings, specifically the interpretation of front and bottom views. A user seeks clarification on the representation of lines in the front view and how to distinguish between circular and non-circular components. The explanation provided emphasizes using construction lines to identify the features responsible for specific lines in the views. The user expresses gratitude for the assistance received, noting that they have already submitted their drawings. The conversation highlights the challenges of visualizing 3D shapes from 2D representations in engineering drawings.
hunter300
Messages
3
Reaction score
0
Hi,

Could somebody help me with this please...its probably really simple but i am just so confused...
Untitled.jpg


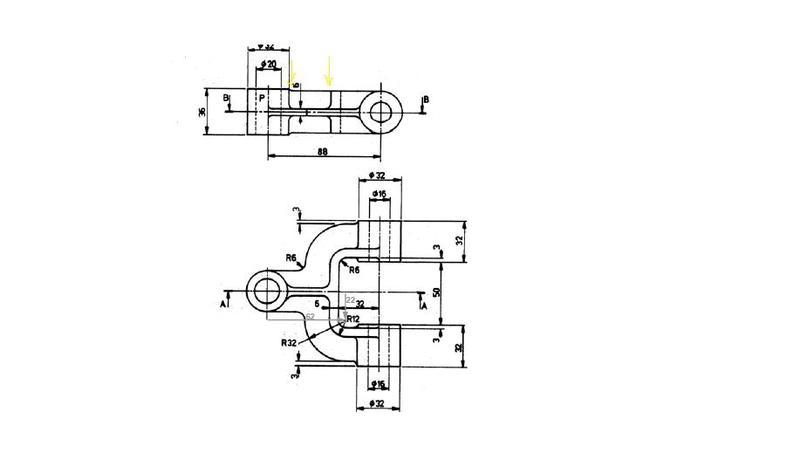
the bottom view shows the plan view and top shows front view wat i don't get is that why does the front view have the lines that i hav indicated with yellow arrows...
and secondly how would u decide whether the component is circular tube or non-circular i.e flat from the front view...

Please help me

Thank you in advance
 
Engineering news on Phys.org
The left yellow line is the bottom tangent of the circular feature on the left hand side of the bottom view. The right yellow line is the left edge of the "U" shape feature.

If you ever wonder where a line comes from, simply draw a construction line perpendicular to the view line that separates the two views and it will intersect the feature that is responsible for the line.
 

Attachments

  • Untitled.jpg
    Untitled.jpg
    25.5 KB · Views: 423
Last edited:
FredGarvin said:
The left yellow line is the bottom tangent of the circular feature on the left hand side of the bottom view. The right yellow line is the left edge of the "U" shape feature.

If you ever wonder where a line comes from, simply draw a construction line perpendicular to the view line that separates the two views and it will intersect the feature that is responsible for the line.

Thanx a lot for your help...i understand which feature is responsible for those lines but wat i don't get is that why are they are drawn the way they are...

I am strugling with wat it looks like interm of physical appearance...
 
A circle on its side looks like a rectangle. It is complicated because of the radii that are helping to eliminate the sharp corners.
 
I threw together a quick 3D for you. Hope it helps.
 

Attachments

  • crap.jpg
    crap.jpg
    12.6 KB · Views: 435
FredGarvin said:
I threw together a quick 3D for you. Hope it helps.

Waooooooooooooo... thanks ever so much that helps a lot except i have handed in my drawings this morning...

But thanks a lot for your helpppppppppppp...seriously

does this forum hav like a rep system...coz i would love to give rep u

Ur AWESOME
 
No prob.
 
Back
Top