How to Calculate Pressure Exerted by C in a Lever and Fulcrum Configuration?

AI Thread Summary
To calculate the pressure exerted by C in a lever and fulcrum configuration, one must consider the forces involved, specifically using Newtons or pounds-force (lbf). The relationship between the applied force and the reaction force can be calculated with the effective length of the bell crank's upper arm. The discussion highlights the need for consistent units, with a recommended pressure of 20 MPa translating to approximately 2900 psi, leading to a required force of 208,800 lb for the piston to achieve the necessary compression. The toggle mechanism's effect is crucial, as it amplifies force when the lever approaches a specific angle, impacting the overall pressure exerted on the piston. Understanding these dynamics is essential for ensuring the mechanism can handle the required loads without deformation.
  • #51
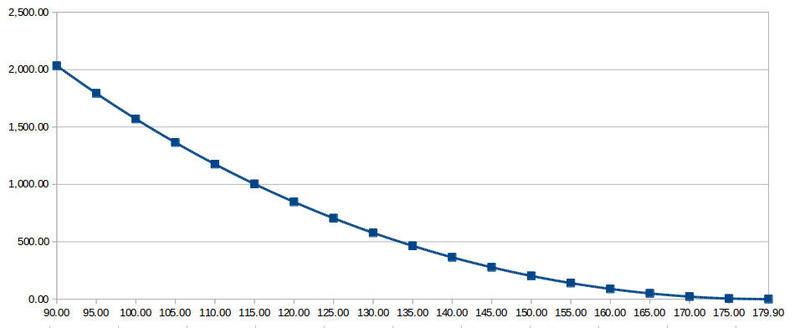
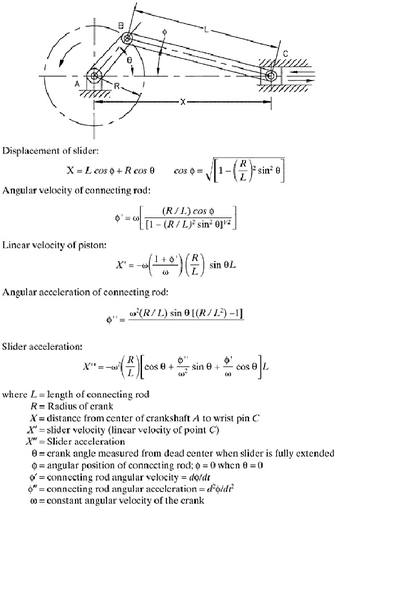
The curves : b is the distance between points A and C, C is the angle ACB. The curves are plots of how they change in moving the long handle from 90 degrees to horizontal. If it is useful or not I don't know. I find it interesting that while the other values change linearly these don't.

That paragraph you quoted refers to shrinkage due to drying. The one I quoted, that mentions 30 %, I'm pretty certain refers to the compression of a prepared mix of soil (that's loose) in the machine. I'm assuming he got that figure from experience. There needs to be a consistency of preparation of the mix and some experimentation.

This press is a variant of the Cinva-Ram invented by a Colombian (not Indian as I previousle said) inventor in the 50's. As I played around with the numbers it struck me that the dimensions of the press as I've found on the net are pretty optimal and great variations from it is not really of value. I found the 30% calculation interesting re stroke, again seemingly confirming he got it right back then.

That Chinese variant is pretty interesting in its 'auto loader' and the way it flips the lid back before elevating the brick. I'll use those ideas. Thank you.

As can be seen in the video the production process can be quick. I think I'll be taking it more slow.

_______

Another thing that I mentioned in early post is I'll be making stabilised compressed blocks by mixing in lime. Roughly 80 % soil, 12 % lime, with soil and water the remaining 8 % depending on experimentation.

The blocks need to cure slowly starting with keeping them moist for a few days then slowly drying over the next three weeks. ( plain soil without stabiliser produces very good blocks but they need to be maintained as over time they can erode, particularly if exposed to rain. )

I've just finished digging a 60 foot diameter bowl 3 feet deep in the middle. In this I plan to set up the press and a curing area. About a foot and a half down the soil becomes damp and consistent. Some say use damp soil but as I'll be stabilising it I'll have to experiment adding water.
 
Engineering news on Phys.org
  • #52
a screencap from the posted vid appears to confirm about 30% compression.

Comparing loaded soil height to compressed brick :

bpc01_zps7m5fy1z2.jpg
 
  • #53
here's a good one...

 
  • #54
Based upon the above, I think you are going to need a longer two man handle; or, maybe a T handle would actually be a good idea.
 
  • #55
Here is a video that shows the potential operating method that I am concerned you may run into with the linkages low force multiplication for the majority of your compressing handle stroke.

 
  • #56
Great. Nice to see the process through.

I'm thinking about extending the length of the lever.

I'm getting close to finishing the 'knuckle'. Before welding it all up I'll post a pic with measurements and description with the hope of getting comments.
 
  • #57
Not welded yet:

AB = 3", for scaling: caliper set to 1", hammer 3lb, glove covers ugly grind job, the long lever is inserted in the red rectangular box, the short angle iron represents crosspiece.

turns out the axle 'guides' have hardened inserts. I cut one guide in half and use it as rests. Everything below that is just a 'sketch' for now.

DSCN0039.JPG
 
  • #58
I'm a bit concerned about the combined smaller apparent 1 1/4" diameter shaft and narrower side plates for the B shaft because that pivot has to carry the same 200,000 lbs maximum load as the handle's A shaft with a larger shaft diameter and wider hardened half bushings.
 
  • #59
Ok, the reason for the larger shaft and plate is that I have a stack of these 'railcar' hydraulic machines but only one of the wider pair found, unfortunate, I understand the weak link here is the 1 1/4" shaft and 1" plate.

How concerned are you? (afk for 8hrs)
 
  • #60
One concern is that the shearing load the shaft is 210,000 lbs and that does not even include any safety factor.
As an comparison, the allowable double shear load rating of a high strength 1 1/4" SAE Grade 8 A490 steel bolt is 221,000 lbs; so, to be safe your shaft material should have a tensile strength equal to or greater than that of quenched and tempered A490 Alloy steel.
Since you are using an axle shaft, I would expect it to be a heat treated alloy bar, so if you are unable to determine the material of the axle shaft, you may just have to take the "try it and see" route. The risk is that, because it is an axle shaft it may hardened to the point of being a brittle material that will suddenly break rather than just deform as a more malleable quenched and tempered alloy would do.

Apart from the above, with respect to the small shaft and holes, due to their small contact areas, I am mainly concerned about possible lubricant displacement and galling in the segment of the shaft and hole that will be repeatedly exposed to a very high load in the region of the maximum load at the end of each pressing stroke. Unfortunately, I cannot find any reliable reference as to what an acceptable contact pressure should be.

Note: Edited for more clarity
 
  • #61
Thank you JBH, that's very helpful.

Fortunately I have a number of the 1 1/4" shafts and guides so I'll take the 'try and see' approach there.

I'm thinking of putting grease nipples for extreme pressure grease on those, as well as regularly cleaning and lubricating all around.

I'll have all shafts removable for inspection and replacement. The big one's a one off at the moment but as the others are likely to first show signs of damage or fail that seems ok with me.
 
  • #62
JBA said:
I cannot find any reliable reference as to what an acceptable contact pressure should be.
Try searching for FILM STRENGTH of Oil, Grease or Lubricant. A couple of (probably outdated) ASTM tests are L-37 and L-42
 
  • #63
This morning I had a bit of realization with regard to the issue of the shaft ductility and hardness. Given your work on this project, I suspect you have have probably previously cut and maybe machined a number of metal materials and using that experience you have a bit of a gauge for judging the ductility vs. hardness of the shaft material by both the difficulty required to cut it and the type of chips created while cutting it. The hardness or brittleness of the material in particular. Unless it was extremely difficult to cut and required a carbide cutting tool, then I would not think you would need to worry about the critical issue of it suddenly fracturing under load. If the shaft is very easy to cut and the chips are easily deformed, then this could be an indication that the material has a low tensile and shear strength and may indent under the high shearing load at the end of the pressing stroke. Another general hardness test (lacking an actual hardness test machine) is a hammer and punch test, the more the hammer bounces on impact, the harder the material. Obviously, all of the above also applies to the shaft support plates as well.

At the same time, knowing the true material and its properties is still by far the better situation.

With regard to the lubricant properties I did do some searching and reviewed some of my machine design references; but, unfortunately, and a bit surprising to me, is that every thing I could find was focused only on the lubrication of pressure fed rotating journal bearings and lubricant thickness vs rotation speed.
 
  • #64
I've been using the cutter in the pic to slice things up. It chews through pretty easily.

I can dent the plates with the hammer. I don't want to try the inserts that way but I'll put a drill on them later.

---

from here :
http://www.skf.com/group/products/l...nderstanding-grease-technical-data/index.html

"Extreme pressure (EP) performance
The 4-ball weld load test rig uses three steel balls held in a cup. A fourth ball is rotated against the three balls at a given speed. A starting load is applied and increased at pre-determined intervals until the rotating ball seizes and welds to the stationary balls. Values above 2 600 N are typically expected in EP grease. Under the 4-ball wear scar test, SKF applies 1 400 N (standard test uses 400 N) on the fourth ball during 1 minute. The wear on the three balls is measured and values below 2 mm are considered as appropriate values for EP greases. "

and here :
https://www.rtvanderbilt.com/OD972K_a.htm

"high load carrying properties as measured by the Four-Ball EP Test (ASTM 2596). The weld point reported in this test is the lowest applied load at which the sliding steel-on-steel surfaces seize and then weld. Most greases weld at between 126 kgf to 160 kgf while grease treated with "

N and Kgf ? and how does this info relate to the q re protection using grease, if at all?
 
  • #65
Unfortunately, the above is directed at ballbearing type bearings and these ball to ball tests have extremely small point of contact areas and only use contact load force and contact area squeeze out pressure as a basis so it is hard to relate that testing to the shaft to bore line of contact sleeve type bearings used in this assembly.

With regard to the bearing inserts, unless they are bronze type sleeves I feel reasonably sure they are either fully or surface hardened and being strictly loaded in compression they are extremely unlikely to fracture.

Edit: I found the below and am including it for general information on sleeve bearings. The section on "Oscillating Motion of Bushings" recommends the use of self lubricating bushings for these types of services.

http://www.astbearings.com/bushings-and-plain-bearings-load-capacity-and-service-life.html

Edit: I have also found a couple of other references, but none are very encouraging because they specify much lower pressures (on the order of 1000 psi based upon the load / projected area (bearing length x shaft diameter) than in your application; but, at the same time, they are based upon rotating machinery applications. However, based upon what I have been able to review, you may find that having a long operating life on your machine is going to require the use of roller bearings on all of its pivots.
 
Last edited:
  • #66
Food for thought.

I have to stick with the shafts and plates I have for now. I'll keep your suggestion re rollers in mind for the future. I have to remind myself that this is an open-source project with the aim of using the simplest methods and readily available material while aiming for an optimum.

I have a number of replacement plates and shafts so I think a try and see approach is ok for now. I've been spending the day fitting grease nipples on knuckle parts prior to beginning welding.

One thing is that by aiming for the parameters I've given, the 'final' version can be scaled down in order to achieve an acceptable result.

For example, by reducing the area of the piston to 11.5 x 5.5, the needed load reduces from 100 tons to 87 tons et.c. though how to know when needed load is attained eludes me
 
  • #67
current progress.

as a possible guide I'm thinking of making an Ideal indicator :

Ideal_test_indicator_pushed.gif


ideal guage.jpg


to gauge angle C as it approaches 0 by mounting it on the side of the case with a feeler on the U arm actuating it so I can see the readout while pushing down.

bp01.JPG
 
  • #68
With regard to your post comment about reaching the required loading, there is going to be a bit of a fine line there and the most difficult will be identifying if there has been enough fill to reach the lower pressure limit (you are going to be having a certain degree of variation in your finished pressed brick pressure) because this will be based upon the operator feel toward the end of the stroke. In the case of an overfill, the maximum compression pressure for those bricks is going to be limited somewhat by amount of loading the operator can apply to the handle to achieve a full stroke.
 
  • #69
Yes. I'll take care in designing the depth of the chamber and have a way of adjusting that. Loading the same amount every time shouldn't be a problem. Assuring soil mixes are consistent, batch to batch, might be a bit difficult.

I'm thinking of fixing the rubber mat to the underside of the lid.

The 'Ideal' dial, if placed properly, should give a precise reading of angle in approaching 'top dead center', and if knowing through the calculations at what angle the best pressure is reached it should be helpful.
 
  • #70
The rubber mat may need a metal plate separating it from the soil mix to prevent high contact pressure embedding and bonding between the brick surface and the rubber.
 
  • #71
Looking at your latest assembly picture, I would like for you to give me the sq tubing dimensions including their lengths for the down links so I can calculate the tensile stress and stretch in those links at the 200,000 lb load.
 
  • #72
I hear you re rubber. I'll try both. I imagine the separator doesn't need to be very thick.

the square tubing :

5/16 walls.

1 15/16 square.

20" long.
 
  • #73
I agree it shouldn't need to be very thick since it is strictly a particle embedding barrier; but, if too thin it may be subject to warping due to varying compression densities across the brick. I suggest you start with something easy to handle and adjust if required.

I assume the 1 15/16" is the tubing outside dimension and will let you know the results of my calculation. tomorrow.
 
  • #74
Yes, outside.

_____

here's just a scribble I did to work out some dimensions and material...

bp01.jpg
 
  • #75
Below is the calculation for the Stress and the expected elongation on your press links. Since I don't know the your actual material alloy, I have included a sample of the specifications for a USA Standard Structural Square Steel Tubing that comes in 3 Grades (Yield strengths). Unfortunately, as you can see, the maximum load stress on your parts clearly exceeds the stated yield stress limits for all but the Grade C strongest alloy steel material.

As a result, it is very possible you will experience in permanent stretching of the arms and loss of loading at the end of the stroke with similar lower strength materials. A clear sign of this on your links will be that you experience an unexpected low handle load on your initial operation and/or are required to successively add more material in the mold to maintain the same operating handle load toward the end of each additional cycle, both of which will be a warning sign that the links are going to fracture at some point due to overloading and/or fatigue cycle failure.
.
upload_2016-11-12_16-44-11.png
 
  • #76
interesting...

OK. While I don't fully understand yet the information you have provided I accept it and it leads me to ask what to do.

I assume I can downsize the area of the piston and reduce the load/stresses or reduce the height of the piston chamber in order to reduce the amount of soil to be compressed and therefore load needed. Am I thinking right here. Something doesn't feel right. Anyway it seems logical to go on to thinking along those lines.

However, if I am thinking right then the questions I look for answers to are

What area piston will make it possible for a grade c to be used in current configuration..

What height of piston chamber to have in order to make sure that before failure there is no more to compress.

edit add : Just thinking aloud for now...

As mentioned before :

the 20Mpa ia a figure given by a scientist who researched 5Mpa compared to 20Mpa and found 20Mpa to be better.

As a result that has been the aim.

It seems clear that for a simple DIY block press this is not achievable without an outlay in materials and constructions outside the current scope.

Therefore it is time to step back from that and see what is achievable. It appears 5Mpa is acceptable, however I look to maximise the Mpa with what I have.

If I continue to use the material I have and go with the design as is at first thought it seems easiest to reduce the height of the piston chamber or is it reduce the amount of soil loaded into it (?) thereby making sure that even though the mechanism can exert the very high pressures that a toggle can it never will even if fully aligned to do so.

If so it seems there are a couple of ways to look at it.

Work out what the mechanism can cope with and work out at what angle that is attained and from that work out the stroke at that point and let that determine the volume of mix to put in the chamber. or

As I understand it there is no way to change a toggle like this to make it behave in a non toggle way in extremis but there should be a simple way to prevent it from acting at that point on the mechanism.
 
Last edited:
  • #77
First, the pressure plate area depends on what safety factor is selected for the maximum anticipated loading. For ductile materials such as are used for the tubing samples, a safe level of stress for a member under a single tension stress would be 80% of the yield strength if this were being based upon the ASME pressure vessel code. In order to maintain your current compression pressure that would reduce the pressing area of your brick by 80%.which could be attained by either reducing the cavity length to about 9 1/2 " or the cavity width to about 5".

john101 said:
If so it seems there are a couple of ways to look at it.

Work out what the mechanism can cope with and work out at what angle that is attained and from that work out the stroke at that point and let that determine the volume of mix to put in the chamber. or

As I understand it there is no way to change a toggle like this to make it behave in a non toggle way in extremis but there should be a simple way to prevent it from acting at that point on the mechanism.

I am in full agreement with all of your above conclusions, but doing so and still achieving your desired 2000 psi pressure while maintaining a reasonable operator handle force is going to be difficult without a very long handle.

At the same time, from the calculations that have been done for your machine and what I have seen of the pictures of the existing hand operated machines, I have serious doubts about those machines (except maybe one I saw with two operators on a tee handle) being capable of compressing a soil brick of the size you are proposing or the sizes shown in some of the pictures to a full 2000 psi pressure level; which, may explain why a certain percentage of cement is being added to some of their mixes to achieve a desired finished hardness and bonding strength.
 
  • #78
The desired psi was 2900. so: 5Mpa is 725psi.

2900*72=208800 or ~ 200000 or ~ 100t

725*72= 52200 or ~ 25ton which as I understand it the material as is can almost* handle. ?

Which, according to previous graph, is attained at A = 176 degrees.

I understand this is easy with load bar length as stated 60".

so for that situation, what is needed is to stop applying force at 176 degrees. ?.

so I need to know when it's at 176 degrees which the Ideal gauge can tell me and at that point I have a stop that prevents the load bar from moving further ?

If on the other hand the area is reduced to (what) then the material as is conforms to (assuming Grade C) the calculation, ie 5Mpa with piston area of
 
  • #79
As you will see below the links at 80% of S yield are all capable of much more than 725 psi of plate pressure with your 72 in^2 brick area.
As for the 176° toggle position, also see the below and the major issue is the operator handle load required at that position.
Take a look at all of this and let me know what other conditions you might want to investigate.

ASTM A500 Structural Square Tubing Grade B Grade C Grade A
Max Allowable Link Tension Load at S yield (lbs) = 93,466 101,594 67,052 (No Safety Factor)
Max Allowable Link Tension at 80% S yield (lbs) = 74,773 81,275 53,642
Total Allowable Load with both Links (lbs) = 149,546 162,550 107,283
Allowable Plate Compression Pressure (psi) = 2077 2258 1490

For Your Selected Plate Pressure (All Grades)
Plate Pressure (psi) = 725 400
Handle Load at 4° (4") Above Horizontal (lbs) = 182 100
(Toggle 176°)
 
  • #80
My apologies.

My last few posts have been based on misreadings of your posts.

In post #77 I misread or misconstrued the meaning of vital of, by and or. Completely missing what you were telling me. I also don't think I read the table you posted #75 correctly.

I need to stop for a moment and untangle that and likely ask some stupid questions. :)

For a start what do you mean by 'S yield', 'S'. ?

edit add : I think I might have the answer to that. Yield has a clear meaning in Engineering: (I was confused by other meanings.)

Yield (engineering)
The material property defined as the stress at which a material begins to deform plastically.

S yield : Stress yield ?
 
Last edited:
  • #81
In your Brick Press Design.xlsx I don't understand the meaning of Fc.

F1 on handle doesn't seem like much to me. 69 lbs. I miss the meaning of it as far as handle length goes. You keep saying I need a very long handle. I don't get it.

Wherever I wrote Grade C, I meant Grade A (assuming Weakest for safety). I misread that bit putting A before C. My mistake. Sorry.

I also misread the 80% references as being 20% of rather than 80% of, as well as reading 9.5 x 5 rather than 9.5x6 or 12x5. again my mistake.

I have to watch my preconceptions and how they influence my comprehension and not take my prior awareness of that as a factor for granted.

OK I'll see what that means re current progress.
 
  • #82
Your definition of Yield as as an engineering term is correct and S yield is an abbreviation for Yield Stress and S ultimate indicates the stress at which a material fails. Additionally, the term "S min yield" indicates that a user of a material can be assured that is the minimum stress at which a supplied material will begin to plastically yield. Generally, the actual yield strength of any piece of that material will exceed that value, but, the S min yield is always the value used when designing a piece of equipment using that material.

The abbreviation symbol S is always to indicate Stress in engineering terms with a number subscripts i.e. S torsion, S tension; S shear that indicate only the source, direction or type of a stress and, unlike S yield and S ultimate, do not indicate a particular point of stress.

Another abbreviation is Ss which always means S shear, which is the term used for the stress on a part that is experiencing a cutting force like the links in your machine impose on its axles.

Similarly F always means Force as in: F horizontal, F vertical, F shear and F tension.

Don't be embarrassed about asking these type of questions, those of us with engineering degrees were introduced to many terms that we see repeatedly in our reference books and they are so ingrained in us that we just automatically use them.without considering who we are communicating with.
 
  • #83
F1 refers back to the terminology used in the figure in post #21 and is the force the operator must apply perpendicular to the end of the handle.

As for my remark about a "Long Handle" was related to the fact that, the longer the handle the less operator force required for any selected bottom plate compressing pressure. i.e. if you double the length of the handle then you reduce the required operator force by 50%.

On a similar note, I need to know the dimensions of the bar or tubing you are using for your handle because I have realized I may have a method you can use to measure the pressure in your machine by using the amount of handle deflection under load that is based upon a style of torque wrench with no moving parts.
 
  • #84
Thank you.

What about Fc as mentioned in your worksheet?

____________________________

re Long handle. I have two.

A solid hexagonal bar that I think was a rail sleeper spike remover. anyway something used in maintaining railroads.
Hexagonal, solid steel 1 3/8 wide side to side, 5' 6" long.

A hollow tube. 1 5/16 od, 1/8" walls, 5' 3" long.
 
  • #85
The Fc and FB on the spread sheet are based upon the A B C letter designations given to the connection points on the figure on post #21.

To clarify my handle length statement, I was referring to providing a reasonable operator load with a high compression pressure.

PS The reason the Grade A is located at the end is that the supplier where I copied the Grade B & C material tubes did not have any information for the Grade A and I had to get that from another source.
 
Last edited:
  • #86
For reference, attached is an illustration of a Beam (Deflecting) Torque Wrench

Below see the calculation for using something similar on your press hexagonal handle (the tube should not be used because it is not strong enough for the potential handle load range on your machine. To use your handle and the torque wrench design basis you would solidly mount a maybe 1/4" Rd rod on the side of the handle mount with it extending some length (I selected 36" for my calc) along the handle and then at the end of the rod you would mount a side plate on the rod with a mark at the deflection point to which the handle deflects when the press reaches your target pressure. The final design and scale inches of deflection can be adjusted as you complete your design.
Attached is an Excel Worksheet for calculating the the deflection at the pointer end for the hex bar. (On that worksheet you are going to see some terms that are used for stress and deflection analysis that will be new to you, but the description of what each represents and how it relates to the stress and deflection calculation is extended and complicated and really best covered by a textbook on that subject)
Beam Torque Wrench.jpg
 

Attachments

  • #87
I'm impressed. That's a very neat solution. Thank you. (I'm already thinking of how to mount an Ideal indicator type mechanism to get a readout from your press handle indicator when looking down on it from the pressing position. Entirely doable methinks.)

(re the Ideal indicator. I've spent some time trying to make one. The material is the hard part. I tried a piece of thin galvanised flashing I had lying around. Drill wanders. Ditto aluminium. Last week I threw out some motherboards. Drat. Would have liked to try cutting it out from a piece of that. I doubt the drill would wander. Next I'll try thin ply.* add : ply works ok. It'll do for now)

I think I'm generally back on track now regarding the press mechanism.

Basically it can achieve the desired pressure without failing if the piston area is below about 60 ^2".

Or

keep the 12x6" piston area and reduce the amount of soil put into the chamber.

Or

keep the 12x6" piston area and soil volume and make it so a-b-c cannot be aligned.

?

While I don't get the size of blocks I want it seems to me the first option is more practical, and they all seem fraught with some potential problem.
 
Last edited:
  • #88
I think I've identified something that's got me stumped. I've been studying the uncorrected Brick Press Design.xlsx

Now I see what you mean about needing a very long handle.

I have to study that to catch up and consider what that means.
 
  • #89
Just as a note, the method I sent you will work just as well with the rod mounted above the handle and a vertical bar or plate on top of the handle at the end of the rod for showing the deflection and could be seen by you from above the handle. (Just to make sure you understand, for my handle deflection to be correct the bar must be installed with flats on the top and bottom of the handle)
An advantage of the load indicator is that if it indicates the load is too low just before toggle full extension then the brick is too thin and the finished compression is below 20 MPa.

I ran a quick verification on my excel calculation sheet and it indicates that for 20 MPa with a 60 in^2 area brick face the handle load at 1" above horizontal (and toggle full extension) will be 152 lbs which could be reduced if needed by a bit of added handle length and is well within the hexagon handle stress limit as I am sure you have already seen.

At the same time, a 20 MPa loading is still right at the yield stress limit for grade C tubing on your vertical tube links, so how are planning on dealing with this problem.
One thing you might consider is adding a reinforcing strip along the front and back faces of the tubing. For example, a 3/16" thick x 1 3/4" wide strip on both faces would add enough metal area to reduce the tension stress to 37,000 psi which would be well within the Grade B material stress limit and just barely above the Grade A limit. The strips would only need to fully welded to the tubing at the top and bottom ends (and maybe an 1" down each edge for safety) to provide this added strength.
 
  • #90
Yes, of course. I get what you mean re mounting bar on top. Neat. (Because the bar is good for other things like a crow bar. I'll clamp the readout on to it. Also I'll clamp a T handle on. I've got more tubing, either round pipe or heavy rectangular tube, to make an extension with as well.)

I have the material for strips the size given. I'll cut and weld them on.

Am I right in thinking that by now the weak link will be the smaller rods at pivot point B. I'm also planning to use the same rods at C.
 
  • #91
Yes, at this point, the shear strength of the B & C 1 1/4" dia axle shafts' material and the potential for lubricant breakdown and galling between the those shafts and the plate holes without the 1/2 bearing shells are still a bit of an unknown.

I was just looking back at your last assembly picture in your post #67 and there are a couple of suggestions regarding the reinforcing of the links and their cross bar.

First, I recommend that you extend the added side plates all the way to the top of the crossbar tubing at the ends of the links.

Second, with regard to the crossbar tubing, it is really hard to calculate the possibility of load buckling of the crossbar tubing where it sits on the top steel angle; so, if it can be reasonably done at this point, adding a bit of the same type of reinforcing strips all the way across the bottom face and on the sides of that crossbar tubing might be a good idea. (those should be fully welded to the tubing along both edges)

Apart from those issues, it appears everything else we have discussed so far seems to be getting worked out.
 
  • #92
The cross bar :

When I place it on the angle it allows me to bolt it in place. If I thicken the side against the angle it moves off center.

What about doubling the cross piece with a second on on top?

_________

Thinking aloud :

I keep getting stuck in thinking about how big to make the piston and chamber.

I still like the idea of making 6x12x4 blocks.

This allows me to make

one 6x12x4 block
or two 6x12x2
or two 6x6x4
or four 6x6x2

or two 9x3x4 bricks and a 3x6x4, or two 9x3x4 and a 4.5x3x4 and a bit (ie two and one half bricks)

per pressing

if I reduce the width or length I can only make one standard brick per pressing plus other relatively useless pieces.

Therefore my current thinking is to reduce the expected Mpa to say 5, keep the original piston/chamber dimensions and stabilise the blocks with Lime (not Cement, Lime is much less energy intensive in production, costs less and, if cured properly, makes a strong bond (as well as waterproofing the bricks/blocks)).

If I do so, are all, if not most of, the structural strength concerns solved?

edit add : in post #79 is 182 100 meant to be 182.1 lbs?

edit add 2 :

another thought :

make two piston/chambers.

one 9x6x4 54 ^2" to use up to 20Mpa

one 12x6x4 for 5Mpa blocks.

edit add 3 :

I came across a couple of more web sites discussing this type of press. 20Mpa is an expected pressure. Also one states the soil volume reduces by about half.

I think I have to let go of the 12x6 size and the idea of making two bricks in one go and and go for a 10x5x7 chamber and make an add on 'chamber height reducer', to place on top of the piston, of a height to be determined by experiment.
 
Last edited:
  • #93
I just looked at the #79 post and now I see that when I pasted it from Excel all of the number columns became scrambled and essentially unreadable. I can't believe I didn't catch that when I did that post. Below is a screen shot of that data in a readable form

upload_2016-11-15_23-12-17.png


The first table simply gives the compression pressure limits for the side links for each of the three material grades.

The purpose of the second "For All Plate ..." table was simply to show you the amount of operator handle force that would result at a handle position 4" above the horizontal and the toggle at 176° with a 725 psi (5 MPa) and a 400 psi plate pressure to give you an idea of how high the operator load would be with the handle at that position at those pressures.

At this point, I think what is important for you to see is that the first table shows that you can safely have up to 1973 psi (17.6 MPa) pressure with the Grade A material limits with your desired 72 in^2 of area; and assuming we return to using the full toggle extension with your latest design and revisions then you would only have a operator handle force of 134 lbs at 1" handle height with your current 60 in handle. So other than possibly lengthening the handle a bit I don't see that is is really necessary to reduce your compressing pressure all the way down to 5 MPa. Does this help clear things up a bit or am I missing something.

With regard to the reinforcing of the crossbar, I was not saying that your current crossbar tube will not be strong enough. I was only suggesting reinforcing it a bit if possible because I don't have any way to calculate whether or not the tubing wall might buckle or not under a 200,000 lb load.
Adding the strip on the bottom of the crossbar will definitely help, so if placing the strips on the sides is a problem then just don't add those suggested plates. Adding a strip to the top of the crossbar will not improve the buckling strength so there is no reason to do that.

Let me know what you think about all of this with regard to your above thoughts about changing your current design.
 
  • #94
yes, thank you that clears a lot up. I'll try to figure out what that means re design.
 
  • #95
"At this point, I think what is important for you to see is that the first table shows that you can safely have up to 1973 psi (17.6 MPa) pressure with the Grade A material limits with your desired 72 in^2 of area; and assuming we return to using the full toggle extension with your latest design and revisions then you would only have a operator handle force of 134 lbs at 1" handle height with your current 60 in handle. So other than possibly lengthening the handle a bit I don't see that is is really necessary to reduce your compressing pressure all the way down to 5 MPa. Does this help clear things up a bit or am I missing something."With this paragraph: If what I'm using is Grade A material (ie the weakest) I can have an area of 72in^2
safely up to 17.6Mpa. Then the operator force at 1" handle height will be 134lbs, and all materials and construction details can be as so far proposed. As far as I understand only the pins at B and C and the lugs at B (and presumably at C) are unknowns.

Is this correct?
 
  • #96
Yes, for everything we have identified and addressed so far that is correct.

Having said that, your first test still has the potential to show us something we may have missed, but that is all a part of the process on any new machine design; and, when you get ready to test your machine I have some suggestions as to how that test sequence might proceed with a goal of doing so safely for both you and the machine.

Just as a note on the handle force, while we can reasonably predict what the handle force will be at the 1" point with the 17.6 MPa pressure, the handle force at each point of travel above that 1" point is going to be dependent upon the soil compressibility vs the force multiplication factor of the toggle, so the actual handle forces through the 89° of travel before reaching that 1" point are still going to be an unknown until your test.

Edit: PS I really want to apologize for my ridiculous error when first posting the above tables. It no doubt caused you a lot of unnecessary confusion and lost time trying to understand it, I generally try to do a much better job of checking what I post.
 
  • #97
I've thought about the errors. My opinion is that they are inevitable and in themselves instructive. Through pondering them before coming to know they are errors I learned a lot of other things. The errors are revealed and fixed. All is good.

edit add : while some may regard it as lost time, I don't. I find that the slower I can do something the less likely I'm to make a mistake which would be a real waste of effort. For example at the moment I've made a cardboard box 12x6x4 and one of 10x5x4 and have them lying around to look at. In this way I familiarise myself with the sizes in a way a drawing cannot do for me.

Part of the good reason for taking it slow has been the design of the piston/chamber. Because the stroke is about 2.8" and the compressibility of the soil according to web accounts is from 30 to 50 % the chamber cannot be more than 6.8 and might have to be (no less than) 5.6". Based on the style and format of the account I suspect the guy who wrote 30% did not apply 20Mpa. There's a photo on his page that shows a youth operating the press. Ditto the chinese video. There doesn't seem to be a great effort in making the brick. On the other hand the page stating about 50% mentioned 21Mpa in the same sentence. So, if it's about 50% with ab being 3" the stroke determines the chamber depth (?). IOW if I want a block pressed to 17.9 % it seems reasonable that I cannot get a block thicker than about 3". Though I might find it compresses less and hence get a thicker block. IOW a finished block size of 12x6x3 appears to be it. The upshot of all that seems to be that a chamber size of 12x6x7 is good allowing for adjustment by adding spacer.

This then determines the minimum height of the piston from c to the top of the rubber/spacer sandwich, the location and length of c's guide slot and the final length of bc.
 
Last edited:
  • #98
As I see it, if you start with a 5.8" deep fill you would have a 48% compression with a 3" thick finished brick; but, since I think the new target compression pressure is 17.6 MPa, at that lower pressure the compression compaction percentage should be reduced and as a result you might get a thicker block from the same fill.

Theoretically speaking, if the compression effect is linear (which I seriously doubt) and 50% compression is results in a 20 MPa finished brick; then the required compression for the 17.6 MPa would be 44% so you would end up with a 3 1/4" brick for the same 5.8" fill. By that measure, a 7 1/8 " fill would give you a 4" finished brick at 17.6 MPa. So on that basis your 7" depth is right in line, but you might want to increase it to 7 1/2" or so because, as you stated, you can always add filler plates to adjust for the finished brick height

I doubt it is going to be as straight forward as the calculation predicts but it is a least a starting point.
 
  • #99
I agree.

Got a bit distracted yesterday. Had to move a huge (1 meter wide 2.5 meter diameter) tyre using only a car jack and bricks to partially tilt it upright and ultimately the car pulling it upright so I could roll it.

The next thing I'm thinking about is the construction of the piston.

This photo shows what I propose.

The top plate (here on bottom) is 3/8 inch. The angle irons are 1/4 " and the bars with the hole for c (ignore the other hole with the split) 1" thick.

piston01.JPG


edit add : or

piston02.JPG
 
Last edited:
  • #100
It looks as though it should handle a heavy loading. I recommend beveling the angles' bottom edges at the angles' bottom attachment to the center post to insure a full penetration weld.
What is the length and leg width of the bar angles and the overall dimensions of the assembled base plate?
I want to try and analyse the loading stress on the welds between the center section and angles'
I don't expect any issue, and even if I find one, it can easily be addressed by adding gusset plates between the top edges of the angles and side posts.

What is the function of the four holes in the bottom angle faces?
 
Back
Top